
410 overshot card punch free sample
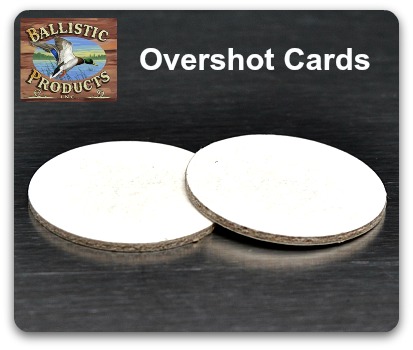
Place an overshot card on top of the shot charge just before crimping to improve overall crimp quality and seal in small shot and/or buffer. Excellent for use with BPI Roll Crimpers.
Our testing lab has proven that poor crimps can alter the performance of an otherwise good load. Overshot cards always produce better, more consistent crimps and this consistency is demonstrated in the standard deviation of loads in our lab. Our ballistic lab recommends overshot cards for better crimps in all loads.
Clear Overshot Disks(either plain or printed with shot size) are also offered for great roll crimping options. See pictures in Additional Images or click on this link.
Shotshell size selection: Use the same size gauge as your hull. Smaller diameter cards also work if your particular size is out of stock. For example, a 20ga overshot card works in a 16-gauge shotshell and so on.
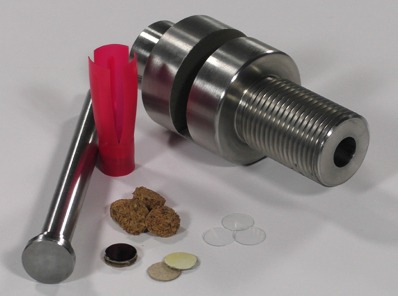
The tool consists of two components including a punch, and die. Starting with the punch, it’s made from hardened tool steel designed to maintain a sharp cutting edge. If you’re the kind of reloader who loads tens of thousands of shells, you’ll be pleased to know the tip has been bored out and extra material left in place so that it can be re-sharpened easily should the need arise. The base of the punch is designed to fit a Lee Precision, single stage press, however it should fit any brand with sufficient clearance that’s compatible with Lee shell holders.
To install this tool, the operator begins by slotting the punch into place and raising the ram. This step helps ensure everything’s lined up well when installing the die, to avoid damaging the cutting edge during operation.
The operator begins by lowering the ram part way until the punch is just below the feed port on the die, but still inside the base of the die. All reloading presses have a bit of play in the shell holder, so the safest way to protect the cutting edge is to simply feed the punch into the die part way before engaging the cutting edge on material.
Next, the user simply slides the material to be punched into the feed port and begins operating the press as normal. As filler wads are punched, they will be pushed out the top of the die where they can be collected. If the operator’s intention is to produce a great many filler wads in one sitting, it is advisable to place a container (a margarine container works well) with a hole cut in the bottom on top of the die, allowing them to stack up inside and avoid making a mess.
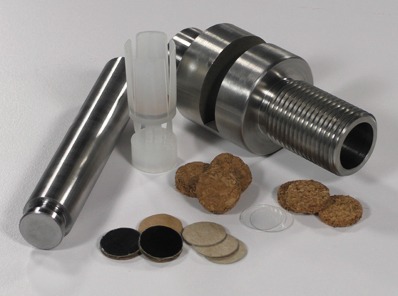
Originally designed this unit to punch corrugated cardboard, so that seems like a good place to begin. The punch works quite well with standard corrugated cardboard boxes I’ve cut into strips. It’s a fast, simple process that yields nice, concentric disks. Cardboard works great for buck and birdshot as it’s dense enough to take up slack, but flexible enough to compress during loading. This is critical to obtaining a professional looking crimp with even the trickiest loads.
Next up is craft foam. It’s not really my first choice due to it not being biodegradable, but I know some folks really like it, so I have confirmed the punch will work with it. As with the cardboard and cork, it punches very easily, although the edges aren’t quite as smooth as the denser materials.
Finally we have plastic blister packaging. Although not biodegradable, I really like having a transparent option on hand when I need something as an overshot card. Once again it cuts smoothly, and easily. The material demonstrated above is actually plastic from grocery store salad containers if you can believe it, however thicker packaging not only punches well, it crimps even better.
The finished filler wads measure 0.345″, the same internal diameter as a standard 410G shot cup, and an equally excellent size for use as overshot cards. With a good supply of these on hand, it’s no trouble at all to customize my shot columns by placing them above or below my shot or slugs. Likewise, if I’ve got a difficult load to crimp like low-volume birdshot or roundball slugs, adding one to the top as an overshot card makes things a snap.
This punch tool mounts in any Lee Precision single stage press (or press that accepts standard 7/8-14 threaded dies and is fully compatible with Lee Precision shell holders), allowing the operator to produce their own filler wads and overshot cards. The corrosion-resistant die is made from stainless steel, and will accept material up to 1/4″ thick. The punch is produced from hardened tool steel, with sufficient material to allow for resharpening if required. Wads measure approximately 0.345″ in diameter and are suitable for use as filler wads to raise shot column height, or on top of shot columns as overshot cards to achieve professional looking crimps.

I use them to cut multiple layers of flannel to make cleaning patches in the diameters I need - they would work for making punches as well. I use a belt sander/disc sander to remove the hardened teeth from the hole saw and then sharpen the hole saw - i.e. bevel the "outside edge" of the bottom which will form a sharp edge and maintain the inside diameter. These mount on an arbor which usually has a center drill bit that is removable - remove the drill bit. Chuck the altered hole saw in your drill press and use a piece of wood on the table - lay your material down and drill through it with the hole saw. The hole saws usually have slots on the side and it makes it easy to stop the drill press, take something like a scratch awl and reach through the slot and push the patches/wad out - then cut another. If you are lucky enough to find a hole saw with the ID that fits you purposes - you could easily stack up three or so layers of thicker cardboard and cut cards or if cutting wads, cut up some 1/2" insulated sheathing or use a celotex type ceiling tile and get a lot of wads. Much easier than hand punching but just be careful to keep material flat on wood on the table so the hole saw has a backer when it breaks through the material you are using. If you leave the teeth on and try it, you"ll end up with ragged edges -- the teeth removed and the edge bevel sharpened on the outside will slice right through.If you know the O.D.of the wad you need for your bore/shell/use - take a set of dial calipers with you when you go looking for the hole saw so you can easily check the I.D. of the hole saw. As an example - remember that a 3/4" holes is designed to cut a hole that is 3/4" hole (.750). The thickness of the side of the material making the hole saw will have to be doubled and subtracted from the O.D. So as an example - a 3/4" hole saw that has sides that are say, 1/8" thick - the two sides would equal 1/4" that would have to be removed from the O.D. of the hole saw to give you the I.D. of the holes - in this example the I.D. would be 3/4" - 1/4" (1/8" of the thickness of the hole saw sides doubled) = and I.D. of 1/2" - which would be the O.D of the wads it would cut. Simplified but you get the idea.


 8613371530291