
overshot weaving technique pricelist

Buy this book! This book is the answer to my dreams. All in one place there are 37 GORGEOUS, well-designed, projects. Beautiful photographs illustrate each item well, and Susan Kesler-Simpson clearly shows the draft, threading, treadling options, yarns she used and alternates, along with a discussion of what has worked for her and has not worked for her. I have several bookmarked projects to be what I weave next. I am really excited. The author"s work is modern in feel, even though overshot was what was hot in Colonial America. These are not our ancestors projects. These are modern designs using a traditional weave structure. The color combinations are lovely. There is nothing not to like about this book. You can weave a project exactly as presented or use the information provided and design your own or use her projects as a jumping off point to your own unique design. I come from the perspective of having been weaving only since 2015, so I am somewhere in the beginner to intermediate range of ability in weaving. Before buying this book, I had woven an overshot scarf, placemats in Monk"s Belt which is a simplified structure, related to overshot, plus an overshot gamp shawl in a workshop. Since starting weaving, overshot has been my favorite weave structure because I love the intricacy of the patterns, but due to my not-yet-advanced status, I find it difficult to design my own overshot. Chapter 1 explains the overshot weave structure, and specifics of how to make weaving overshot easier. Chapter 2 covers creating an overshot pattern from a twill pattern, and there are illustrations in both chapter 1 and 2 showing drafts to make her explanations clear. Chapter 3 explains how borders are designed. Chapter 4 explains how to change the pattern by changing the treadling, illustrated with drafts. Chapter 5 explains how to design an overshot gamp. Chapter 6 explains how to set up the loom. Chapter 7 explains treadling. Chapter 8 is a grouping of small items that can be woven using overshot, such as keyrings, buttons, necklace medallion, book covers, purse. After those 7 chapters are the projects. The 37 projects include baby blankets, shawls and scarves, curtains, table runners, belts, Christmas ornaments, coasters, tablecloth, napkins, cape, poncho.

Weavers-in-the-making and curious fiber artists can find loads of inspiration and technical guidance in weaving books. In addition, there are beautiful editions that will look absolutely stunning on your bookshelf!
Books on weaving are relatively easy to come across, but it is important to find an option to complement your goals and needs depending on where you are in your weaving journey.
Looking for new weaving designs to test out? Starting from scratch? Want to get a glimpse into how professional artists create textile magic? Here are our top picks for the best books on weaving!
Whether you want to hone your technique or find inspiration in fellow weavers, we’ve got you covered. Here are some of our favorite and best weaving books you can find!
If there’s a weaving book classic, this is it. A fantastic pick for beginners and experienced weavers alike, Learning to Weave by Deborah Chandler combines weaving essentials and a handy set of tips to guide you as you evolve in the craft.
This 232-page book contains everything from illustrated step-by-step warping instructions, fundamental weaving techniques, basic weave structures, guidance on reading and designing drafts, and more.
On the Loom: A Modern Weaver’s Guide by Maryanne Moodie will give you an insider’s look into the ancient art of weaving through the lens of the modern-day crafter. Perfect if you’ve been searching for inspiring books on contemporary weaving!
CrazyShot — Creative Overshot Weaving on the Heddle Loom is an introductory book to the world of rigid heddle loom weaving: one of the most popular methods learned by home crafters.
While one of the shorter weaving books listed, this 50-page beginners book includes step-by-step instructions to weave 14 designs, guidelines on the single heddle overshot technique, reading charts, and tips to achieve the best results.
Once you’ve got basic rigid heddle warping and weaving skills down, we suggest complementing your weaving book collection with the author’s comprehensive charted designs guide: Crazyshot Companion: Charted Designs for Overshot Weaving on the Rigid Heddle Loom.
This is wildly more comprehensive than the previous book, with almost 300 pages on rigid-heddle looms, techniques, and projects; it’s one of the most complete options you’ll find on these popular tabletop looms and suited for beginners.
Content covers everything from setup to creation, supported by step-by-step photographs. Tapestry, bead weaving, and basic and complex weaving techniques can all be found in this book — available for Kindle and paperback.
Available for Kindle, as well as in hardcover and spiral-bound editions, this classic book by Jane Patrick presents an array of patterns for the simple rigid-heddle loom and variations such as multishaft looms. Talk about books on weaving with a loom!
Throughout 240 pages, you’ll find different chapters focusing on weaving designs, demonstrated by photos of swatches to illustrate techniques. Some include leno, soumak, Brooks bouquet, and embroidery on fabric.
Released in 2020, The Art of Tapestry Weaving by Rebecca Mezoff is a comprehensive guide to mastering tapestry-making for fiber artists of all skill levels.
While many weaving books cover techniques for making images with yarn, this 320-page book revolves around enthusing fiber artists with contemporary, trendy tapestry creations with a thorough guide to everything you need to get started.
Also, Rebecca Mezoff is a renowned teacher of contemporary tapestry weaving, so you’ll be guided by someone who is not only an artist but knows how to navigate the complete beginner from the perspective of a professional instructor.
You’ll learn every part of the process, from developing color palettes and choosing yarn to warping a loom and weaving designs. This is more of a technical guide than a tutorial on weaving patterns. Hardcover editions can be purchased on Amazon (for Kindle, too) and Woolery.
Weaving by Mary Maddocks features 144 pages filled with detailed, easy-to-follow tutorials supported by lifestyle photography to teach you the fundamentals, along with 17 stunning projects to put to the test.
Recently released (2020), Weaving: Contemporary Makers on the Loom is a 224-page book anyone with a sweet spot for fiber art, weaver or not, will appreciate.
This book is by Katie Treggiden, a design expert and journalist who has beautifully documented a close-up look into professional weavers’ lives, studios, and works. It comprises in-depth essays on weaving, the history of the ancient craft, and where it’s headed today.
Unlike some of the other books on weaving listed, this edition is all about celebrating contemporary weaving and its makers and is not so much a technical reference for beginners. It is, however, filled with personal, inspiring stories that will bring you closer to the world of weaving.
Stunning photography fills the pages of this book, making it an incredible gift for anyone who collects craft books or has a love for weaving. There is only a hardcover edition of the book; you can find it on Amazon and Woolery for roughly the same price.
When searching for books on weaving with a loom, it’s always good to be as specific as possible and know how you want to approach the craft. That said, if circular weaving is your jam, this is the perfect beginner’s book!
Emily Nicolaides is the author of this 144-page book, released in 2022, and focuses on the art of circular weaving: it provides an extensive, detailed guide on techniques, project types, materials, and more. It’s ideal if you’re discovering circular weaving for the first time.
To support this content, you’ll find an array of stylish photography in every section, demonstrating over 30 techniques throughout. I also love that it includes guidelines for creating your own handmade cardboard looms and shuttles — quite the treat for DIYers.
This is a fantastic pick if you’re curious about the potential of circular weaving; there are many projects to learn here. The book is also very straightforward and easy to follow, making it especially newbie-friendly. Know that besides paperback, a Kindle edition is available on Amazon.
Last up is one of my favorite books on weaving! Published in 2020, Woven Together is a wonderful take on real-life weaving stories that come from the heart.
This 224-page book features the stories and experiences of 20 DIYers, artists, designers, and craftspeople who have incorporated weaving into their work. You’ll get a privileged look into their creations, backgrounds, passion projects, and more.
You’ll get an eclectic overview of different references and inspirations, the production process, and, best of all, detailed patterns for projects. These include DIY textile weaving designs, like wall hangings and rugs, to rattan and basket weaving ventures with bamboo and grass.
That said, this book also appeals to both fiber artists and basket weavers. If you’re curious about basket weaving, we’ve written a guide on the best online basket weaving classes! You can purchase this book on Amazon, which is currently available in hardcover only.

"Thank you, Kelly, for providing this RHL Overshot Class. Because of all your videos, I have gone from newbie to being able to produce this beautiful scarf! I learned how to read a four shaft pattern draft and from that, warp and thread my loom. I learned how to manage more than one heddle and handle different combinations of them. It was also helpful to learn about floating selvedges. I will never do another project without them."
"I love learning new techniques. This was a fun one to learn. I appreciate your step-by-step instructions to help get me a solid foundation to start. I look forward to trying my hand at this beautiful scarf!"
"This was one of the best weaving courses I have taken on line. Your calm and slowly paced weaving videos are excellent. Very easy to follow. Also the feedback you give to questions is much appreciated and it always works. I like being able to go back an replay the videos as I progress to make sure I didn"t miss anything. Good job."
This is the section to explore the possibilities of overshot with many variations, test out your yarn and get some practice in weaving with this structure.
Kelly is a self taught weaver with a big passion for sharing the timeless art of weaving with others. Kelly is known for her calm and slow teaching style and she bases her classes on how she would have liked to have been taught. She designs all of her own projects and caters for levels from beginner to intermediate. Most available classes are for the rigid heddle loom, floor, table and inkle loom weaving.

Crazyshot - creative overshot weaving - introduces anyone who uses a rigid heddle loom to a whole world of creative weaving. Using just one heddle and one pick-up stick, you"ll explore color, design, and texture, taking your weaving to the next level. Complete step-by-step instructions are included for weaving all 14 designs in this book. Also provided are how-tos for the single heddle overshot technique, reading charts for the rigid heddle loom, and finishing techniques, along with lots of tips and tricks for successful and satisfying results. Complex patterning is easier than it looks with this simple charted technique. All you need are basic rigid heddle warping and weaving skills to start your next weaving adventure
With one heddle and one stick, Myra Wood explores the art of working with ground and pattern wefts in this creative approach to rigid-heddle weaving. Known for her for colorwork across many mediums, Myra beautifully illustrates that complex does not have to be complicated. --Liz Gipson, Author of A Weaver"s Guide to Yarn and other books for rigid-heddle weaving and the host of the Yarnworker School

My first teaching assignment was a lecture to the Whidbey Weavers Guild. During this time of emerging corona virus activity, the guild was well attended. My lecture on Overshot: Past and Present was a warm-up for the three-day workshop I would begin the following day.
We had an eager 15 attendees in the overshot workshop. The work was very creative. I send out instructions for preparing the looms ahead of time. In the workshop, everyone follows the same treadling order, but each weaver chooses their own colors to bring. Sometimes the thickness varies from one weaver to the next, also. The result is that everyone’s artistic decisions and sense of design are apparent. No two set of samples are identical. The students work through a certain set of treadling patterns and go home with a variety of samples. Some of their work is pictured below.
It was fun getting to know this weaving group. They are so supportive of each other and encouraging. I have never taught in an area where I needed to plan my presentation around the ferry schedule so that was a new experience. I said my good-byes at the end of the weekend class, knowing that I’d see some of them the next day.
The day after my overshot workshop, two wonderful ladies took me up to my next assignment: a lecture on Summer and Winter to the Skagit Valley Weavers Guild. Many of the guild members were also members of Whidbey Weavers Guild and of the Whatcom Weavers Guild, who would host me for my next workshop. A couple of my overshot workshop students brought in their samples. They had cut them from the loom and washed them the day before, after the overshot workshop was finished. It was fun to see their completed work and talk about what their next steps would be.
The three-day Early American Textiles workshop was presented at the Jansen Art Center and hosted by the Whatcom Weavers Guild. Nine students wove round robin style on ten different looms. Each loom had been warped by one of the students in a traditional weaving pattern using thread similar to what early American weavers would have used. Throughout the workshop we stopped to talk about production practices within the US and Europe during the 17th, 18th and 19th centuries. One of the students brought in a lovely coverlet she had found in a thrift store. Another shared stories of her aunt and uncle who were weavers. My students were very knowledgeable and, as usual, I learned as much from them as they did from me.
I hope I get a chance to visit the area again. I wish everyone had such a nurturing weaving community. We all need connections and we benefit from seeing each others work. I’ll leave with a couple of photos from the ferry to Whidbey Island from Mukilteo.

Besides downsizing my collection (no heirs), I want to part with my work. I’ve had a couple small shows, but haven’t sold the majority of my work. I wonder if people ever sell much at shows! I have lots of weavings but also a lot of dye work that I did during the pandemic.
My friend, Cathy arranged a trip for us to go to Amami Island in Japan to see a very special textile being woven. Kimonos would be woven of the cloth and the textiles are known as Oshima Textiles. We went to a special Oshima shop in Tokyo once and all the kimonos were very unattractive to our eye. However the mud dye and the weaving is extraordinary. We went to Amami Island and saw them weaving what I’d heard about: TWICE WOVEN cloth. That means, at first the threads would be woven for the RESIST when the threads were dyed. AFTER THAT the threads would be put back on a loom and WOVEN again.
While it looks like it would be a very time-intensive and difficult technique to weave – it really isn’t! You just have to understand how and why it works the way it does. (We will get to that.)
In its simplest form – overshot is a weaving technique that utilizes at least 2 different types of weft yarns and floats to create a pattern. These patterns are often heavily geometric.
Ground weft– plain weave pattern that is used between each row of your overshot pattern. This plain weave gives the textile structure and allows for large areas of overshot to be woven without creating an overly sleazy fabric. Without the use of a ground weft on an overshot pattern, the weaving would not hold together because there would not be enough warp and weft intersections to create a solid weaving.
They were most popular though in southern Appalachia and continued to be so even after textile technologies advanced. When other parts of colonial America moved to jacquard weaving, the weavers of southern Appalachia continued to weave their overshot coverlets by hand.
Since the overshot coverlets were most often woven at home on smaller looms they usually had a seam down the middle where two woven panels were sewn together.
The thing about overshot is that no matter the application, it is pretty impressive. Perhaps that is just my opinion, but due to how complex it can look, I feel that it is pretty safe to say.
Just because it was originally used for coverlets, does not mean it can only be used for coverlets. Changing aspects of the pattern like the colors used, or the way you use your ground weft can drastically change the look and feel of your weaving.
In the image below you can see the ground weft is not the same color throughout. Instead, I wove the ground weft as discontinuous so that I could add extra pattern and design into the weavings. In this case, you may be wondering how to deal with your weft yarns when they are in the middle of the weaving and not at the selvage.
The discontinuous weft yarns will float onto the back of the weaving until you are ready for them in their next pick. This does make your overshot weaving one sided since it will have vertical floats on the back. Keep this in mind if you want to try this technique out.
Also seen in the image above, the overshot yarn that I used was not all one color! This is a really simple way to get extra dimension and interest in your overshot if that is something you are looking for.
This makes it simple to be able to only weave overshot in certain parts of your weaving. If you want to do this then you can continue to weave your plain weave across the entire width of your weaving, but only weave overshot in specific areas. This creates a overshot section that functions similar to inlay.
Since the overshot pattern is strongly influenced by the weft yarns that are used it is important to choose the right yarns. Your weaving will be set up to the specification needed for a balanced plain weave. Make sure you understand EPI in order to get the right warp sett for your overshot weaving.
The ground weft used is almost always the same yarn as your warp. This allows the overshot weft to really be able to shine without contrasting warp and weft plain weave yarns.
In order to get the full effect of the overshot, it must be thick enough that when you are weaving your pattern it covers up the ground weft between each pass. If it is not thick enough to do this, it will still be overshot, but the full effect will not be seen.
What this warp thread does is serve as an all-purpose selvedge that does not correspond with your pattern. Instead, you would make sure to go around this warp thread every time to make sure that you are able to weave fully to the selvedge. Without this, your overshot weft will float awkwardly on the back of your weaving whenever the pattern does not take it to the edge.
I have mentioned this book multiple times because it really is such a great resource for any weaver looking to weave patterns of all types. It contains 23 pages of different overshot patterns (among so many other patterns) that you can set up on your floor or table loom.
Like a lot of different types of weaving, it is possible to do it on almost any type of loom that you have. The difference being that it might take you a little bit longer or require a bit more effort than if you did it on a traditional floor loom.
Weaving overshot on a frame loom or rigid heddle loom will require the use of string heddles and pick-up sticks that you have to manually use to create a shed.

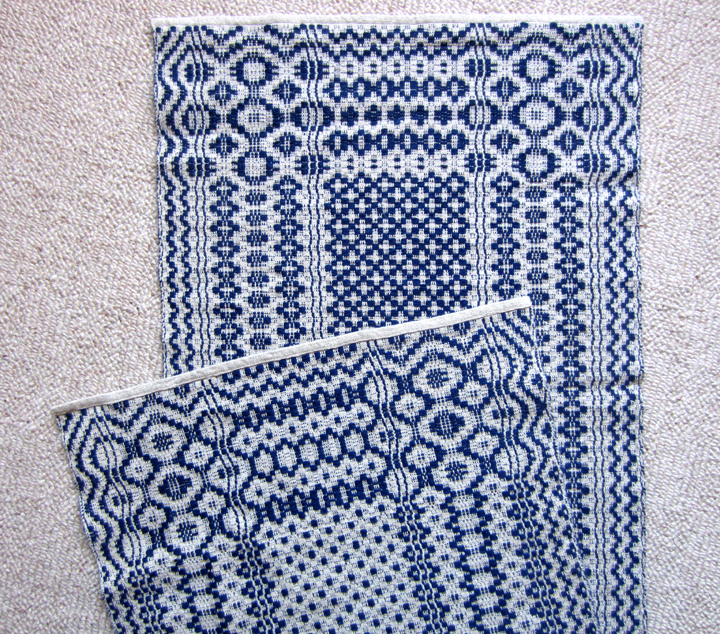
After weaving the project samples for my book, I had a bit of an 8/4 cotton warp remaining on the loom. I perused my stack of Handwoven magazines and saved project files for some inspiration and decided upon weaving a little overshot on this remnant.
For the Non-Weavers - Overshot is a weaving technique. If you are familiar with Colonial coverlets, they were traditionally woven in overshot patterns. Here is a link with great photos Woven American Coverlets.
Unlike Krokbragd, a wealth of information exists on how to weave overshot. Just about any weaving book will contain at least a chapter on the topic, as well as there are videos, articles and countless published drafts.
Back to my little overshot project, I found my inspiration in the November/December 2017 issue of Handwovenin an article by Inga Marie Carmel entitled ‘Exploring Overshot’. The author chose a draft called Blossom, a Bertha Gray Hayes miniature overshot pattern.
Bertha Gray Hayes was an early 20th century weaver known for her miniature overshot and name draft designs. Miniature overshot pares down an established overshot pattern to its bare minimum while still maintaining the integrity of the pattern’s character. For more on the subject, check out Weaving Designs By Bertha Gray Hayes: Miniature Overshot Patterns by Norma Smayda, Gretchen White, Jody Brown, and Katharine Schelleng.
In Ms. Carmel’s sampler, she explored six different treadlings of the Blossom pattern. Since I had a much smaller warp, I had to do a bit of reworking in Weaveit (the weaving software program I use). I was only able to weave three of the six variations; the star and rose which are two of the basic overshot treadlings, and a variation referred to as “in the Scandinavian manner”.
Typical of overshot samplers and coverlets, the motifs are framed by a complementary border. If you compare my left selvedge with the right, you will notice that I did not quite work out the correct border. Although I’m not keen to sample, this certainly is a good example where sampling would be beneficial before committing to weaving the edited draft on a much larger project.
An interesting feature of overshot is that the reverse side is generally also equally attractive. I actually chose this reverse side as the “front” of my project.


 8613371530291