
rotary table saw free sample
With hand-fed saws, the operator adjusts the height and angle of the blade. Then, holding the stock, the operator pushes it into the blade. A guide is used to maintain a straight cut at the desired width. At the end of the cutting stroke, the operator either changes positions or pushes the stock past the blade. Self-feed or power table saws are equipped with rollers or a conveyor system to hold the lumber and force-feed it into the saw blade.
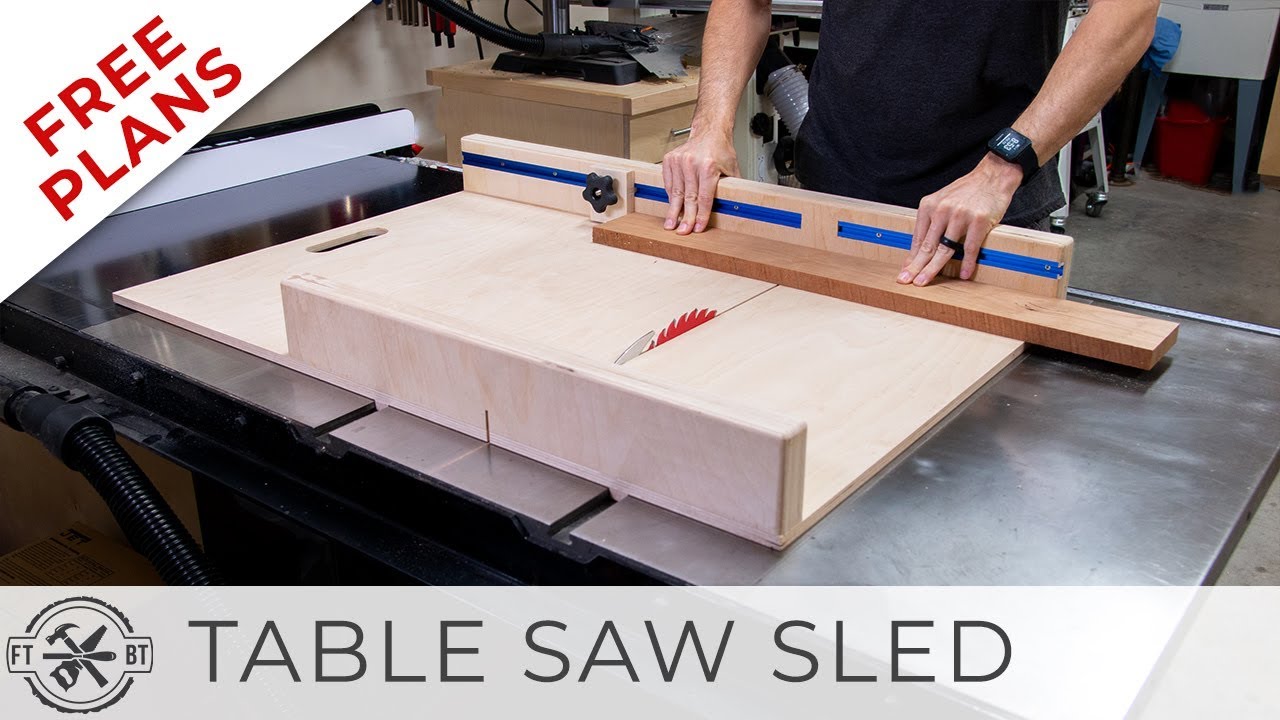
A table saw sled (or cross cut sled) makes cutting wood against the grain safer, and much easier. There are lots of technical ways to approach making a table saw sled, but sometimes you just need a simple and elegant solution to a problem. This is possibly the easiest cross cutting sled you can make, and it still achieves accurate cuts.
Cross cutting sleds (in case you didn"t know) are used to cut against the grain of wood on a table saw, or cut very small pieces without fear of chopping your fingers off. Cross cutting (or mitre cuts) is a topic that is covered on the free Table Saw Class, which will bring you from zero to hero on being a table saw pro.
This cross cut sled can be made with scraps and only requires three cuts to be precise, the rest can be slapped together with reckless abandon and sill make perpendicular cuts. At the end of the Instructable we"ll use the 5-cut methodto check the accuracy of the sled once it"s created.
This table saw sled uses scrap wood, relying on a few precise cuts and a very straight piece of hardwood. Here"s what you"ll need to make your own:Plywood (flat, and at least ¼" thick)
Before making any cuts make sure your table saw is calibrated, otherwise every cut you make will be off. Table saw calibration is covered extensively in the
Before checking your cut it"s wise to clean up your table saw surface and mitre track of any sawdust or debris. If you neglect this step you"re not going to get an accurate assessment if your cut fits snugly in the track.
Apply a small bead of glue on the hardwood along the lengthmaking sure not to use too much or accidentally spill any glue onto the table saw. You only need a small amount of glue, since we"ll be adding screws to attach the hardwood to the plywood later.
Once glue is applied place the plywood on top of the hardwood track, aligning the plywood so it"s approximately square to the track and the center of the plywood is in line with the saw blade.
Before gluing on the sled back fence, which needs to be square to the blade, we"ll need to make a reference cut. The back fence needs to be perpendicular to the saw blade and perfectly square to make accurate cuts.
Place the sled into the mitre track and place the plywood directly over the lowered blade. Start the saw and slowly raise the blade until it"s about 1" higher than the surface of your plywood base, steadying the plywood with your other hand (away from the blade) as needed to prevent the plywood from wandering during the cut.
Kerf is the material that is removed when cutting and it"s equal to the thickness of the blade, this is described in more detail in the Table Saw Class.
The sled back fence is the only other piece of wood that needs to be precise for this sled. This back fence will be where you align your wood to be cut in reference to the saw blade, so it needs to be square and perpendicular to the blade.
Apply a small bead of glue to the back fence and place on the plywood. This is the most critical part of the entire sled, as misalignment here will result in every cut made on the sled being at an angle. Take the time to ensure your back fence is totally perpendicular to the saw blade.
What I"m showing is only a very basic start, table saw sleds can be customized with all kinds of clamps, tracks, and hold-downs to suit your needs. Once you make one sled there"s no limit to the types of additions you can make, why not make a few and have sleds on hand for every specific cross cut you make!
Secondly - if your track is 3/8" deep - rip your track so there will be some space under it for sawdust and expansion. I make mine 5/16" thick. Then, use pennies or a few washers under it to raise it slightly proud of the saw table for gluing to the plywood.1
great instructable. i just made one. I like the idea of adding plexiglass to the top. i"ll do that when i can get a small piece. this was the first thing i made since i upgraded my old 70"s Craftsman 113 table saw with a new Delta T3 fence. hoping to do lots of projects now that I have this. thanks for posting!
I built a similar sled and quickly realized that I needed to put a block of wood where the blade exits the sled to enclose the exiting saw blade to prevent ever having my thumbs in the path of the blade. I also put a piece of Plexiglas from the front to the rear fence above the blade to prevent anything flying off the blade from hitting be in the face, and also to prevent my fingers from getting too close to the blade path.
Here is a photo of my sled with the features I added for safety. I also added a hold down clamp and an adjustable stop to use when the cut length is longer that the front fence. When I am holding small pieces to cut with my fingers I hold them tightly up against the plastic shield over the blade which prevents them from getting in the blade path. However, usually I will use the hold down as seen in the photo
Can i ask why you only attached one track guide to the sled when there are 2 tracks visible on your table saw? Was this intential? To save time, is not essential or is there another practical reason?

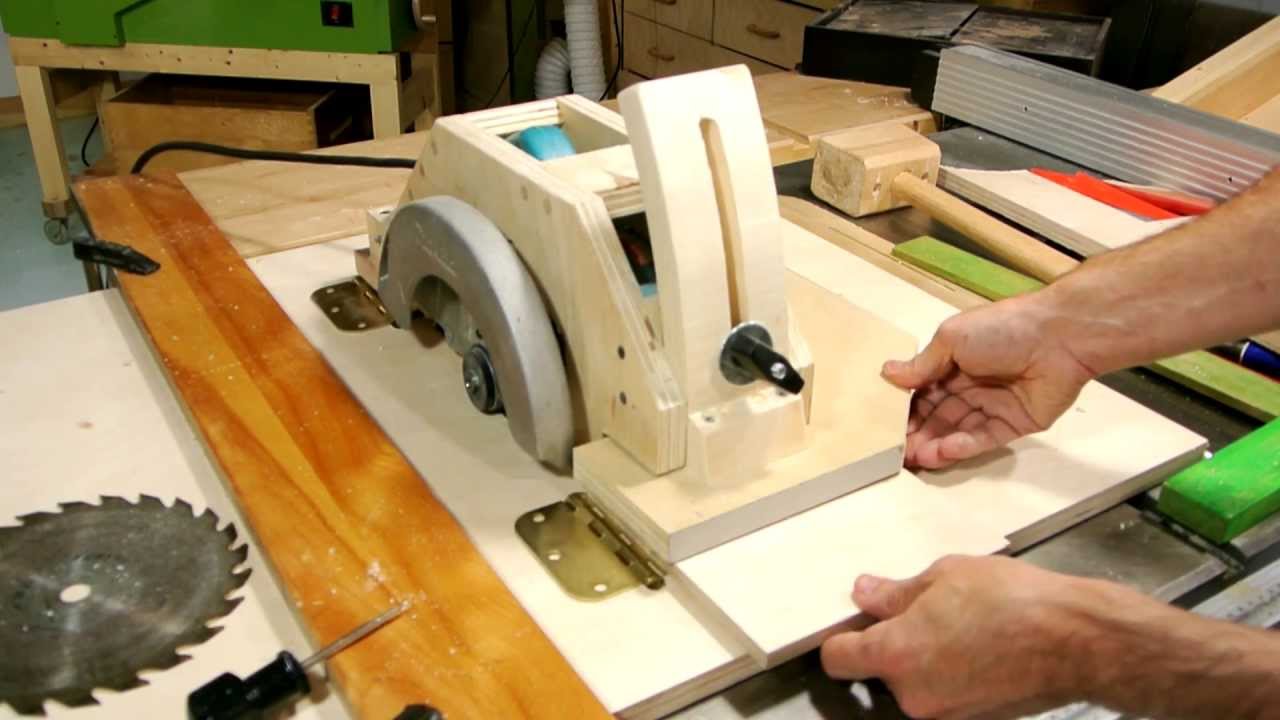
This instrucable is about building a table and attaching a hand-held circular saw to the table. The table stands on saw horses, so it"s more of a surface than a free-standing table. The table includes a removable panel where the saw attaches, so the table can be used with other tools---a router for example.
Please be careful if you attempt this project at home. There are power tools involved, which should inspire extra caution. Real table saws cause their share of injuries, so just imagine what could happen with this ad hoc arrangement.
Remember that you want to hang a large saw under the table when you"re choosing where to put the cross pieces. Make sure there"s enough room to mount and adjust the saw.
Leave a hole in the middle of the table. The removable panel makes it a lot easier to mount the saw and allows you to use the table with other tools. To mount a router, just make another panel and mount the router on that.
If you"re inspired, you can even use a block plane to deal with any bumps. But the plane can only make it locally flat, so your table could still be off. But who cares---if you wanted something really precise, you"d have purchased a table saw a long time ago and you"re only reading this article to see if it"s a joke.
You may need to add a true piece of wood to the edge, where the fence rides, depending on the lumber you started with and the final shape of the table. I started off without putting too much thought into the orientation of the table, so I ended up with a rough edge.
I found a flat piece of wood of the appropriate thickness, a bit of 1/4" plywood, and some glue. After it was firmly glued into place, I realized that the edge was a good straight board but the edges were not parallel. I was able to correct for it later because the fence need only be true to the blade, not the end of the table.
Cut a slot in the panel and figure out how to mount your circular saw on the bottom of it. I have a DeWalt saw (too bad it"s not Craftsman!) and it"s got a fiberglass deck (the black bit) that I had no trouble drilling through. I used 1/4" hardware because that was what I had on hand. I used a counter bored holes and carriage bolts, so I didn"t have to worry about the bolt turning as I mounting the saw.
There were two problems from this set up, though. First, I couldn"t cut through 2x4 lumber because the boards I made the table out of were too thick. Also, I found out why zero-clearance plates are so popular.
I removed the first panel, which was made out of 3/4" lumber, and replaced it with 3/8" plywood. There"s a bunch of shims to keep it level with the surface of the table. The saw is mounted on a panel and there is the possibility of changing the bit that surrounds the blade. The combination of the panel and plat works, but the table isn"t very flat. There are a lot of little corners and edges and sometimes things get caught.
I also found out that the slot was too wide because bits of wood kept falling into the saw. They either were launched toward the ceiling of my garage or caused the saw to slow down and jam up. So I made a new slot that was just wide enough for the saw blade. It doesn"t have a blade guard, anti-kickback device, or a splitter, so it"s really quite dangerous. I"ll have to make a splitter and guard ASAP.
The fence must be parallel to the blade. Square up the fence to the blade. You"ll probably have to pull back the guard, so make sure the saw is not plugged in. Then put a single screw in the T of the fence and square it with the end of the table. Add at least one screw to set the angle.
I spent a lot of time making the T square, but it turns out that the table"s end wasn"t square. I was able to correct for the difference using the method outlined above.
The main reason I made the saw was to cut up the old lumber I had in my garage. There"s old 2x4 and other stuff from the last 7 years of home improvements. I was able to re-claim some of the lumber but a lot of it is probably only good for throwing away or making charcoal. I also made a shop cart for my tool box and misc tools. It was inspired (but doesn"t at all resemble) by an instructable about building a shop table.
Hi! I have an ingco Circular saw (https://www.discounttrader.com.au/wp-content/uploads/2018/10/CS18528S.jpg) and im planning to make it into a table saw because i have no other use for it,
My question is, how do i turn the saw on if it"s mounted upside down on the bottom of the table? it has a two button start for safety reasons, meaning you have to press the safety button and then also pull the trigger for it to start sawing. how do i accomplish this?
my idea is to somehow permanently jam the safety button to the on position and use a foot lever of some kind to turn on the saw, but that could be very dangerous.2
I was thinking, that one thing you could do to keep the saw running when in use, is to by pass the switch on the saw & wire in a switch within arms reach by your waist on the side of the table. it may sound complicated, but it"s really not. It"s actually quite easy.
I"ve been looking at multiple versions of this idea. I saw someone ziptied the switch on, then plugged it into a surge strip with the toggle switch mounted close by. You can turn it on/off safely.0
Yes I wonder if my hand held saw even has a switch that is by-passable. My dad is a carpenter by trade and I distinctly recall that his table saw back in the early 80’s was a giant hulking home-made job with a Skil saw at the heart of it. I guess safety features were a little easier to work around in those days
My god!! Enough the safety lessons guys. We have enough of that in our normal day jobs. Every single instructable on here assumes you have common sense and are responsible for your own safety. These are DIY projects - Not some over-engineered, over priced machine with all the safety cutoffs in the universe.
i am a hobbyist & planning to built a table saw using a seven n half inch circular saw, but after hearing all the risks especially kickbacks i got sceptical. As my setup wouldnt be having riving knife, i thought of using a sled riding on a pair of telescopic channel which will feed the job & use clamps to hold the job with sled. I can feed the sled from side holding those clamps from sideways thereby avoiding standing in path of blade. Even if i use a rail guide it will run on top of the sled for whole length of the table. Do you think its workable. Any suggestions will be very helpful0
Money spent at a garage sale for a real table saw would be well spent. New saws also can come with a brake that stops the saw INSTANTLY when it comes into contact with flesh. Sooner or later, this machine will get you hurt.
I bought two cheap, used saws--perfectly serviceable--at garage sales. Yes, SawStop and now Bosch make both job site and shop versions of table saws that "break" intantaniously, but they begin at around $1200-1600 dollars. Take of you fingers out there.0
hate to tell you this but since i spent 15 years in the construction business I feel at least a "bit" qualified to make this comment. A table say never stops when it hits flesh. It stops when that plastic guard is raised to high high. You set most of them by adjusting the blade tips so they barely clear the wood you are cutting(just like you should do with any circular saw(it make the cutting much much more efficient, reduces kickbacks and reduces the force needed to push the blade through the wood) If you try to slide something else under that plastic guard be it a body part or another piece of wood it jams the blade.
Please educate yourself on how things work BEFORE bashing someones good idea. This tablesaw is no different than the older ones that didn"t have the brakes on them and so are no more dangerous.
I know this is an old post, but doesnt mean you"re not still wrong. :) There is most definitely flesh detecting saw safety mechanisms. YES, not on most consumer grade equipment, but it definitely exists.
Those saws are not even remotely close to being incorporated into the design of the manufactures of table saws. The likes of Craftsmen DeWalt and Milwaukee have even said that they will not be incorporating this design into their models because of the cost. The top comment is akin to saying that you should buy a new car because the new ones have ejector seats that will save you in a crash because he saw it in a movie once and it was theoretically possible. So, "Please educate yourself on how things work before bashing someone"s insightful comment."0
Joeny and Garion, take it easy. Let"s take the time to read and understand before reacting. Try to be positive and have a good attitude. Put that confrontational energy into posting a new instructable or something. Your comments will be much more credible after you"ve posted some of your own work.
A real table saw, even a bench-top model, probably would be better. This design, however, is one way to use labor in the place of cash. Someone in my family worked on a nuclear submarine. He told me that they were taught not to rely on safety features. That"s all I have to say about that. A garage-sale table saw won"t have the flesh-sensing feature. That feature is proprietary and is on a saw that is relatively expensive.0
Excellent idea and exactly what I was planning to do. Do not listen to the ramblings of attention-seeking, drama-loving individuals. As has been mentioned, safety is in procedure. A simpler mind or more careless individual should not make or use this table. For that matter, they should not be around power tools in general; store bought or otherwise. Great instructable. I"m also planning on making a router table for my dremel tool. I"ll post back if I lose a finger.0
The construction of the table is going to be very simple. It will be a box with a hollow top. The hollow top is through which all the dust that falls down the blade will be collected. https://www.youtube.com/watch?v=U0YaVYjQ-FM
a good idea if you want to make a quick change multitool table is to head to your local hobby shop and pick up some battery phugs/sockets and some wire. Bypass the original switch with a socket/plug on the positive or negative, and insert a 250v reccomended switch somewhere on the table with a socket/plug opposite to that of whats on your tool. When your tool is mounted on the table, use the trigger lock feature most tools have(to keep it on) so you only have one switch to turn it on and off at will. If you"re worried about usability after such a mod, just make a loop jumper to continue the circuit and use the drill like normalMore CommentsPost Comment

Ensure that there is adequate support to hold a work piece; use extension tables or roller supports at the side or back for larger pieces. If an assistant is at the back (outfeed) end of the saw, an extension table should be in place so the back edge is about 1.2 m (4 ft) from the saw blade. The assistant should wait for the work piece to reach the edge of the extension table and should not reach toward the saw blade.
Beginner woodworking projects - be safe and use a table saw push stick. This combo stick / shoe saves space and works on any standard cut with the table saw. Table saw push stick you can make yourself for multi-purpose use and added safety. #woodworkingjigs #tablesaw #pushsticks #woodshop #woodworking #thepowertoolwebsite
Anyone serious about woodworking or DIY eventually wants to add a table saw to their power tool arsenal. Named for the table that supports the material being cut, the table saw is an excellent tool for making quick, precise work of repetitive cutting tasks. If you’re in the market for one of these beauties or just bought one for your home workshop, study up here on how to use a table saw to make cuts correctly and safely.
Table saws, which run between $300 for a standard model to $700 for a contractor-quality version, are sold by the size of the blades they accommodate. The 10” size is most common and ideal for most carpentry and woodworking tasks, yet you’ll find 8” table saws that are handy for small work and 12” versions well suited to creating deeper cuts on thicker material. The parts of a table saw include:A table top of at least 3’X3’ (possibly larger than 4’X6’) with extensions available for most brands. The table, typically made from cast steel or cast aluminum, rests on a stand or a metal cabinet. Most table saws are considered stationary power tools, but portable versions with foldable legs for easier moving are available.
Depending on the saw you choose, you may have additional accessories such as rollers or table extensions to support long lengths of wood, vacuum attachments, or clamps.
Too many weekend warriors—and pros—have suffered serious injuries for not knowing how to use a table saw. If not properly handled, the material being cut can get in a bind and kicked back, either throwing the material at a high velocity toward them or jerking it violently and pulling their fingers toward the blade. To lessen the risks of kickback:Never start the saw while the material you’re cutting is touching the blade.
In addition to the specific safety observances to prevent kickback, take the time read the manufacturer’s safety provisions and be sure to always wear goggles and ear protection while using the table saw. Also remember to unplug the saw before you adjust or align the blade, and don’t remove the safety guards that come with the saw.
With accessories such as clamps, stops, and jigs, you can make such specialty cuts as dado cuts, compound angles, and rabbet joints—yet woodworkers rely on the table saw most for two basic cuts. Ripping, the most common use of a table saw, involves cutting material to a specific width. Crosscutting applies to cutting material to a specific length. Below, you’ll find step-by-step directions for using a table saw to make each of these common cuts.
Ripping is the simplest cut to make, thanks to the table saw’s rip fence that adjusts to the width of the desired cut and also serves as a guide to control the material while cutting.
Unplug the table saw and fit a rip blade (suitable for the material you’re cutting) into the blade arbor on the top of the table. Adjust the blade height so the top of the blade rises no more than ¼” above the thickness of the material you’re cutting. For example, if you’re ripping long pieces of wood from ½” plywood, set the blade no higher than ¾” above the tabletop.
To do this, use the arbor nut wrench that came with your table saw to loosen the arbor nut (the nut that holds the blade in place) and position the rip blade with the teeth facing the front of the table saw. A table saw blade spins towards you, from the top downward, so the sharp blades must face the front of the table saw and not the back. Tighten the arbor nut snugly.
Position the rip fence by releasing the locking lever on the front of the fence, which locks the fence into place, and then sliding it so its inner edge matches the desired width of the cut. Your table saw has a ruler on the front to help position the fence, but don’t depend solely on the ruler for measuring your cut. Use a precision tape measure and measure the distance from the fence to the closest edge of a saw blade tooth. Saw blade teeth alternate, one toward the left and then one toward the right. By measuring to the closest edge, you’ll account for the amount of wood the blade will cut away (called the kerf) during the cut.
Plug in the table saw and place the material to be cut on the table, aligned with the rip fence, but do not allow the material to touch the blade until you’ve turned on the saw and the blade reaches full speed. If the material makes contact with the blade before the blade reaches cutting speed, it a sure recipe for kickback.
Guide the material slowly but firmly along the rip fence with one or both hands, whichever is necessary to control the material, keeping it flat along the table top and snugly aligned with the fence. When ripping large, thick boards, you’ll often want to use both hands to guide the material at the start, and then switch to one hand as the cut nears completion. If the material is long and extends beyond the back of the table, either use a table extension to support it or have a helper support it as you cut to keep the material flat at all times. Don’t let go of the material and walk around to the back of the table saw, which may cause the material to lift off the table, increasing the risk of kickback.
When making crosscuts on a table saw, it’s vital to remember not to use the rip fence a guide. The rip fence stabilizes long lengths, but most crosscuts are made on fairly narrow material—cutting it in half or taking off the end of a board, for example. Not enough of the material is available to fit along the rip fence during crosscuts so attempting to use the fence increases the risk of dangerous kickbacks. Instead, use a miter gauge.
A miter gauge features a guide fence to stabilize the material and a bar that fits into one of the deep grooves on the table’s surface. When the bar is fitted into a groove, the whole miter gauge slides from the front to the back of the table saw so you can control the cut. It also features a protractor-like guide that’s adjustable by loosening a knob and then selecting the correct angle before retightening the knob. Sometimes, the miter gauge that comes with a table saw is a little on the lightweight side. If you plan to do a lot of crosscutting, consider investing in an after-market miter gauge that’s more substantial. Alternately, you can use a miter sled (see “Note” below).
Note: You may wish to use an after-market miter sled to support your material during crosscuts. A miter sled resembles a shallow rectangular box with pre-cut slots in the bottom, which allow you to position the material in the sled and then slide the entire sled over the table while cutting. You don’t necessarily have to buy one, though. Many woodworkers make their own miter sleds, and you can find free detailed plans online. Making a miter sled might be a great first project for your new table saw!


 8613371530291