
cnc mill rotary table free sample

Years ago, before I learned CNC, I owned a Phase II 8″ horizontal/vertical rotary table that I purchased from Kap Pullen’s Getmachinetools.com store. He has them at a good price, BTW, and he’s a darned nice fellow to deal with as well as being a frequent HSM contributor. Anyway, its a nice little table, but I hadn’t done a whole lot with it for quite a while after purchasing it. As is so often the case, one day, a project landed on my doorstep and I was glad to have it.
Before I could get started, however, I had to make some accessories for it. Basically, I needed some T-Nuts to fit the table, as well as a little fixture that makes it easy to hold a plate up off the table through a hole in the center so you can machine it. The latter, what I call a “plate machining fixture”, was inspired by something similar I saw the Widgitmaster of CNCZone fame using to make Dremel clamps for his mini-router:
The Plate Maching Fixture and 3 Homemade T-Nuts. T-Nuts are easy to make: square a block to the proper dimensions, mill the side reliefs, drill, and tap. These are much smaller than the mill’s Bridgeport standard T-slots, so I made them myself and I’m using 1/4-20 bolts with them. They’re made of mild steel.
I turned the round spigot using the 4-jaw on the lathe. I’m making the fixture out of MIC-6 aluminum plate, which is pre-ground very flat on the sides. This is a 5 inch by 3 inch piece. I’ve clamped it to the rotab using my T-nuts and the regular mill clamps and step blocks. It is sitting on parallels to make sure I don’t cut into the table. You can also see how I’ve clamped the rotary table to the mill table using a big cast iron V-block I have. You can never have to many blocks with precision faces hanging around!
Having a 4-jaw chuck on your rotary table is mighty handy! Because it’s a 4-jaw, you can dial in the workpiece by adjusting the jaws until it is perfectly concentric with the table’s axis of rotation. The best way is to make an adapter plate that attaches to the back of the chuck in the same way that your lathe does so you can exchange lathe tooling with the rotab. Here is an example:
For the example, the chuck is threaded onto the adaptor plate, and then the holes in the adapter plate’s flange are used to bolt down to T-nuts on the table.
In my case, I bought a 4-jaw from Shars brand new, and simply drilled some through-holes in the chuck to mount to the table directly without an adapter plate:
First, you want to make sure your part is properly centered on the table. To do that, I clamp the table down on the mill table (no special place is needed), put my Indicol indicator holder on the mill spindle, and find some round feature on the part to indicate on. For example, on the plate milling fixture above, indicate on the round boss, or on the center hole. Spin the table and bump the part in until spinning the table doesn’t move the indicator.
Second, locate the center of rotation directly under the mill spindle. You can simply use the X and Y table handwheels to do this. Use that Indicol to indicate off of a circular feature you want centered under the spindle. Turn the indicol around on the spindle and adjust the handwheels until the indicator stays put relative to the spindle position. A Blake Coaxial indicator will make this last even simpler.
When you’re rounding partially by cranking a part around on the rotary table, it’s really easy to go a little too far and screw things up. The answer is to drill the end points to make the exact stopping point on the rotab a lot less sensitive:
Centering with a Blake indicator is really fast, but what if you don’t have a Blake, or worse, what if your mill is too small to accomodate one? Here is a nice solution I found on a German site. This fellow has made an ER collect fixture for his rotary table, and has taken care that when installed on the table, the axis of the collet is aligned with the table’s axis. He can then place a dowel or other straight pin in the collet and line up until it will go into a similarly sized collet on the spindle. Nice trick! It’s similar to how Widgitmaster showed me to align a drill chuck on a QCTP to the lathe centerline with a dowel pin held in the lathe chuck.
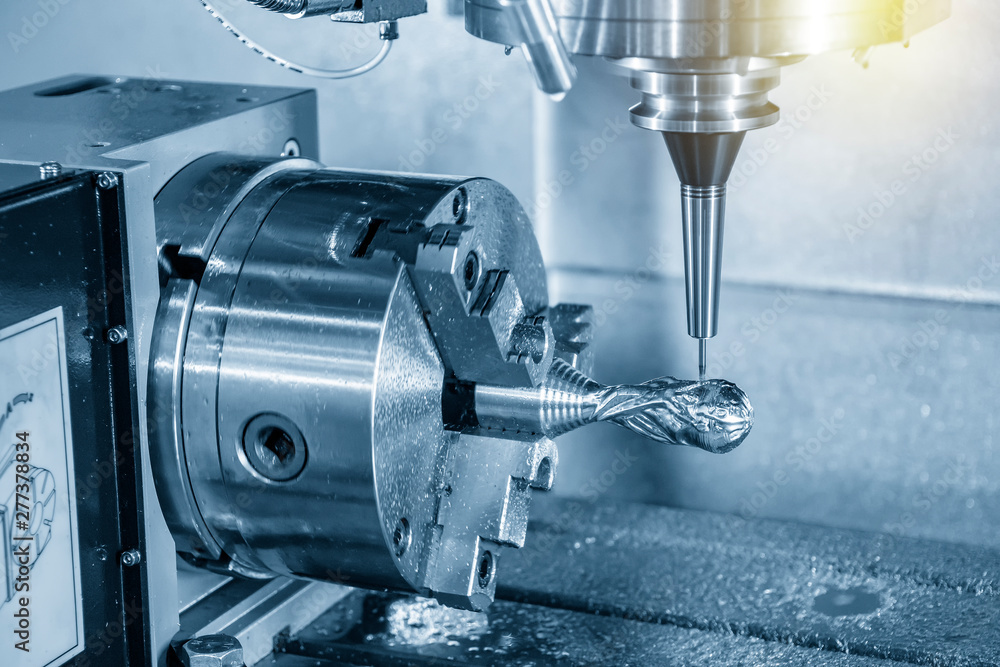
The 4-axis CNC milling machine cutting the sample parts with ball endmill tools. The 3-axis machining center attach the rotary table for cutting the sample parts.

The 4-axis CNC milling machine cutting the sample parts with ball endmill tools. The 3-axis machining center attach the rotary table for cutting the sample parts.

With this extension, your CNC milling machine gets the 4th axis. That allows you, for example, to mill round parts or create engravings on rounded surfaces.
This rotary axis is made to order for us by a German precision mechanic. In this price segment, this rotation axis for CNC milling machines is unrivalled in Europe!
There are many rotary tables on the market. If possible, they have to be inexpensive. You can get a lot of them! Usefulness? That is where the wheat is separated from the chaff. For example, there are many CNC turntables with the cheapest belt transmission. The disadvantages are obvious: slippage due to the belt. If not in the belt drive itself, then on the load or idle side of the belt. Perhaps useful for engraving work. For milling, however, usually not or limited in the choice of material (aluminium 3D milling not possible).
That means you can use the CNC router for 3D 360° machining in almost all materials. Even round engravings on Plexiglas are possible without any problems with this CNC accessory. That means for our CNC machine users: Round surface milling of plastic parts, wooden parts, aluminium parts or round parts made of brass, as well as engravings of all kinds.
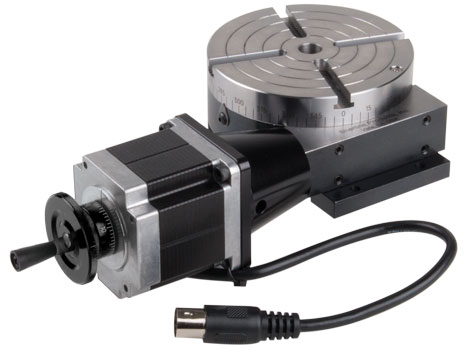
Sherline’s CNC driver box comes equipped with an A-axis output cable ready to drive a 4th rotary axis. This rotary table is all you need to turn your Sherline CNC mill into a 4-axis machine. Just plug the A-axis cable from the external driver box or the built-in driver box in your Sherline computer into the matching plug on the stepper motor. The EMC2 software is already set up to handle G-code for the A-axis, and numbers entered after the letter “A” in your code are interpreted in degrees.
The same end result can be obtained by ordering a CNC ready rotary table and a stepper motor and attaching the motor, but this single part number does the same thing, making it easier to order and saving you the trouble of installing the motor on the rotary table.

Sherline has taken its P/N 3700 manual 4″ rotary table and applied a stepper motor mount with dampened coupling in place of the handwheel. The mount accepts a NEMA #23 frame-size stepper motor for CNC control. This allows the table to be used as a 4th axis with CNC systems that have the capability to drive a rotary axis.
The rotary tables can hold more weight when they are not under a continual load. Click on the Video tab above to see examples of different weights and uses for our rotary tables.

G94 is used to perform simultaneous milling. The relay is pulsed at the beginning of the step so that the CNC mill goes to the next block. The Servo Control then executes the L steps without waiting for start commands. Normally, the L count on the G94 is set to 1 and that step is followed by a step that is run simultaneous with a CNC mill.

When the Servo Control executes a G94, a 250 millisecond delay is required before starting the next step. This may cause the mill axis to move before the table rotates, leaving a flat spot in the cut. If this is a problem, add a 0 to 250 milliseconds dwell (G04) after the M-Code in the mill program to prevent mill axis movement.
By adding a dwell, the rotary unit and the mill start moving at the same time. It may be necessary to alter the feed rate on the mill to avoid timing issues at the end of the spiral. Do not adjust the feed rate on the rotary control; use the mill with its finer feed rate adjustment. If the undercut appears to be in the X-Axis direction, increase the mill feed rate by 0.1. If the undercut appears in the radial direction, decrease the mill feed rate.
If timing is off by several seconds, such that the mill completes its movement before the rotary and there are several spiral moves one after another (as in retracing a spiral cut), the mill may stop. The reason is the mill sends a cycle start signal (for next cut) to the rotary control before it has completed its first move, but the rotary control does not accept another start command until it finishes the first.

Countless products today, from smartphones to supersonic jets, are made possible because of the reliability and versatility of CNC milling. It’s an ideal method for rapid prototyping, as well as volume manufacturing in plastic and metal. Let’s take a closer look at some of the remarkable advantages and applications for CNC milling.
CNC milling is a manufacturing process that uses a cutting tool mounted on a rotating spindle to selectively remove material from a block of raw substrate. The workpiece is rigidly mounted to a table, and this table moves or rotates on different planes so the tool can work at many angles. Sophisticated CNC milling machines can have 5 or more axes of independent motion to make more complex shapes or to avoid having to move the workpiece to a separate machine.
The axis of motion for a CNC milling machine are based on an X-Y-Z coordinate measuring system. All machinists refer to this when describing the basic movements of the mill, relative to an operator facing the machine. A standard CNC mill for example has three axes. The milling spindle represents the Z-axis, moving up and down. The X-axis is left-to-right, and the Y-axis is front-to-back.
All of these movements of CNC mills rely on Computer Numeric Control, which is a computer program derived from a 3D digital file of the desired finished part.
This control system is not only fast and accurate but, unlike earlier systems, it can be easily modified as needed, line-by-line and in real time, in order to fine-tune the machining program for the best CNC milling results.
Making a finished part from a block of material requires many different tools, each of them performing a very specific CNC machining function. Changing these tools one at a time by hand would be prohibitively time-consuming and inefficient.
To counter this, CNC milling machines have rotating carousels where all the needed tools are pre-loaded on separate holders. When needed, these CNC milling and machining tools can be exchanged automatically on the spindle within a few seconds.
The carousel on this Haas VF-2SS mill can hold a maximum of 30 tools, plus one on the spindle. This guarantees that all conventional CNC milling operations can be performed in one set-up. We further improve on this efficiency by using an automated tool dispensing system from Guhring. With more than ten thousand cutters in storage we are always assured of having the right CNC machining tool for every milling and CNC turning job.
On a CNC machining center, the workpiece is mounted in a fixed position on a work table while the tool is moved around it. This is the fundamental difference from CNC turning on a lathe, where the workpiece spins while the tool remains stationary.
Because of this fundamental difference in motion, parts are held in place in very different ways on these two machines. In CNC turning, for example, all parts are mounted on a spindle. They are concentric and therefore held securely by a three-jaw chuck right down the centerline of the part, the same way every time. The same is not true for CNC milling, where different holding strategies are needed.
However, other unusual shapes or parts may require custom holding fixtures which can make a CNC machining project more complex and time consuming. We have designed several of our own which were later patented.
Symmetrical parts that are essentially round or radial are best machined on a CNC turning center for maximum efficiency and precision. But most parts we work with are not round or symmetrical so they must be machined on a mill.
Multi-axis mills are unrivalled for creating square shapes, bevels, angles, slots and complex curves – any subtractive machining process can be done on a mill, including making round shapes. They are also accurate, routinely holding tolerances of .01mm or 10 microns. We have a wide variety of stock materials for any application and offer the best incoming material inspection and testing service.
VEVOR is a leading brand that specializes in equipment and tools. Along with thousands of motivated employees, VEVOR is dedicated to providing our customers with tough equipment & tools at incredibly low prices. Today, VEVOR has occupied markets of more than 200 countries with 10 million plus global members.
VEVOR is a leading brand that specializes in equipment and tools. Along with thousands of motivated employees, VEVOR is dedicated to providing our customers with tough equipment & tools at incredibly low prices. Today, VEVOR has occupied markets of more than 200 countries with 10 million plus global members.
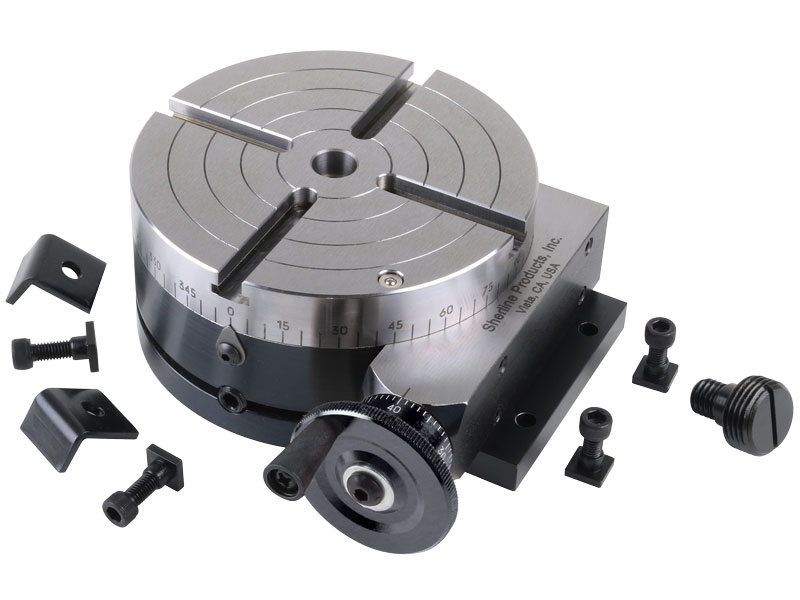
The mill rotary table is one of the main accessories of milling machine. As a precision work positioning device, it is widely used for indexing drilling, milling, circumferential cutting, boring, etc. The rotary turn table for milling machine is made from HT200 casting with high quality. It has already passed the ISO9001 quality system certification. They are are very popular on the market for their superior performance, excellent design and reasonable cost.
Both vertical and horizontal with two functions. Circle cutting, indexing drilling, milling and more complicated work are possible when the vertical position of the table is used together with the tail part.


 8613371530291