
how to build a rotary table free sample

This website is using a security service to protect itself from online attacks. The action you just performed triggered the security solution. There are several actions that could trigger this block including submitting a certain word or phrase, a SQL command or malformed data.

For a corner fillet weld such as those, it may help if you grind off half of each corner on the slotted plates giving a 45 deg V. This will help to ensure the weld gets good penetration and strength at the same time as allowing you to retain the original edges for alignment.
Looks to me like you are using a 240V single phase welder. In Oz I would use a Satin craft 13 electrode as these have a slower flux than a Satin craft 12. This helps stop the flux from running into the weld pool and stopping the arc. My welder has only 2 settings 2.5 and 3.2 mm so I try and use the shortest possible cable between the power point and the welder. If I have to go longer a heavier duty cable helps keep up the volts and amps.
Years ago, before I learned CNC, I owned a Phase II 8″ horizontal/vertical rotary table that I purchased from Kap Pullen’s Getmachinetools.com store. He has them at a good price, BTW, and he’s a darned nice fellow to deal with as well as being a frequent HSM contributor. Anyway, its a nice little table, but I hadn’t done a whole lot with it for quite a while after purchasing it. As is so often the case, one day, a project landed on my doorstep and I was glad to have it.
Before I could get started, however, I had to make some accessories for it. Basically, I needed some T-Nuts to fit the table, as well as a little fixture that makes it easy to hold a plate up off the table through a hole in the center so you can machine it. The latter, what I call a “plate machining fixture”, was inspired by something similar I saw the Widgitmaster of CNCZone fame using to make Dremel clamps for his mini-router:
The Plate Maching Fixture and 3 Homemade T-Nuts. T-Nuts are easy to make: square a block to the proper dimensions, mill the side reliefs, drill, and tap. These are much smaller than the mill’s Bridgeport standard T-slots, so I made them myself and I’m using 1/4-20 bolts with them. They’re made of mild steel.
I turned the round spigot using the 4-jaw on the lathe. I’m making the fixture out of MIC-6 aluminum plate, which is pre-ground very flat on the sides. This is a 5 inch by 3 inch piece. I’ve clamped it to the rotab using my T-nuts and the regular mill clamps and step blocks. It is sitting on parallels to make sure I don’t cut into the table. You can also see how I’ve clamped the rotary table to the mill table using a big cast iron V-block I have. You can never have to many blocks with precision faces hanging around!
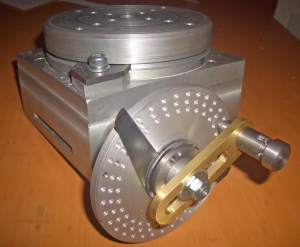
Having a 4-jaw chuck on your rotary table is mighty handy! Because it’s a 4-jaw, you can dial in the workpiece by adjusting the jaws until it is perfectly concentric with the table’s axis of rotation. The best way is to make an adapter plate that attaches to the back of the chuck in the same way that your lathe does so you can exchange lathe tooling with the rotab. Here is an example:
For the example, the chuck is threaded onto the adaptor plate, and then the holes in the adapter plate’s flange are used to bolt down to T-nuts on the table.
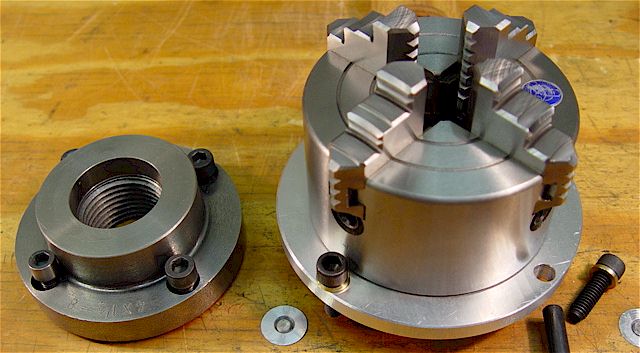
In my case, I bought a 4-jaw from Shars brand new, and simply drilled some through-holes in the chuck to mount to the table directly without an adapter plate:
First, you want to make sure your part is properly centered on the table. To do that, I clamp the table down on the mill table (no special place is needed), put my Indicol indicator holder on the mill spindle, and find some round feature on the part to indicate on. For example, on the plate milling fixture above, indicate on the round boss, or on the center hole. Spin the table and bump the part in until spinning the table doesn’t move the indicator.
Second, locate the center of rotation directly under the mill spindle. You can simply use the X and Y table handwheels to do this. Use that Indicol to indicate off of a circular feature you want centered under the spindle. Turn the indicol around on the spindle and adjust the handwheels until the indicator stays put relative to the spindle position. A Blake Coaxial indicator will make this last even simpler.
When you’re rounding partially by cranking a part around on the rotary table, it’s really easy to go a little too far and screw things up. The answer is to drill the end points to make the exact stopping point on the rotab a lot less sensitive:
Centering with a Blake indicator is really fast, but what if you don’t have a Blake, or worse, what if your mill is too small to accomodate one? Here is a nice solution I found on a German site. This fellow has made an ER collect fixture for his rotary table, and has taken care that when installed on the table, the axis of the collet is aligned with the table’s axis. He can then place a dowel or other straight pin in the collet and line up until it will go into a similarly sized collet on the spindle. Nice trick! It’s similar to how Widgitmaster showed me to align a drill chuck on a QCTP to the lathe centerline with a dowel pin held in the lathe chuck.
Semi-annual (2/Year) sampling frequency means the sampling shall be done during the months of June and December, unless specifically identified otherwise.
Yearly (1/Year) sampling frequency means the sampling shall be done in the month of September, unless specifically identified otherwise in the effluent limitations and monitoring requirements table.
.jpg)
The terms "igus", "Apiro", "chainflex", "CFRIP", "conprotect", "CTD", "drylin", "dry-tech", "dryspin", "easy chain", "e-chain", "e-chain systems", "e-ketten", "e-kettensysteme", "e-skin", "e-spool", "flizz", "ibow", "igear", "iglidur", "igubal", "kineKIT", "manus", "motion plastics", "pikchain", "plastics for longer life", "readychain", "readycable", "ReBeL", "speedigus", "triflex", "robolink", "xirodur", and "xiros" are legally protected trademarks of the igus® GmbG/ Cologne in the Federal Republic of Germany and where applicable in some foreign countries.
igus® GmbH points out that it does not sell any products of the companies Allen Bradley, B&R, Baumüller, Beckhoff, Lahr, Control Techniques, Danaher Motion, ELAU, FAGOR, FANUC, Festo, Heidenhain, Jetter, Lenze, LinMot, LTi DRiVES, Mitsibushi, NUM,Parker, Bosch Rexroth, SEW, Siemens, Stöber and all other drive manufacturers mention in this website. The products offered by igus® are those of igus® GmbH
PI’s direct-drive rotary tables with frictionless, brushless, closed-loop torque motors provide the best combination of high accuracy, high velocity, and maximum service life. PI provides closed-loop direct drive rotary tables with both mechanical bearings and air bearings. Stage models with large apertures and low profile are available. The stage design is optimized for high speed, stiffness, and high load capacity. If completely friction-free and maintenance free motion with virtually unlimited lifetime is required, air bearing rotation tables are recommended. These ultra-precision, high-speed rotary tables provide vibration-free motion with extremely high accuracy and negligible runout, wobble and eccentricity errors. The lack of lubricants makes these also clean room compatible and ideal for any high-performance metrology application in optics, photonics, and semiconductor manufacturing, test and metrology related projects.
In contrast to worm gear driven rotary stages or belt-drive rotation stages, torque-motor direct drive stages eliminate play in gears, couplings or flex in drive belts, providing motion with zero backlash and excellent constancy of velocity, while achieving higher speed than worm-gear drives.
PI’s precision direct-drive, positioning tables can be used in high performance factory automation, research, semiconductor, and laser processing applications. Due to the use of brushless high-torque, motors with direct metrology position feedback, backlash is completely eliminated, and reliability is greatly improved.
With modern direct-metrology rotary encoders, sensor resolution down to 1/100th of a microrad is available on select models with large rotary table platforms, using the high interpolation factors
Based on the high encoder resolution and powerful servo controllers, the direct-drive rotary tables also provide excellent velocity control, which is required in automation applications including high-speed laser processing, indexing, and semiconductor wafer inspection.
Most Direct Drive Rotation stages can be mounted horizontally and vertically, and with combinations all 3 rotary degrees of freedom (3DOF, pitch, yaw, and roll) can be addressed.
Our product range includes single and multiple axes, tilt/rotating tables, and indexing and high-speed spindles. Additionally, we offer customized solution tables for customer requests or OEM projects.
Customer satisfaction is our highest priority. Due to a high degree of vertical integration, our customers have one point-of-contact and the guarantee that all components are manufactured and assembled to your specifications.
Even for EDM machines that have been in use for decades, we will work with you to determine the ideal rotary indexing table and/or rotating/indexing spindle solution.
Our state-of-the-art rotary indexing tables and customizable reference and clamping systems provide endless application possibilities and highly efficient solutions.
Customer satisfaction is our top priority. You specify the task and together we’ll find the optimal solution for your production challenges and products.

Run the quill down and touch the sharpie to the rotary table table and by moving the mill table (cross feed) draw a line that will be parallel to the work.....
Now, use an indicator to final align the edge of the plate to be true to the machine ........Do this by rotating the table....Be sure to make all corrections by turning hand wheel in the direction that you will
If you have a moveable degree pointer for the table also set it to zero (most have some adjustment here)....If that is not available on your table make a simple sheet steel pointer plate that is just plain(no pointer.
Move to and cut features as needed...be sure to account for backlash in the table worm...(The starting point for the rotary cuts need to be positioned by moving in the direction you moved to set the plate to zero.)...

In 1996, Precision Detroit Company established a relationship with WEISS GmbH. WEISS has been manufacturing high quality index tables for decades and is the leading automation component manufacturer in Europe today.
In August, 2007, WEISS GmbH established WEISS North America, Inc. as a wholly-owned subsidiary. On September 30, 2007, WEISS North America, Inc. acquired the assets of Precision Detroit Company, Inc. relative to its PDC Geneva Motion index tables and its network of sales representatives throughout the U.S. and Canada.
Today, WEISS North America is not only a rotary table manufacturer but your complete automation manufacturer and solutions partner. WEISS has decades of expertise in providing automation, drive and control solutions to industrial markets. WEISS offers industry-specific, cost-effective and efficient technology solutions to help you maximize your efficiency, increase your productivity and achieve optimal system performance. We understand that your application has unique processes and specific requirements and we work closely with you to develop the perfect automation solution for your particular needs.
Successfully competing in our increasingly competitive global environment requires strategy, innovation and proven reliability from a partner that you can trust. Give us a call at 888-WEISSNA, fill out the form above, schedule a call below or simply send us an email to discuss your automation needs.

The DGII Series is a line of of products that combine a high rigidity hollow rotary table with an AlphaStep closed loop stepper motor and driver package. It retains the ease of use of a stepper motor, while also allowing for highly accurate positioning of large inertia loads.
The gear-reduction mechanism employs precision gears along with a proprietary adjustment mechanism that eliminates backlash. The repetitive positioning accuracy from a single direction is ±15 sec., while lost motion in a positioning operation from two directions is 2 arc minutes. These characteristics make the DGII series the ideal choice for applications in which accurate positioning is a must.
AlphaStep products are stepper motor based hybrid motors with a unique hybrid control system combining the benefits of "open loop control" and "closed loop control".
By utilizing the high responsiveness of the stepper motor, moving a short distance for a short time is possible. The motors can execute commands without lag.
During positioning, the motor stops with its own holding force without hunting. Because of this, it is ideal for applications where the low rigidity of the mechanism requires absence of vibration upon stopping.
Because it is normally operated with open loop control, positioning is still possible without gain adjustment even when the load fluctuates due to the use of a belt mechanism, cam or chain drive, etc.
It operates synchronously with commands using open loop control during normal conditions. In an overload condition, it switches immediately to closed loop control to correct the position.
If an overload is applied continuously, an alarm signal is output. When the positioning is complete, and END signal is output. This ensures the same level of reliability as a servo motor.


 8613371530291