
joe pieczynski rotary table free sample
I’ve got a couple of threads running where rotary tables have been mentioned (ok, mainly by me). One thing to put to bed straight away: I don’t really *need* one, but it would be handy for some jobs, and - primarily - good fun to play with.
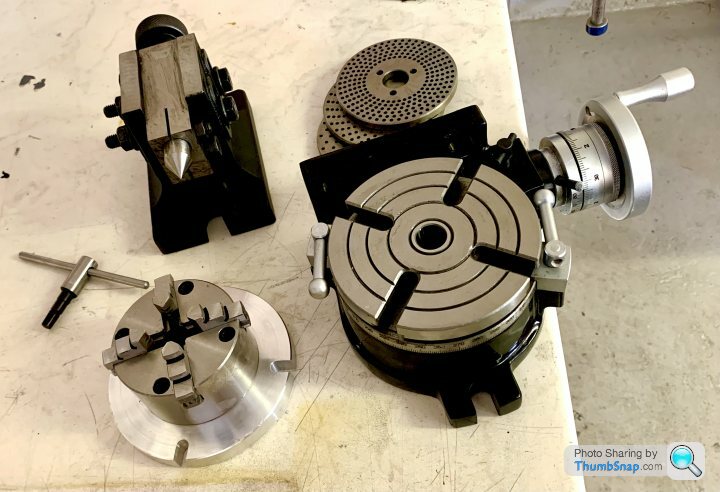
Ive got an SX2P mill, and a 5” table was suggested as a good size for that. Soba was a brand mentioned, and one of the usuals has a set including table, tailstock, 4-jaw chuck and dividing plates. Cost is about £340 from Chronos, delivered. I understand that quality could be acceptable, but chances are it might need some fettling. I watched a review video, and it seemed as expected.
Is there a ‘rotary table 101’, for example what’s the correct way of centering the table under the spindle, and when using the 4-jaw chuck how do you subsequently centre the work in that?
Mine came with a 3 jaw and that gets used equally in both vertical and horizontal modes the 4-jaw SC would be similar. Also have a flange mount ER32 that gets used sometimes as it"s a bit shorter and also allows the spindle collet to get closer to small work when table is vertical.
To centre my rotary table I have a centered plug which fits into the rotary table centre. This allows put a centre into the mill spindle and just run it down to the rotary table to centre it to the spindle then bolt it to the mill table.
When I bought my (secondhand) rotary table I also bought a small import 3-jaw chuck. I"ve never fitted it and not missed it, so I never will fit it. I mount work direct on the table.
Andrew - the first part I’d use it for is the small (c.30 mm) diameter aluminium output shaft blank for my son’s rc car (as per earlier thread) The Chuck would seem the obvious choice to hold it, but the height restriction could be an issue. What would be the best way of centering and holding a piece like that direct to the table? Make a temporary base plate and screw the bar vertically to that, then clamp the plate to the rotary table? Or something like that?
To centre my rotary table I have a centered plug which fits into the rotary table centre. This allows put a centre into the mill spindle and just run it down to the rotary table to centre it to the spindle then bolt it to the mill table.
I was wondering if something like that is accurate enough. Sounds straightforward. I guess you could also turn and drill a tight fitting centre plug, then align the table so the drill presses straight into the hole?
For a more accurate set-up, mount a dial indicator on the mill spindle and use it to locate on the morse taper of the rotary table spindle. (or the machined recess on the end of some RT"s). Carefully turn the mill spindle by hand to achieve zero movement of the indicator. Bolt down the RT and check again to see if it has not moved.
That"s obviously an - ahem - suboptimal setup, but shows what can be done in the way of fitting quarts into pint pots. The work was ~1" diameter and the tool mounted in an ER25 collet chuck. I didn"t have problems with headroom - it was the size of the table which was problematic. Anyhow it worked:
Over the years I have built up a fair number of simple arbors which get reused or it"s not hard to knock up another and these just go into the chuck and the work screws to those. Not sure I would want to try clamping this 1/4" sq x 3/8" long part direct to the table and still be able to get at it will a 6mm cutter and not hit any clamps
As you don"t have any form of indexer like a 5C spin indexer you will end up using the R/T to cut square or hex shapes onto small parts which will again be quick and easy to hold in a chuck or collet fixed to the table
......the first part I’d use it for is the small (c.30 mm) diameter aluminium output shaft blank for my son’s rc car (as per earlier thread) The Chuck would seem the obvious choice to hold it, but the height restriction could be an issue. What would be the best way of centering and holding a piece like that direct to the table? Make a temporary base plate and screw the bar vertically to that, then clamp the plate to the rotary table? Or something like that?
I"d concede that a chuck might be the simplest solution, but not necessarily the most accurate. My rotary table has a 1" parallel hole in the centre, which is way more useful than a Morse taper. So I"d make a 1" spigot with a flange for clamping to the table and a recess to locate the work. There would also be a hole for a screw into the part to be machined.
If you could not get the chuck in then a 5mm pin held in your collet chuck and lowered into the central hole would locate the part and a couple of small clamps will hold it down by the flange. Zero DRO before raising head and changing to the cutter. Though as I said it could be done without a rotary table too.
My advice is not to get wrapped round the axle worrying about the quality of hobby tools. If the best possible rotary is really needed (and I suggest it"s not), then buy an industrial model. It will cost a few thousand pounds, and although it will be somewhat more robust, don"t expect it to be bullet proof. Many a well-made rotary table has been wrecked hacking out big wheels for model traction engines!
Most hobby rotary tables are of the HV6 design. A worm drives a cogged wheel and turns the table on a simple plain bearing. Though obviously made down to a price, they"re reasonably accurate and sufficiently sturdy for most amateur purposes. They"re aren"t high-technology, nowhere near as difficult to make as a computer hard disc.
Today the world is flooded with mid-range tools, affordable rather than excellent. Not intended to last forever, they are nonetheless generally acceptable for the light duty found in typical hobby workshops. Many products come from similar anonymous factories, and are rebranded by a local seller. But be aware that some versions are too cheap, or customer returns, or manufacturer rejects. The customer probably has no idea who made the item, or even which country or countries it came from. And for this class of kit, it rarely matters. The customer isn"t looking for "quality", he"s after "value for money" and "fit for purpose".
In this way, with the R T in a suitable position on the table, the Tailstock is clamped to the table, so that the Tailstock barrel can be inserted into the bored arbor.
The Tailstock barrel locates the R T.so that it can be clamped to the table. The Tailstock can then be repositioned wherever is suitable along that T slot, for the work in hand.
This is not present - it’s just a plain threaded collar, which in my table wasn’t true to the shaft. This makes preload and play impossible to get right, since if you remove the bind, you get clearance 180 degrees round. I tried to clean it up in the lathe, but with limited success. If the roller bearing was fitted as listed, it would be way better. Further to this, there’s a grub screw which is a limit stop for worm gear engagement with the main gear. This is just loose in its thread, and would be free to vibrate either way, changing the critical engagement adjustment preset. I substituted a cap head screw and locknut which can be seen in the image below (just above the silver engagement lever). Anyway, once adjusted to the best of my ability, I got about 3 minutes of backlash on the handwheel, and about 0.0035” play at the edge of the table:
The chuck is OK, very stiff, but no big deal. The supplied t-nuts clashed with the lock plates, and needed thinning on the linisher. Contrary to some reviews, my supplied chuck key is a perfect fit. I tried the table/chuck out by helping my son making some differential parts for his r/c car. This involved milling sectors from a small diameter shaft:
Pleased your generally happy with the Soba 5 inch table it should serve you well. I must have been lucky with mine I have 1.5 minutes backlash at the handwheel and 0.0015" at the table edge. In a full 360 degree rotation I have a couple of spots each about 15 degrees worth where it goes a tad light but hardly noticeable.
Don"t forget you can gain around 40mm in Z if you use finger collets against using the collet chuck. I have a 6mm and 10mm which take most of my regular cutters. I mainly use the collet chuck but if you have a tall job plus a table mounted vice or chuck it could make all the difference to fitting the job and tooling in. The 40MM extra on mine is based on my finger collets against the collet chuck both from ARC.
My Tailstock has tappings for a key or dowels. Because my T slots differed in width from the keyway on the Tailstock, I made up two stepped dowels. One end is tight fit in the Tailstock keyway, and the other in the T slot of the Mill table.
Position the R T, loosely, on the Mill table so that it roughly aligns with the Tailstock, in the place where you wish to use it, with the 2MT alignment arbor in place...
The Centre barrel, being snugly located in the 2MT arbor will have aligned the Tailstock barrel vertically; and the R T along and across the Mill table, so both can be clamped.
Once the Tailstock centre barrel has been aligned, it is set up and should not need to be reset. It can be used, with the 2MT arbor to align the R T on the Mill table in the future.

For those of us who have, or are thinking about getting a rotary table for our mill but, (like the dog who catches the car) aren"t quite sure what to do with it after we get it, there is a new video series starting up on YouTube.


 8613371530291