
mounting chuck to rotary table in stock

6" base adapter plate is ideal to use on 6" rotary tables of either 3 or 4 slots to mount either 4" , 5" 3-jaw ,6-jaw or 4-jaw self-centering lathe chucks. This base adapter plate can also be used on milling, drilling machines if you remove the MT2 stub on the center of the plate. Morse taper 2 stub on the center of plate to fit 6" rotary tables and guarantee proper TIR accuracy. 4pcs 5/8" table slots T-nuts and bolts included for mounting the plate. Made of tough and strong illuminum alloy.

6" base adapter plate is ideal to use on 6" rotary tables of either 3 or 4 slots to mount either 4" , 5" 3-jaw ,6-jaw or 4-jaw self-centering lathe chucks.

All CategoriesAntiquesArtBabyBooks & MagazinesBusiness & IndustrialCameras & PhotoCell Phones & AccessoriesClothing, Shoes & AccessoriesCoins & Paper MoneyCollectiblesComputers/Tablets & NetworkingConsumer ElectronicsCraftsDolls & BearsMovies & TVEntertainment MemorabiliaGift Cards & CouponsHealth & BeautyHome & GardenJewelry & WatchesMusicMusical Instruments & GearPet SuppliesPottery & GlassReal EstateSpecialty ServicesSporting GoodsSports Mem, Cards & Fan ShopStampsTickets & ExperiencesToys & HobbiesTravelVideo Games & ConsolesEverything Else
I"m a wanna-be machinist newbie. I have a small mill (no lathe). I obtained this small 6" rotary table (a Griz product). I would like to get a small 3-jaw chuck mounted to it, but have NO CLUE as to how to choose a chuck that will be compatible with this RoTab. Am I looking for a 6" chuck? Or 4"? I can"t go too "tall" or I waste all my Z axis. I don"t even know how the chuck would mount to the RoTab. The hole in the center is a MT#2, would a chuck use the MT? Or attached how?
Can someone guide me to some options regarding how to get a chuck on here, where to find the components needed? I am not looking for gold-plated accuracy. (It"s just an inexpensive $900 ChiCom mill with an inexpensive $250 ChiCom RoTab. Not proud of it, but I"m lucky to have it, and it works good enough.) In fact I"d love to buy a chuck used if possible and save some coin. Ideas?
More info on my intended useage of chuck-on-rotab, if you are interested: This RoTab will mount horizontal or vertical. With the RoTab in the vertical position, with its associated tailstock, I believe you can "fake" some lathe operations on a mill. I need to do some small lathe operations with it, which will entail bringing down an endmill to the work and then slowly turning the RoTab. So sort of reverse of a lathe, in this setup the bit is powered and the work is being turned slowly by hand. Yeah, I wish had a lathe but in this obanomy, you make do with what you got.
Alternately, I think I can do some vertical lathing without the RoTab. If the stock is small enough to go into the mill"s chuck (5/8 max) and stout enough to hang free, some lathing can be done by clamping a lathe bit in the vise and running it up and down the work using the Z axis. For small work only.
I suppose you could also chuck a larger round piece in the rotab/chuck (with the rotab/chuck in the horizontal position, and the work sticking up vertically), and use an endmill to make bushings, and other short, squat round work, etc. by spinning the work in the rotab/chuck against the endmill.
What would be really helpful is to find a tutorial that discusses how to fake a lathe on a mill...anybody have a source? As I say a lathe is not in my immediate future. Even if I had the $ I do not have the space right now!

Rotary tables can also be equipped with a chuck for workpiece clamping fixtures. These are attached to the set-up table with a flange. Three-jaw chucks are ideal for round or regularly shaped three- and six-sided workpieces. The workpiece is always held centered, because the jaws are operated by a scroll chuck.Centered clamping

I have a 5" 4 jaw that I use on the 9x20. I also have a nice Phase II 6" rotary table. I was going to buy another 6" 4 jaw for the rotary table and just drill it between the jaws and run socket head screws through it to T-nuts. I may still do that, just because the plain back 4 jaw 6" chucks are cheap.
Then I thought, why not just use the 5". I haven"t done it yet, but the idea I had was to use a 6" chuck adapter threaded for the 9x20 (have it already) and turn the register to catch the back of the 5" chuck - basically, make a regular lathe chuck mount. With the check mounted and checked out, turn the diameter of the adapter to match the rotary table as required. Then remove the chuck, mount the adapter on a faceplate backwards and face off the back of the plate to make it flat all the way across. Alternately, I could just mill the threaded mounting boss off the back side. Take what"s now a chuck mounting "puck" and punch 4 holes in the outer diameter clear of where the chuck mounts to catch some t-nuts on the rotary. Mount chuck to puck, puck to table and done. If the chuck is needed on the lathe, it"s just put back on its old 5" adapter and mounted on the lathe. One chuck doing double duty. More engineering, but hey - I need practice.

How did you establish concentricity between the center line of the chuck and the CL of the rotary table? With a typical 3 jaw chuck (scroll type) it would seem easy to get things eccentric and, unlike with an independent jaw chuck, there would be no way to dial it out with the chuck jaws. I guess if the MT and the 1 1/2-8 were made as one part honoring the locating diameter on the back of the chuck and then that part was assembled to the adaptor the eccentricity would be reduced, but you would still be faced with getting the adaptor to touch down on the RT exactly when the MT mated up with its bore and the chuck nestled up on the other side of the adaptor. That sounds dicey to me. Anyhow, I"m sure it"s far simpler than it seems in my mind and I"d be real interested to understand it better since setting up rotary tables is one of my least-favorite things. Just seems to take forever.

Remove the 4 cap screws around the outside. Slide the special T-slot nuts into the T-slots on the rotary table. Set the chuck and adapter over the T-slot nuts and reinsert the cap screws. The adapter is registered by the boss that extends from the bottom of the adapter. Tighten the 4 cap screws evenly.

You are right about getting the morse taper correct! that has been in my thoughts about this set up! I have thought about it for a while and I think would want to make this as short as I could, also I am not real concerned about getting the morse taper fit really tight just a good snug fit, and have a flange like you do and just drill about 3 holes in that flange for some allen flat heads and drill and tap the rotary table so it can be bolted down and no chance of moving! so basically the tapered hole in the rotary table would be to line up the adapter not really do any holding the flange and the flat head allens would be bolted down to the table! best set up would be just so the tapered shaft morse #2 would fit so the flange could pull it into the taper flush with the rotary table top! would take a bit of fitting to get it just right but can be done! to me that would be the ideal way to get it made, if the morse taper was not so hard to turn you could machine it until it fit just right but it would have to be indiacted in to run true and they are a pain in the @#%[email protected]#% to make with the right angle on the compound! for this set up it would be better if the hole in the rorary table was not tapered it would make the whole job an easy one! but if the table is needed for vertical work the tapered hole is handy!

Is there any relatively easy way I can fit a 3-jaw chuck concentrically to a rotary table when the chuck only has mounting holes from the rear. Or do I have to go out and buy one with mounting holes from the front?
If your chuck has a Myford backplate you can buy an adaptor which fits your rotary table and has a Myford threaded nose to accept the chuck. Alternatively you can do what I have done and make an adaptor which fits the MT in the table and has a threaded nose to suit whatever is on the chuck backplate. If you do this you must use a drawbar to secure the adaptor in the table taper - it is a very short taper.
I have got a three-slot table so could make a backplate to fit the table, mounting with T nuts and bolts and bolting the chuck to this backplate first.
To make it more versatile (because I want to use other tooling as well) I am making an arbour threaded with the spindle nose uppermost and an MT taper to fit the table (mine"s MT2) so that I can screw any of my chucks to the arbour.
If its not a threaded chuck then turn a circular plate about 25mm larger dia than the chuck, counterbore or countersink for the chuck mounting screws and then mill 3 or 4 slots into the edge depending on the number of slots in your table and use these with tee nuts, studs etc to hold it to your table just like the Chronos ones
I have a 3/8 thick 5" dia. "sub plate" that has a short male register turned on one side to locate in the RT and a female register on the top side that accepts a plug to register the chuck concentrically. The chuck was drilled for 6mm capheads that hold it to the sub plate (from beneath), the sub plate is then held to RT with 6mm capheads into tee nuts in the RT slots
I should add that the 3 jaw is the Myford type with internal thread and register which makes the above relatively straight forward. This will of course be more of a problem if the chuck has a conventional backplate.
In the near future I"m intending to make a low profile indexing table and intend to drill right through the chuck for the hold down bolts. This will eliminate the sub plate.
I made a threaded nose with a 100mm dia flange with slots to take bolts that go into T nuts in my 6" rotary table, I,v tryed to keep things as low as possible, but with 8" chucks I have minimal room with the jacobs chuck in the mill, so I find use for short drills ect.Ian S C
Use this to line your the chuck’s own back plate and your new adaptor and spot through the retaining screws to hold the chuck to the adaptor. Use counter sunk screws.
On my home made table I made a small table the same diameter as the mini-lathe chuck (80mm) with a deep groove all round so you can get at the mounting screws. It means its a bit higher than usual by about 1", but I can also put my 7" faceplate on it.
I suppose you could make a short locating plug, MT one end, and some sort of boss to fit the chuck at the other end. Then hold the chuck down using Tee nuts and long bolts/ clamps on the outside of the chuck. This would give you maximum vertical headroom. Drill/ bore a hole thro the plug in case you need to mount a longer workpiece in the chuck. Bit crude, but it would work !
I go away for a couple of days and there are a myriad of really helpful replies. Thank you so much! I will be able to make a suitable chuck fitting for my RT this weekend.
For what its worth my chuck is a Chinese one with a shallow recess for fitting to a backplate. Unfortunately, no Myford or Boxford here. So I"ll be using the ideas based on the thick plate twixt RT and Chuck.
It is indeed interesting that none of the usual tool suppliers has filled the requirement for an RT with an integral, concentric, low-height chuck over a wide range of sizes....
I have the adaptor from Chronos for the Boxford lathe and mount it to my rotary table Only issue I have is that it often unwinds itself so I need to come up with some idea to fix it when trying to machine a large flywheel as the lathe will not take the size of flywheel. Any body have any ideas?? Newbie Mike
Could make some brake shoe devices to bolt into the rotary table slots and come into firm contact with the body of the chuck. Need one in each slot to ensure force is symmetrical so no tendency for the chuck to be pushed out of true. I"d use softwood shoes on an L shaped bracket with a projection on the base of the L so that tightening the bolt pushes the shoe into contact. Use a scrap of alloy sheet under the projection so it doesn"t mark the table.
Simpler way would be to get one of the long jubilee clips used to hold smoke deflectors on chimneys, central heating pressure vessels (and probably lots of other things) to clamp simple L brackets to the chuck which could similarly be bolder to the table. 3 mm alloy would probably work, bends easily and will take up the chuck diameter when the clip is done up. Maybe two clips for extra security.
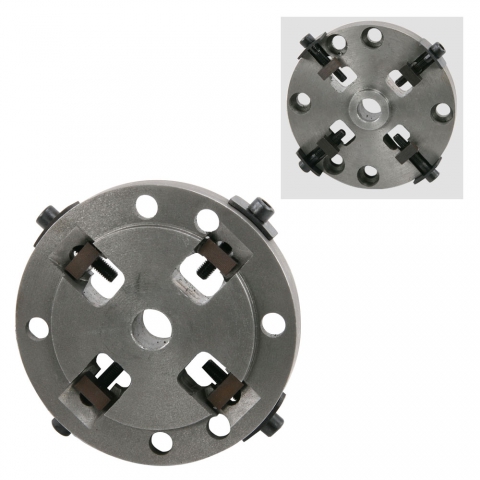
a week or so ago I posted a bit on my rotary table fitted with a chuck. I made a base-plate (photo below, right) between chuck and table- The base plate bolts to the table and is larger in diameter than the table and chuck. I drilled the chuck through so that it bolts onto the base plate from the front of the chuck.
Surrounding the chuck is a larger ring that also bolts to the base plate ( below left) and has four screws through the side that impinge on the chuck. Backing off slightly on the three chuck bolts allows the work piece to be nicely centred using the 4 side screws, and then tighten up the chuck bolts.
Forgive the repeat of the photos of the previous post - I have not managed to work out how to give a link to just a specific section post in the forum...
I have drilled 4 M10 holes in my RT allowing me to bolt down a 4 jaw chuck. They were carefully located to make the chuck body as near concentric as possible. But the way I look at it is that I would never put something round in the 3 jaw in the lathe and expect it to run true - I always try to plan to get all the concentric things turned at one setting. If something has to run true it goes in the 4 jaw on the lathe. So why is it different on a rotary table?
Thought proceess might be best started with the RT purchase - four T-slots, not three. I mistakenly bought a 4 jaw self centering chuck for mine and regretted it. I will change it for an independent four jaw next time I need to remove it. The independent chuck does not even need to be mounted that central - how many rotary tables are spun at high speed!
A baseplate fitted to a three slotted RT, followed by the 4 jaw chuck is better than a self centering chuck. I cringed, every time I have wanted to remove that current chuck, to mount something direct on the RT. It will not be fitted centrally again!

Now you can attach a 1/4″ or 3/8″ drill chuck, an older Unimat chuck with 12 x 1 mm or 14 x 1 mm threads or a 1/2-20 Sears chuck to your Sherline rotary table. The adapter screws into the 3/8-16 threaded center hole of the table.
The chuck adapter has a 15/32 through hole with 3/4-16 thread for the chuck and a 5/8-24 thread for the rotary table. The through hole allows stock to pass through the chuck and P/N 3710 4″ Rotary Table.

It is possible to mount a 100mm chuck to a 110mm table if the chuck is a front mount bolt design. Otherwise, probably not, unless you want to make up a screwed spigot type mount.
Basically you attach the backplate to the RT using CSK screws then attach the chuck to the backplate. You could in theory have a chuck larger than the RT doing it this way.
Making a backplate with register and dialing it in so it"s concentric is an exercise for the builder..... personally I"d use a 4 jaw as then dialing the workpiece in is a lot less hassle. I"ve got both set up for my RT but I use 8" chucks on a 10" RT so there"s enough peripheral space for the clamp bolts. For the 3 jaw I made the holes oversize and tap the chuck to get minimal runout. This is obviously a lot easier if the RT has T slots at 90 deg. Many have them at 120 deg which I regard as a major PITA.
Some time back Stuart made a D1-4 camlock adapter for his RT so that he could attach his lathe chuck to it with relative concentricity. It was a pretty involved project involving machining a 5MT register and the 3 detent cam lock locations.
I concur with PDW, I have a vertex 8" RT and for the life of me I can"t work out why they made it with 3 T slots instead of 4. It"s a major PITA when tapping the workpiece into concentricity.
Looks like the Vertex HV-4 has 120 degree T-Slots so a three jaw chuck shouldn"t be a problem. I"d be looking for a 100mm 3 jaw chuck with three through the body mounting screws that way it should line up with the T-slots and you can plonk it straight on.
I too usually prefer to use a 4 jaw on a rotary table but I don"t think I"ve ever seen a 4 jaw with three mounting holes so you would need to make an adaptor plate or you might get away with using an 80mm chuck. Depending on what you are doing a collet chuck with a MT2 arbour might also be an option.
As a quick and dirty way of centring a 3 jaw, I put the chuck on the table then drop a piece of 22mm stock into the jaws until it bottoms out in the MT3 taper of the table. Tighten the chuck jaws onto the 22mm stock then clamp the chuck onto the table. Loosen the chuck, withdraw the stock and the chuck will be pretty close to centred.
and for the life of me I can"t work out why they made it with 3 T slots instead of 4. It"s a major PITA when tapping the workpiece into concentricity.
There is a school of thought that says it"s easier to bolt down something with three points without bending/twisting. So the correct answer is 12 slots ;)
There is a school of thought that says it"s easier to bolt down something with three points without bending/twisting. So the correct answer is 12 slots ;)
Front mount 3 jaw as others have mentioned. I have seen some drilled front mount 4 jaws - in-fact I have a cheap Chinese 4 jaw lined up for drilling when I find the time. Bison make one (too large for your table) for RT"s as an example - Bison Front Mount Scroll Chuck - 6" Plain Mount (http://www.ajaxtoolsupply.com/bifrmoscch6p1.html). Then get a cheap MT2 test bar. Put the test bar down the MT2 bore, close the chuck jaws and snug down the screws. It"s what I do to get rough chuck alignment on my RT. Obviously not terribly accurate but all depends on what the job is in terms of the effort one goes to.
I see H&F are selling a kit which has the reverse problem, ie a 4 slot table onto a 3 jaw chuck. I"m not sure if this is the same solution already suggested, but a picture is worth 1000 words. You can see how they do it with a plate adapter in the kit.
Unfortunatly no. I believe ARC might do an MT2 mandrel with a 40 mm diameter head. I have bought a couple of MT2 mandrels with a 1" (25.4 mm) head that I can turn to suit a 20 mm cutter. Or get a small one and make a pressed on collar that you can thread to suit.
I see H&F are selling a kit which has the reverse problem, ie a 4 slot table onto a 3 jaw chuck. I"m not sure if this is the same solution already suggested, but a picture is worth 1000 words. You can see how they do it with a plate adapter in the kit.
That looks like a Vertex HV6, which is the one that I have minus the chuck and adaptor plate. I"ve found mine to be very good. I do confess that I completly disasembled mine and cleaned, deburred and lubricated it before using it. As received it was dry and coated in that horrible waxy grease. I"ve just noticed in that picture that they have included an MT2 stub, I don"t see a securing screw for it though.
I"ve been looking at these recently too, and they all begin to look the same. That picture was of a toolmaster kit - I think the HV6 on the H&F site has the three slots. My guess is that the stub is just for centering the adapter plate onto the table, in that kit above.
Not really Bob, I have a secondary mounting plate (nothing flash) but haven"t as yet done anything about the handle extension idea, it is on the "to do" list.:wink:

In reality Wm, you are stuck with mounting a 3 jaw chuck. I prefer the 4 jaw self centering and because I own an old Vertex 6" with four slots, it was dead easy.
A 100mm chuck will be just fine, but you will most probably have to make yourself 3 T-nuts to match the slots in the table and to fit the screws that usually come with the chuck. Once you have all the bits, it is only a 30 minute job to put it all together.
First off, centre up the RT to the spindle using the MT hole in the middle using a dial gauge. Once done, lock up your table in the X&Y then recheck to make sure it hasn"t moved.
Put a precision mandrel in the chuck (I use the shank of a milling cutter), and turn the rotation wheel of the RT and using your dial gauge, see how much runout you have when measuring the mandrel. Gently tap the chuck until you get no movement on the clock when doing a full rotation. When you find the sweet spot, gently tighten the chuck holding bolts until tight. Recheck with you gauge to make sure nothing has moved, if it has, redo the tapping bit.


 8613371530291