
ge xl44 oven safety valve reset pricelist

GE gas range oven safety valve for round ignitors. 3.3 - 4.0 volts. 2.5 - 3.0 amps. Valve has male wire terminals. Reference number 164D2574G001 and 30100-17. ... More Info
GE gas range oven safety valve. This is a dual valve. 1/4" male terminals on top. 3/16" male terminals on bottom. Reference numbers 223C3389G001 and Y30148-14. ... More Info

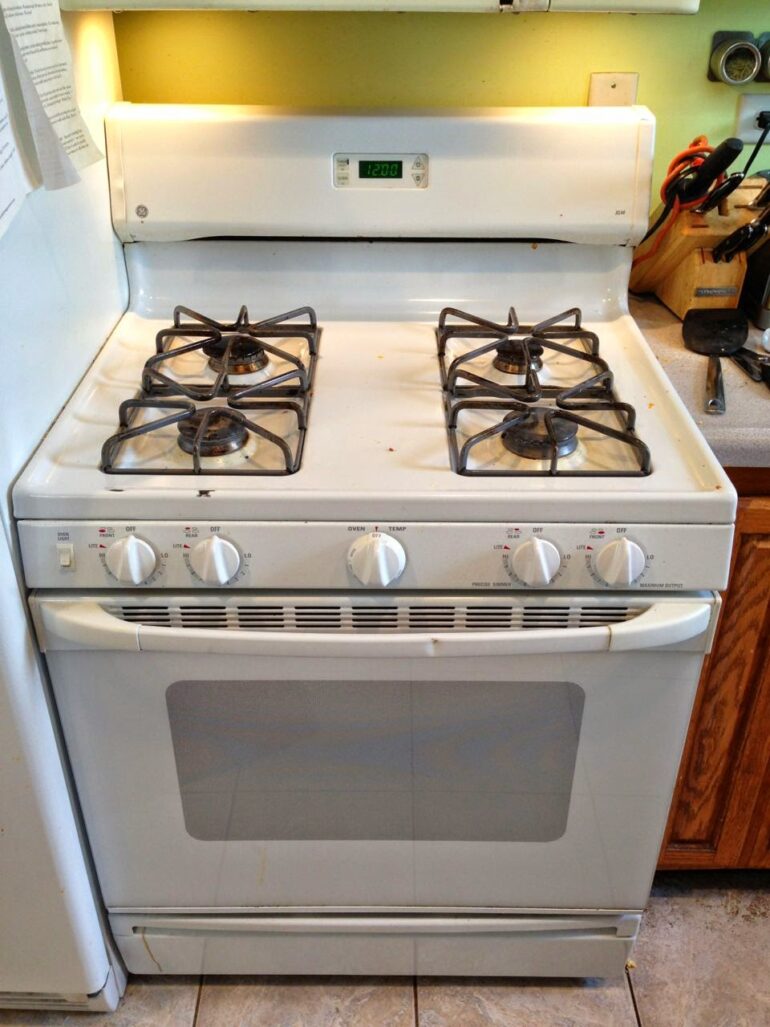
NOTE: Read on before you do this step. If you need a torx set get one here on amazon.com. When the GE tech came to trouble-shoot the oven (and tell me they weren’t going to cover the repair) I asked him to give me a quick overview of how to do the repair and he specifically said I was supposed to remove the screws from each burner. He also said to be very careful not to cross-thread them or break them off because he said that happens sometimes. I removed the three screws from each burner but the spark igniter for each burner stays attached and holds the burner to the top so removing the screws didn’t do any good.
When I did this repair I actually did step 6 first but I would suggest doing this step first. I honestly didn’t have a clue the way a repair man would get the stove top released from the spring latches that are on either side but I used a screw driver and tried to carefully pry up. I now would suggest taking a butter knife and inserting it in the crack between the oven top and the control panel and compress the spring clips straight in as you pry up the top. I think this would have made it easier for me. Be Careful: You don’t want to lift the stove top too high because all the piping for the burners is connected to the top of the stove. Release each side and just let it be for now.
Lift the stove top up until the curved wire guides (see red arrows on each side in the image above) come all they way out and then place them out of the hole somewhere so that the stove top stays up.
As you can see from the image below I removed these before step 6 but I suggest doing them last because it is easier to pry the top up when the cover is on there tight than the way I did it. There are 4 phillips-head screws on the front side, circled in red in the picture below. If you need a good screwdriver set get one here.
This is where I made sparks fly because I had not unplugged my oven. Don’t make the same mistake. The wiring connector welded itself to the body of the old thermostat when I shorted it out! There is a wire with the same type of connector as the oven light switch on each side:
When I got to the point where I took the picture above I took my finger and spread out the insulation so I could better get at the hole in the top of the oven for when I remove the wire and replace it with the new one.
Do not simply stretch out the new thermostat wire because you will twist it and it will not straighten out. Gently unroll it and straighten the wire. Be careful not to kink the wire or make any sharp bends in it.
This was a little tricky since I wasn’t able to take off the top of the range but it still can be done. You don’t want to bend the thermal couple on the end of the thermostat wire too much. I ran the wire out the back of the oven through the rectangular slot that is closest to the hole in the top of the oven and then down through that hole as follows:
You’ll need to install the mounting clips, properly spaced on the wire and then squeeze them to install on the two slots cut into the back of the oven.
Since it’s time to start putting the oven back together I would suggest cleaning everything as you go. While you have it off you might as well clean it and given ours was something like 10 years old it needed it:
The oven light switch popped out when I was putting things back together. One thing to note when reinstalling the switch is that there are two notches on one side of the opening that match the little posts that stick out of the left side of the switch as seen here:
Although it didn’t help me at all I had removed the three torx screws from each burner (out of suggestion from the GE tech who came to my house). Now is the time to reinstall them so you can reach underneath the range top to line up the screws with the holes. The GE tech I talked to warned me that it was easy to cross-thread them. He also said that you could get by with only 2 screws on a burner if you messed one up. I didn’t have a problem getting them all back in fine.
I think I know why the range top locks down using these spring clips–because when you lift it up, it bends the burner piping slightly and it wants to spring up and the clips hold it down. From the way the piping zig-zags (giving it room to flex) it looks like it was designed to do this. I’m sure once we’ve used the burners some they will relax and not push up on the range top anymore.
Thankfully everything worked great when I got it all put back together and hopefully it does for you as well. Let me know if you have anything to add to this tutorial in the comments section below. Also, if you have any questions please post them as well and I’d be glad to respond.
If you did accidentally leave your oven on for a weekend (and your house didn’t burn down) you very likely will need to replace the igniter, because it is not meant to be left on for that long. See my post, How to Replace the Igniter on a GE XL44 Oven to see how to do that–it’s easy (a lot easier than this repair).
This website is using a security service to protect itself from online attacks. The action you just performed triggered the security solution. There are several actions that could trigger this block including submitting a certain word or phrase, a SQL command or malformed data.
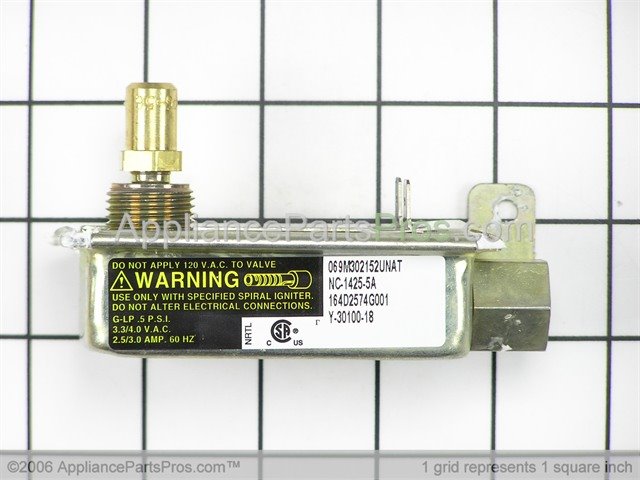
Trouble turning on your gas stove? If your igniter is glowing but there is no flame, then one of two components in your range are at fault. These components are the “safety valve” and the igniter itself.
Take a clamp-on type ammeter, and attach it to the circuit to determine whether the igniter is working efficiently enough to open the safety valve. Clamp your meter onto the wire that either goes to the bake burner igniter or the bake burner safety valve. Turn on the bake function, and see what current is drawn. Typically your meter will show 2.8 – 3.0 amps for a normal current draw for a working igniter. If your meter is showing 2.7 or lower then you can assume that the igniter is not drawing enough current to actually ignite the flame, and therefore it won’t open the oven safety valve to allow the gas to enter the burner chamber. If this happens, it’s time to replace the oven burner igniter.
To test the oven safety valve, measure between the two terminals, on the valve and look for continuity. The resistance here is low, but you should be able to detect 1 to 1.5 ohms. If your model uses a dual valve, one for the broil burner and one for the bake burner, then you will have two bi-metals and again you can test them for continuity using a multimeter. They also should be very low resistance and those would indicate that they"re normal working oven safety valves.
If after performing these tests, you"ve determined that you need to replace your gas range"s oven safety valves, oven igniter, burn igniter, or safety valves? Take a look at our large selection of oven parts.


 8613371530291