
gas oven safety valve leaking in stock
I found myself this morning with the (very literal) headache of a gas leak. Smell led me to the oven of my old stove. I removed the main pipe from the oven valve, applied soap to the valve exit, and it bubbles slowly alright. I don"t ever use the oven, so I don"t care for replacing the valve. So...
2. The pilot exit from the valve lets out a lot of gas, is that normal? I know it has a safety valve on the igniter, and it seems to be working (no bubbles on the pilot), but shouldn"t the main valve close both pipes?

Their are several different gas safety valves. On ovens with ignitors, if the ignitor is weak then the oven will not light off, but what if the igniter is new and the oven will not come on?
NOTE:Never put 120 volts to the safety valve in an attempt to make it come on. All you will do is kill that valve"s bi-metal. It has to be hooked in line with the igniter to work properly. Why? The ignitor takes up most of the power. The power goes through the safety valve as 120 volts but because the amperage is all being hogged by the ignitor, the gas valve opens up and allows gas to flow out into the burner and ignite. Unless it is leaking most of the time the gas safety valve is NOT the problem.
On ovens with pilot lights or standing pilots most of the time it IS the safety valve because the little thermocouple that mounts on the pilot goes bad and won"t open the safety valve.
Some ovens offer a seperate safety feature called a flame switch. What it amounts to is the thermocouple mounted on the pilot light goes to the flame switch which will have continuity as long as it is heated by the pilot light.
NOTE: If you do have to replace the gas valve remember this: It will not come preset. You will have to adjust the flame height with a wrench. It is a good idea to set the 2 valves side by side, adjust the orifice height on the new valve to the same height as the old one and then you need only to tweak it a tad. If the flame is too low it will take 2 hours to bake a pie shell. too high and the bottom will be cooked before the rest. It is best to adjust the flame to about half way up the flame spreader.

Gas ovens contain a number of valves depending on their age and design: pilot safety valves, oven safety valves and thermostatically controlled valves. Any of these valves contain gaskets that may leak with age as well as develop leaks where they connect to the oven’s system of gas pipes or tubing. Older ovens that use the oven’s control knob to control gas flow are prone to develop leaks because of the constant use this control receives.
Thank you for your inquiry. The oven safety valve is one part that may fix the issue, but there are some other parts that you will need to check to see which one is causing the issue. You will need to check the igniter, the electronic control board and the temperature sensor. I hope this helps. Thank you and have a great day!
Can this oven valve work on my range? The range was plugged into the wrong outlet and it shorted out, the igniter glows when the stove is turned on however the burner isn"t lighting. I was told the the valve needs to be replaced.
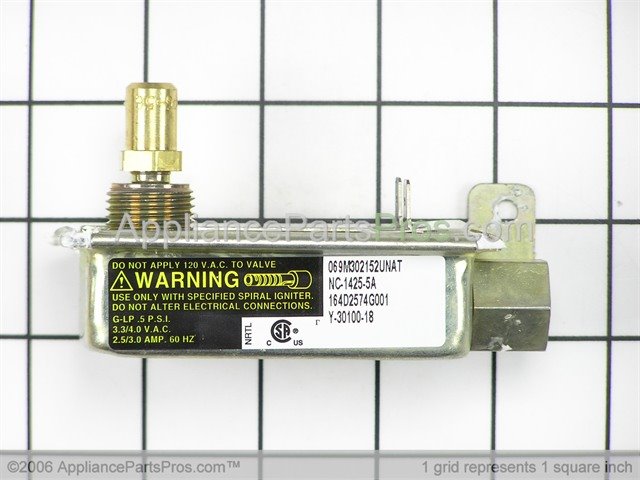
Thank you for your question. This is not the correct safety valve for your appliance. I have listed the correct valve below for you. I hope that helps. Good luck with your repair.
Oven doesn"t heat. Igniter glows when gas is turned on, voltage on value starts near zero and slowly ramps up to just under 3 volts, but gas never ignites. The slow ramp seems normal to allow igniter to get hot, but not sure what the valve"s voltage should be to have it open. Valve coil is not open per ohm meter. Sounds like a bad valve? Thanks.
Hello Curt, Thank you for your inquiry. It sounds like it could be either this part or the pressure regulator. When the ignitor heats up to a certain temperature, it is supposed to trigger the valve to open and let the gas in to ignite and the regulator cuts it off at a certain pressure. Hope this helps!
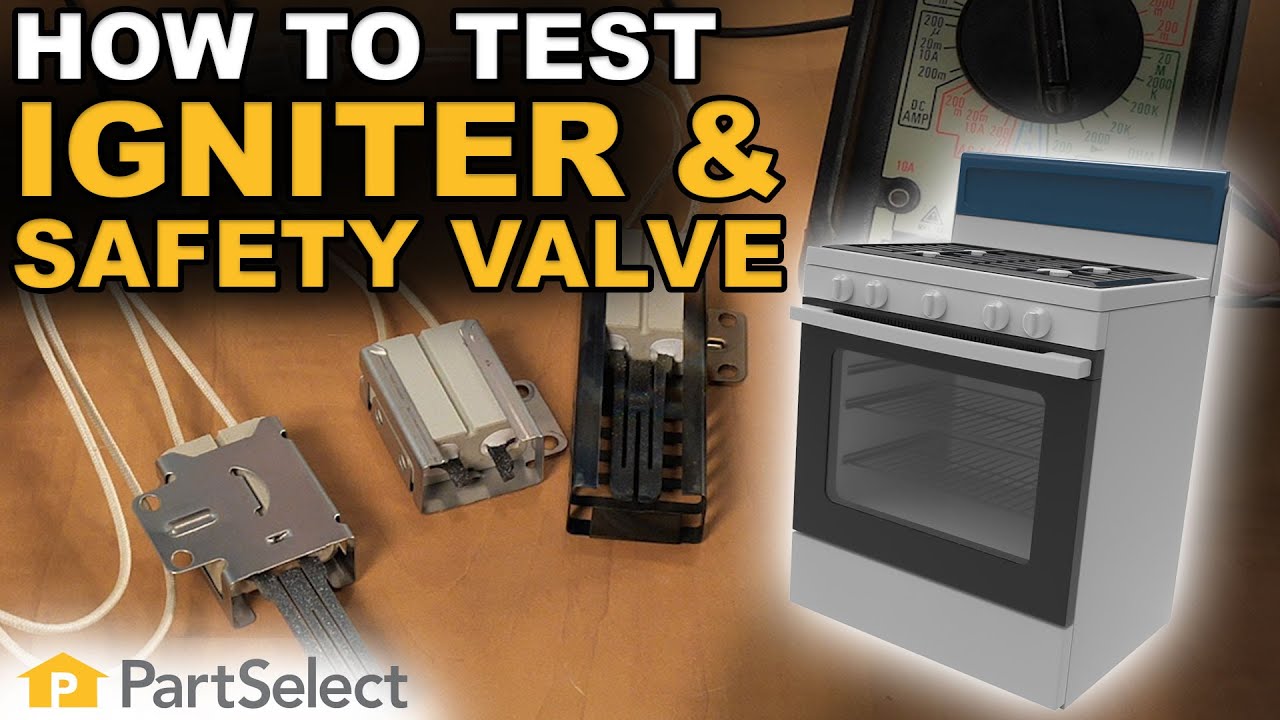
Hello Sal, thank you for your question. You can test the gas valve to see if it has gone bad. You will need to test this with a multimeter. Here is a video that will show you how to test that valve.
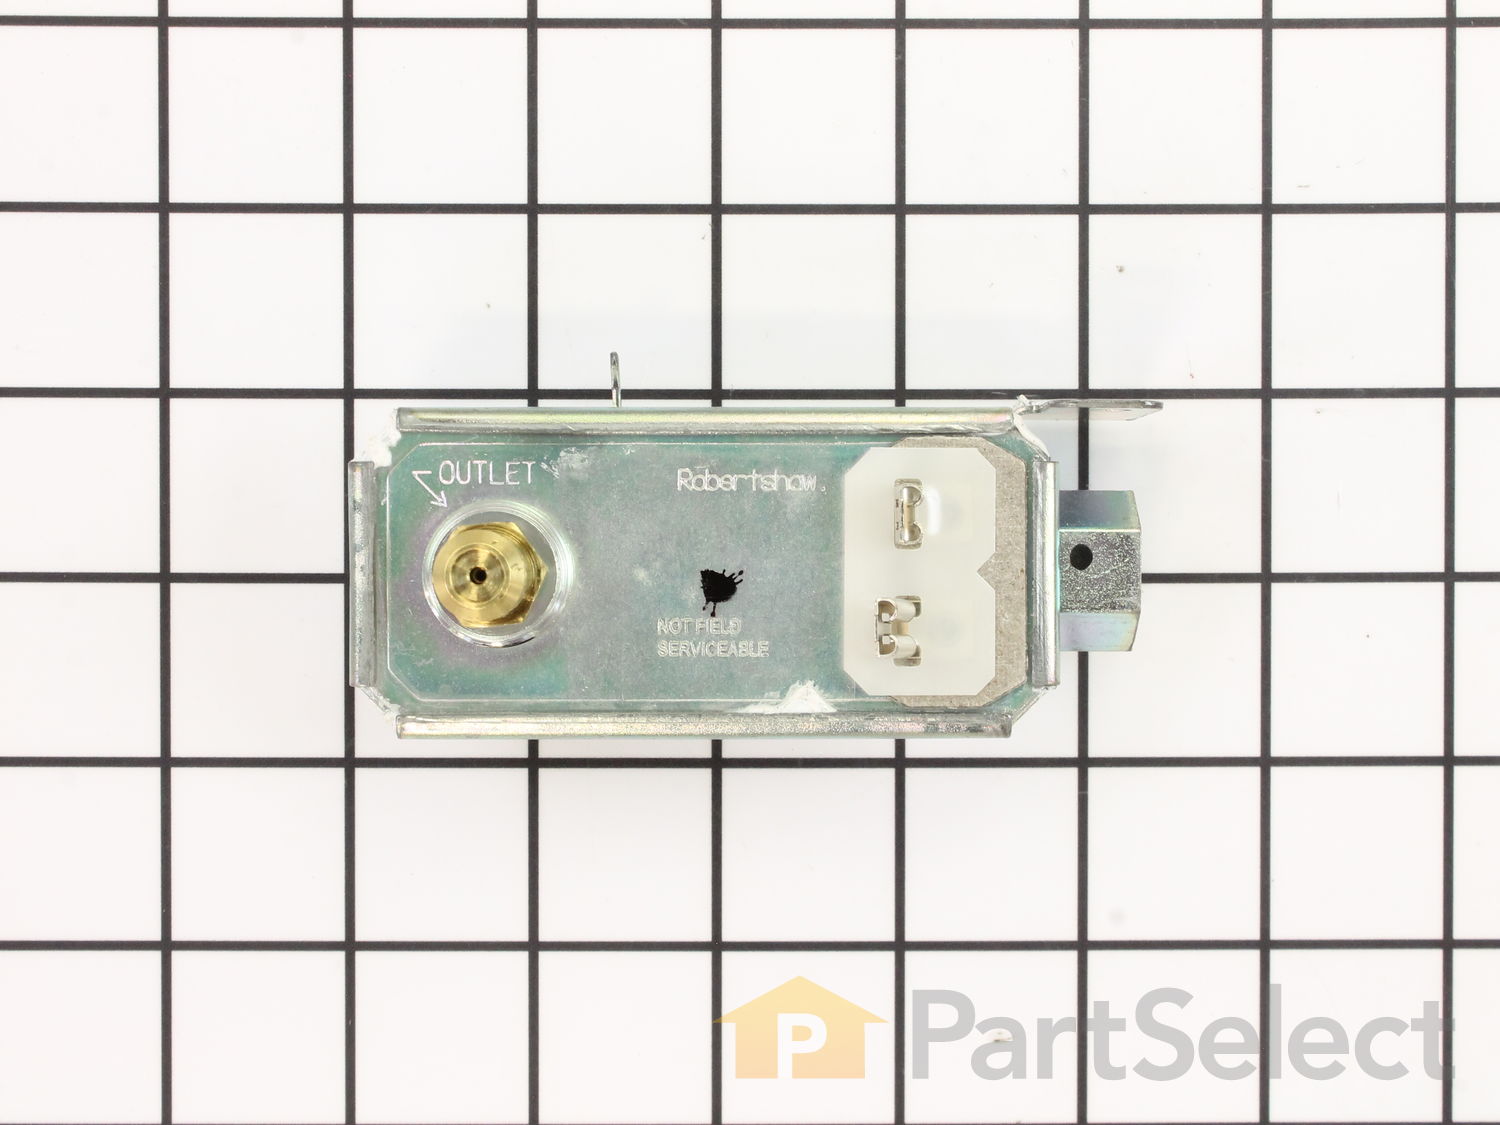
Hello Steve, thank you for your question. The oven safety valve part number WB19K31 will work with either NAT or LP gas. The part itself can be switched over without any additional parts. Please check your owners manual on steps to change that over. I hope this helps!
In the oven a wire from the igniter shorted (had to pry the wire off the wall) to the frame. Would the control valve or the thermostat also be damaged. Where is the thermostat located on the stove. I noticed that the plastic on one of the knife connection on the control valve was missing
Hello Robert, thank you for writing. It is doubtful that the Oven Safety Valve or Oven Thermostat were also damaged when this occurred. The Oven Thermostat (part PS235170 on your model) is located behind the Manifold Panel (control panel). We hope this helps.
Hi there, i have a GE gas range (model jgbp28sem1ss) and need to replace the safety valve for the part of the oven that bakes. Is this the correct part? Thanks

The functional standard conforms in all aspects to CSA, Delta C, CE, Gas Mark and JIA for international high quality standard, which complies with low pressure 1/2PSI gas appliances.
100% in-house quality assurance inspection with all gas valve for leakage testing procedures in strict conformance to safety regulations requirements for high precision and reliability.
Pressure cookers have become commonplace in modern households, and their improved safety features have made them twice as popular. In the past, pressure cookers earned a dark reputation for explosions, but today, most pressure cookers have a minimum of 10 or more safety features.
That said, when the pressure cooker safety pressure valve starts leaking, you should know the cause because pressure cookers must release steam to stay safe.
You find many pressure cooker safety valves on top of the lid near the handle, but this depends on the type. If you see a leak from here while pressure cooking, that doesn’t always mean danger.
The safety valve releases the steam to lower the pressure to safer levels and regulate the pressure. The newer models, like the electric pressure cooker, even release the steam using a computer chip. A pressure cooker model like this will release light vapors or condensation from the safety valve, which doesn’t pose a danger.
Important to note: The safety valve leaking doesn’t pose a danger as long as the pressure cooker continues to build to the desired PSI. Once you reach your desired PSI, the safety valve should stop leaking altogether. If it continues to leak, that indicates pressure control failure.
Pressure cookers will open the safety valves enough to release the pressure cooker steam building in the pot. This causes a hissing sound or rattling sound. Don’t feel intimidated that is normal. If you wanted a quieter pressure cooker, electric pressure cookers don’t make as much noise.
You must maintain consistent pressure to ensure that the pressure cooker will cook the food all the way through. Safety valves can be bought and replaced if you have a broken one. However, buy a quality safety valve from any of the reputable brands to ensure the quality.
Manufacturers made safety valves to protect consumers from exploding pressure cookers. If you have a defective safety valve that doesn’t leak, you could use it. You could use it, but you wouldn’t be wise to do it. Don’t do this.
Safety valves let out the dangerous excessive steam. When they leak, they let out steam unnecessarily, and the pressure cooker won’t cook the food. On the other hand, when defective and closed, you have a higher risk of it exploding. Never use a pressure cooker that has either a leaking valve or a defective valve.
You don’t want to see steam exiting the safety valve because the leaking from high pressure can put you in a dangerous situation. The escaping steam can cause second and third-degree burns if exposed to the skin. If you notice a leak, immediately turn off your pressure cooker from the heat source and release the steam. Even smaller leaks pose a danger.
Steam exits from the safety valve of your pressure cooker because of a broken disc, or rubber gasket, on the inside. Because of this, it releases too much steam and the vessel never boils. If you have damage to the valve, you will see a hole in the valve.
Warning: Working on the safety valve yourself does pose a small level of danger. Do this at your own risk. If you don’t want the risk, then take it to an authorized service center. A utensil repair professional can also repair this, but it depends on how much damage was done to the pressure cooker.
As we said, you can use two methods to replace the safety valve if you have a leak: You can replace it from the inside of the lid, or you can replace it from the outside of the lid. Before attempting either consult your user manual.
To replace the safety valve from the outside, you will use a screwdriver on the outside to turn the screw, while you hold the screw and keep it from twisting on the inside. Once it releases, use a cotton swab to clean the inside of the hole.
Check for surface damage as well to make sure that you don’t have structural problems. Examine the o-ring as well to make sure that it doesn’t have defects. Replace the safety valve with the new one and tighten it up.
From the inside, you will use a wrench to unscrew the safety, while the screwdriver will hold the screw in place. Once you have released it, do the same thing as you did with the first method. Replace the safety valve and tighten it back up.
While you can replace them via the DIY method, don’t try to fix a broken safety valve. The replacement parts only cost between $2 to $17 to replace a safety valve. Buy from a genuine brand because it guarantees that you fix the problem.
Considering the cheap cost, you may want to buy a spare because you can replace it at a moment’s notice. When the pressure reaches a dangerous level, the safety valve acts as the canary in the coal mine. This blows out before it explodes. The safety valve attempts to bring the pressure back down to a normal level.
Never use a damaged valve because it doesn’t provide the same level of protection. You may experience similar problems as before like the valve leaking, or the valve shutting down altogether. Both scenarios put you in a dangerous situation.
The safety valve leaking poses a danger at the first sign of damage. With that in mind, a leak only gives you one example of what can happen to them. You should replace the safety valve whenever it becomes cracked or brittle. As soon as you see the damage, replace it.
Inspect the safety valve for signs of wear before each use. Another reason that manufacturers say to only fill the pressure cooker two-thirds full is that it ensures that the food doesn’t block the safety valve. The pressure cooker will build a dangerous level of pressure if that happens.
Let’s say that the food blocked the pressure release valve. The safety valve may melt to release the steam. That becomes the last stop before the pressure cooker explodes. The valve helps to maintain the pressure levels. While you have other safety features, this component especially protects you.
Thorough cleaning after using your pressure cooker will go a long way to helping it stay in tip-top condition. Handwash the pressure cooker lid with soap and warm water. Never put a pressure cooker in the dishwasher because this can be hard on the more sensitive components like the gaskets and rubber ring or seal.
A leaking safety valve doesn’t always mean danger, but look for the cause if it continues after you reach the desired PSI. Some steam leaking is normal, but you shouldn’t see an excessive amount of it leaking. That indicates that your pressure cooker has too much pressure.
Never try to repair a damaged safety valve. You can simply replace them, but if you don’t feel comfortable doing it yourself, hire a professional. Always pay attention to leaks because they can stop your pressure cooker from building pressure.

Propane safety is the utmost importance when it comes to propane gas leaks. If you suspect a gas leak in your home or business, stop what you’re doing, leave the area immediately, and call your propane supplier from a safe location immediately to report the leak.
Propane manufacturers add a distinctive skunk or rotten egg smell to propane so you are able to detect right away if there is a leak. Follow our steps below to keep you and your family safe in the event of a propane leak. For information on how to prevent a propane gas tank leak from happening in the first place, we recommend calling a residential propane supply company near you.
The easiest way to detect propane gas leaks is if you smell the bad odor added by the manufacturer. However, people on certain medications or the elderly may not be able to smell propane as well as others. While it’s rare, it may also be possible that the smell added by the manufacturer has dissipated due to rust inside the tank.
Checking for a propane tank leak is easy. Apply soapy water or a special leak detector solution to where the propane tank’s cylinder valve and regulator outlet connect. Next, you’ll need to slowly open the cylinder valve. Bubbles will form if there is a leak.
With any gas leak, there is always the concern that the slightest ignition could start a fire or explosion. Once a gas leak has been confirmed, you’ll need to put out any open flames. Do NOT turn on light switches, household appliances, or even use your phone. The slightest spark could cause an explosion.
If you are able to, turn the main gas supply valve clockwise to prevent more propane gas from leaking into your home. After, immediately move to a safe location and call your propane supplier.
If you are able, open as many windows as possible as you exit the house. This will help some of the built-up gas escape from your house, reducing risk of fire or explosions. Do not stop to pack any possessions. Inhaling propane gas can make breathing difficult or impossible.
Once you have evacuated the house, do not return until your local fire department has stopped the leak and deemed your home safe to re-enter. Do not be tempted to go back inside the home to get belongings. Breathing in propane gas can be deadly.
Before using any of our propane household appliances, you’ll need to schedule a propane tank inspection to ensure the leak is stopped and fixed so it won’t happen again. To prevent leaks from happening in the first place, we recommend scheduling routine propane gas tank inspections so you and your family can stay safe.
Propane tanks shouldn’t leak over time. Believe it or not, running out of gas in your propane tank can be dangerous. If the propane appliance valve or gas line of a propane tank remains open after the propane supply runs out, a leak may occur when the tank is refilled.
We advise you to leave turning on your propane tank to your propane supply company. While it’s as simple as turning a valve, there can be some significant complications with leaks from the tank to your house.
If your propane tank is leaking at the valve, call your local propane company and tell them that you have discovered a leak in your propane tank. It’s crucial that you don’t try to repair the tank any further yourself and let a professional determine a time to come to your home to do a system check or pick up the tank.
Crystal Flash is a residential propane gas supplier in Michigan that offers propane tank installation and inspection services to keep homeowners safe from gas leaks. For more information on how we protect our customers from gas leaks through propane tank maintenance services, be sure to call any of our Michigan Propane Delivery locations.

Gas leaks are a serious matter. Gas line repairs should only be done by a licensed and certified plumber. If your home uses gas, it is always in your best interest to receive regular gas line inspections.
You may have a gas leak in your home or beneath your lawn and not be aware of it until it’s too late. Gas companies are aware of thousands of leaks that go un-repaired because they present no immediate problem.
Gas distribution lines are part of America’s aging infrastructure. Decades-old copper and, in some places cast-iron, gas lines deteriorate from the corrosive effects of the gas, plus water and minerals in the soil. Gas escapes and collects in underground voids or eventually makes its way to the surface.
Government agencies and gas companies grade gas leaks in terms of severity and threat as Grade 1, Grade 2 or Grade 3. Definitions are similar from state to state. The agency that regulates natural gas in Texas, the Texas Railroad Commission, defines them as:
Grade 3 – A leak that is non-hazardous at the time of detection and can reasonably be expected to remain non-hazardous. These are reevaluated within 15 months or at the next scheduled survey, if sooner, until the leak is regraded or no longer results in a gas reading.
If you smell gas outside and away from your home a distance of 15 feet or more, notify the gas company. To get a better idea of the location start sniffing to see where the smell is strongest. Good visual cues are dead or dying plantings or a circular brown patch in your lawn.
Look for areas of heavy insect activity. Some insects are attracted to the smell of the Mercaptan odorant added to help detect the naturally odorless gas. Listen for a hissing sound, which could indicate a gas leak.
Do not dig or attempt to repair a suspected leak. That’s a job for either the gas company or a licensed plumber, depending on the location of the leak and the location of your gas meter (see details below under “Gas riser” and “Gas pressure regulator”).
You or someone in your family may develop physical symptoms that may have resulted from exposure to natural gas. These include nausea, headaches, fatigue, difficulty breathing, dizziness, and drowsiness. These might indicate a gas leak near or inside your home.
Gas may leak out anywhere in the distribution system, especially around valves and fittings. Some areas have proven more problematic than others. Here are the ones we see most often:
1. Gas riser – The gas riser is the pipe that emerges from the ground to connect the gas supply to your gas meter. Since the early 2000s gas risers have been made from non-corrodible plastic materials. Prior to that most were metal, as seen in this example from a home built in the mid-1990s.
Over time, metal in the ground corrodes and develops thin spots that can develop holes where gas leaks out. In most cases, the gas company is responsible for maintaining the meter and all the gas pipe coming from the street to the meter.
Homeowners are responsible for the gas system that runs from the meters into and throughout their homes. Gas meters usually are located at the rear or on the side of a single-family home, within inches of the outer wall. In multi-family housing gas meters may be inside.
2.Gas pressure regulator– Leaks also develop in and around gas pressure regulators (the disc-like object on the left side of the image shown). Leaks develop at joints of all types due to people or tools bumping the pipes, or perhaps faulty installation. Sometimes a diaphragm in the pressure regulator can leak because it is defective or foreign matter may have gotten in the gas line to foul it. That said, it is not unusual to smell gas around the regulator because it will vent gas at times to regulate the pressure.
Try a bubble test. Mix three tablespoons of dishwashing detergent in a quart of water and spray the mixture around the joints. If you see bubbles, it becomes a job for a licensed plumber or the gas company. If the leak is on the house side of the meter or the side where the gas supply enters the meter, it is your responsibility as the homeowner. If between the meter and the street, it is a job for the gas company.
Swimming pool heaters may have gas pressure regulators, too. In most cases, homeowners are responsible for maintenance and repairs to them, as the gas travels through the gas meter for the property before it gets to the pool heater.
3. Fireplace valve – The valves that control gas flow to gas fireplaces frequently develop leaks. Valves, like any mechanical device, can wear out with use. The difficulty of repair usually depends on where the fireplace gas valve is located. If it’s in the floor of a home with a basement or crawl space it can be reached easily.
4.Pilot Lights– Gas appliances require a way to ignite the gas to produce a flame when you want to cook, heat your home or get hot water. Newer standing pilot lights have a thermocouple safety device that will shut off the gas supply to the pilot light if the flame goes out.
Some older gas appliances do not have this safety feature: if the pilot light gets blown out the gas can build up in the room and pose the danger of explosion from the smallest spark.
Pilot lights have mostly been replaced by electronic igniters that shoot a spark directly into the gas at the burner or directs the gas over a glow rod that ignites it. This system is more efficient because gas flows only when someone turns it on. There is no pilot light to go out and cause a possibly dangerous situation.
5. Joints and fittings – Any joint in a gas line not sufficiently tightened or sealed can develop a gas leak. Gas furnaces, ovens, range tops, driers water heaters, and other gas appliances usually are connected wit
Plumbers wrap thread seal tape on the threads on the male connector. When tightened, the tape is squeezed to fill in any gaps. If the tape was not properly applied or was not applied at installation, a gas leak is a near certainty.
As with any suspected gas leak, this is not a DIY job. Get a licensed plumber. The best way to be sure you don’t have a gas leak is to a plumber to an annual inspection of your home’s gas system.
If you smell natural gas or have any reason to think you may have a gas leak in or around your home start investigating immediately. If the smell is strong, leave the area immediately. If the gas smell is faint, you may wish to try to locate the source by smell and a bubble test. Do not attempt a repair.

Fortunately, by understanding how relief valves work, you can solve whatever problem you’re having with the one on your water heater. In this article, we’ll review everything you should know about this valve.
A water heater pressure relief valve, also referred to as a T&P valve, pressure relief valve, or water heater temperature valve is a safety feature that you can find on any water heater. The reason it’s there is to keep you safe in case the water pressure is too high.
Without this safety feature, your water heater could end up breaking. You could potentially end up with burns if the high water pressure is dangerously high.
This valve also ensures that there aren’t any leaks in your water heater, which would lead to low water pressure when you want to use it to wash the dishes or take a shower.
The water heater pressure relief valve is in place so that it can relieve excess pressure and temperature in a water heater if either of these is too high. Because this everyday appliance is a closed system, thermal expansion occurs in water heaters.
Here’s how it works. Whether your water heater is heated by electric elements or a gas burner, both the metal tank and the water inside expand when the hot water temperature is somewhere between 120 and 140 degrees.
If your water heater pressure relief valve is working, this is when it will open. This releases steam and hot water from the discharge tube, making your water heater operate safely again.
On the micro-level, the functioning of this valve works like this. The relief valve itself has been set up by a professional or pre-designed to open when the temperature or pressure reaches a dangerous level.
This specific state that the water heater is in is called the “blowdown.” Usually, the “blowdown” is defined by professionals (and is used in the design or set up of the valve) as a specific pressure percentage.
The “blowdown” is usually somewhere between 2 and 20%. Once the pressure has reached the “blowdown” amount, the pressure relief valve will close again so that you can use the water heater as intended.
If you’ve been noticing any issues with your water heater pressure relief valve, then you need to know where it is on your water heater. Usually, you can find it on the top or side of this appliance. It’s a valve that’s connected to a plastic or metal discharge tube that points up.
This is for safety reasons. Everything has been done according to standards that have been mandated by plumbing codes. So if you’re having any issues with the valve, you’ll have to call a professional to have it fixed.
If you suspect there’s a problem with your water heater pressure relief valve, you can do a test. This is actually good idea if you don’t have any problems at all, as this type of maintenance will protect your water heater—and yourself.
To get started, identify where the relief valve shut off is. Usually, you can find it upon the cold water feed, which is on top of the water tank, on the right side where the inlet is.
Finally, release the level so that it quickly snaps into the original position. If it doesn’t snap quickly into this original position, then your water heater valve isn’t working and needs to be replaced.
When your water heater pressure relief valve isn’t functioning properly, it’s usually for one of to two reasons. It either sticks so that it doesn’t properly open or close, or it has a leak, which means that it’s continually dripping, lowering your water pressure.
If your valve is sticky, then it becomes stuck in a closed (downward) or open (extended position). If it’s closed, then the valve won’t be able to relieve the heat or pressure that builds up in the closed water heater system. There could be a rupture as a result.
Sometimes, you can easily fix this problem by opening and closing the valve lever a few times. However, if it continues to stick, then you’ll need to replace it.
Your water heater is leaking? Make sure that it doesn’t come from the valve before replacing it. If your pressure relief valve is leaking, then this maybe because it isn’t seated properly in the tank’s threaded opening. This is quite a common issue if you’ve recently replaced your old valve with a new one. To fix this issue with this cause, you have to take several steps.
If the lever snaps into its original position and it’s still leaking, you need to turn off the gas valve by turning it to the off position. Then, shut the water off so you can replace the valve safely.
If a water pressure issue is what is causing the water heater pressure relief valve to not work, then it might be dangerous for you to change the valve yourself. Generally speaking, it’s a good idea to hire a professional to protect yourself.
Now that we’ve reviewed everything you should know about a water heater pressure relief valve you might have realized that you need to replace your water heater valve. However, to be as safe as possible, you want to hire a professional.


 8613371530291