
instant pot safety valve free sample

Following this advice is a problem because the steam release vent is one of the pressure cooker’s main safety systems and any obstruction could cause this system to fail, or to trigger one of the other last-resort safety systems (which are generally pretty messy and could permanently damage electric pressure cookers).
In fact, most pressure cooker instruction manuals instruct the cook not to cover the lid or obstruct the vent or steam release valves of their pressure cooker.
If the range hood is not accessible, operate or carefully move the pressure cooker next to an open window or ventilated area before releasing pressure. If moving the pressure cooker, ensure the pressure valve is pointing away from you and that the floor is free of trip hazards (children, pets, rugs). If the pressure cooker is electric, disconnect or hold the power cord so you don’t trip over it.If your cooker’s instruction manual advises you not to move the cooker while it has contents under pressure, don’t do it.
foamy food with wrong pressure release – Foods that are known to foam and bubble, such as beans, rice, most grains and fruits should only have the pressure cooker opened using Natural Pressure Release. This keeps the foam from bubbling up and shooting out through the pressure valve.
If you must get the cooker open right away, and there is stuff spraying out of the valve, open the pressure valve in small bursts 5 to 10 seconds apart – this will give the foam time to subside between bursts. Then, clean the pressure cooker lid, gasket, and every part of valve very well so there is no food residue interfering with the valve at the next use.

Instant pots are often an appliance you might not think needs a lot of fixing and they frequently don’t but there is the odd time, especially if you have had yours for a number of years you might find certain parts need replacing or come loose.
There are a number of ways to fix your instant pot valve if it falls out from replacing the valve altogether, cleaning it and replacing it back on or checking that the valve has not been misshapen in any way.
In this article, I am going to talk about what to do if your instant pot valve falls out, breaks or comes loose. I will also talk about what can cause this for future reference along with how to fix it.
While an instant pot float valve can come off the instant pot itself, it’s quite rare indeed. The float valve works by connecting a cap on the inside of the instant pot to the float valve, which comes out of the instant pot entirely. When pressure builds within the instant pot, the internal cap is pushed up and the float valve closes.
There are two ways that a float valve could ‘fall out’. One way would be if just the internal cap of the float valve has come free of the instant pot, and is within the pot. This is dangerous for obvious reasons – nobody wants a small piece of silicone in their food.
Another way that a float valve could come out is if the entire valve (cap included) simply comes free of the machine. It is designed to come out so that you can clean it. The reason for this is that sometimes small pieces of food (such as rice or beans) can get stuck to or within the valve.
If this happens, the valve needs to be properly cleaned before it can be used again. At the end of the day, the valve is a safety feature, and it’s always worth taking great care of safety features.
This can happen if you’ve been cooking something in your instant pot which has small parts within it. For example, a rice dish, or even porridge is at risk of this happening. If a small piece of food is trapped within the silicone cap on the inside of the instant pot, then the valve will start to function poorly.
If this poor functioning is allowed to continue, the pin of the valve may fall out, or even get pushed out, by small pieces of food or the inherent pressure in an instant pot.
Whenever silicone is seen in a kitchen appliance, it is considered to be a serviceable part. This means that over time, any silicone parts may need to be replaced. This can be seen in instant pots as the silicone cap on the inside of the pot will age and start to become hard over time.
If the silicone cap gets sufficiently stiff, then it may simply fall off or break. This will lead to the pin of the valve coming loose, and potentially coming out of the lid.
In very rare circumstances the pin portion of the float valve could become misshapen and therefore not work as it is supposed to. These cases are very rare as the metal pin is very resilient, but they are worth bearing in mind nonetheless.
To clean the float valve, as you should regularly, you must remove the internal silicone cap, and then pull out the metal pin. These two components make up the float valve and must be washed in hot soapy water before being replaced.
The problem with cleaning the float valve in this way is that it is quite easy to replace the components incorrectly. For example, you could replace the silicone cap upside down, which would result in the mechanism working incorrectly.
Making sure that the valve in your instant pot’s lid is completely clean will mean that it is much less likely to fall out at any point. If the mechanism itself is unobstructed by any food debris or liquid from cooking, then it will work much more efficiently.
Regularly removing the float valve from your instant pot and making sure that it is spotless will make sure that it works just as it should every time that you use it.
Over time, the components in the valve may become worn and, thusly, the valve will stop working. Both and valve pin and the silicone cap are serviceable, replaceable parts – simply get a new one and your instant pot will be working as it should!
While you could, in theory, replace just the pin or the silicone cap, we’d recommend actually replacing the entire valve all at once. A brand new valve will work much better than a new cap and an old pin, for example.
The number one reason that your valve is most likely to fall out of the instant pot is that it has been assembled incorrectly. Whether by you or by someone else, it is an easy mistake to make!
If the valve falls out, make sure to get the lid off your pot, and take a close look at the valve and lid. Making sure that everything is completely clean (the best way to clean them is to wash them with hot, soapy water), first insert the pin. Insert the pin from the top of the lid, pushing it down into the lid itself.
As we’ve said before: the valve is designed to be removable for cleaning, so if you do assemble it incorrectly, you can always take it off and try again.
You certainly can! The instant pot valve is designed to be removed and cleaned at regular intervals. Because the parts that you’re removing are both small and of vital importance, Instant Pot makes sure to sell replacement parts.
When buying a replacement, ensure that you buy a full set of pin and cap, so that you can completely replace the entire valve all in one go. Replacing just the pin, for example, will be a little pointless if the silicone cap is going to fail in a couple of months.
If the valve is replaceable and you can secure it back within the instant pot, then you’re good to go. Alternatively, you’re playing a dangerous game.
The float valve is pushed up by pressure building within the instant pot. When the valve is completely pushed up the lock on the lid is engaged, and your food cooks over time. This means that the float valve is an integral safety feature as if it isn’t in place, the seal won’t form, and the lid won’t lock.

The Instant Pot is a great kitchen appliance that has taken the world by storm with its ability to cook meals quickly and precisely. However, some users worry that they might experience blow outs of their Instant Pot during cooking – so can an Instant Pot explode? What’s going on there?
Today I’ll be discussing the reasons for pressure cooker explosions. The good news is, as long as you follow the safety guidelines and Instant Pot manual instructions, you’re not going to run into any problems as an Instant Pot is very safe when used correctly. We’ll begin by talking about how the Instant Pot works.
The Instant Pot is a programmable electric pressure cooker that uses heat, steam and pressure to cook food very quickly. It works by using pressurized steam to transfer energy directly into the food through either a “hot water” bath or with direct contact via the inner pot which helps the food reach an internal temperature of 110 degrees Celsius or 230 degrees Fahrenheit at high pressure. This cooks the food and then steam is released either naturally or in a quick release.
Instant Pots can only blow up if they build up too much pressure inside of them. Luckily Pressure cooker brands such as Instant brands have many safety mechanisms to ensure their pressure cookers are safe every time they are used.
The answer is no. An Instant pot only becomes dangerous if you don’t follow the rules and use the safety features correctly. Just as a car is dangerous when you don’t drive safely, you need to follow the manualand guidelines to have a good experience whilst using a pressure cooker. As with most things – problems only arise through user error.
When you use these safety functions correctly and follow the instructions in the Instant Pot user manual the risk or chance of your Instant Pot blowing up is very low. The many safety features ensure you are safe every time you use your pressure cooker.
The truth is if you follow the safety rules and guidance in your user manual you will be okay when cooking delicious meals in your Instant Pot and you’re unlikely to have Instant Pot explosions.
When you use these safety functions correctly and follow the instructions in the Instant Pot user manual the risk or chance of your Instant Pot Pressure Cooker Exploding is very low. The many safety features ensure you are safe every time you use your pressure cooker.
The Instant Pot will automatically select the pressure level needed for your recipe. You can also manually control the pressure if you want to produce more or less steam.
Your Instant Pot has a special button that releases any excess pressure which prevents an instant pot blowout and serious injury caused by high pressure and steam.
One safety valve is on the lid of the Instant Pot, it is used to let off excess steam in case there’s too much inside of you pot. Another safety valve is located under the lid handle.
There’s also a small anti-blockage vent at the top of your Instant Pot. This is to allow steam to escape but will prevent food from going up into it and causing a blockage.
The temperature controls on the Instant Pot are very accurate. You can adjust cooking temperatures to ensure that you have perfect results every time you use your Instant Pot. Unlike a traditional pressure cooker, electric Instant Pots have automatic pressure control and automatic temperature control, giving them an even greater level of safety.
Instant Pots have lid close detections this feature will ensure that your pressure cooker won’t blow up if the lid is left open for too long. The lid lock prevents modern pressure cookers from opening until the steam has been released.
There’s a special steam release handle on top of your Instant Pot, where you can control the flow of steam coming out of your pot. This prevents any steam from escaping when you don’t want it to and blow up your instant pot!
Your Instant Pot also has a special function called leaky lid protection. This will sense when the lid of your unit is not fully closed and turn off the heating element so you don’t blow up your Instant Pot. Always check your silicone sealing ring to ensure it is properly installed, and your lid is secure to prevent any steam leaks or explosions.
The handles of the Instant Pot are designed with heat resistance in mind. This reduces the risk of injury from accidental burns when handling your pot. The handles also have a large grip surface that makes it easy to move your unit around without any
The instant pot also has a special feature called excess pressure protection. It uses a pressure sensor, so if there’s too much pressure inside your Instant Pot at any point, the excess pressure protection will blow off steam from the sides of your unit so you don’t blow up your Instant Pot!
So, as you can see, many safety features work together to ensure that you’re safe if using an Instant Pot. These instant Pot safety features protect against an Instant Pot Explosion.
Not all electric pressure cookers are the same so it’s important to learn everything about the particular model you have, whether that’s an Instant Pot Lux, Instant Pot Duo, Instant Pot Ultra or another pressure cooking brand altogether.
This is one way to blow up your Instant Pot! Overfilling your instant pot can cause pressure to build up inside the unit. When you exceed the capacity of your Instant Pot, steam can escape from the safety valves on top or at the bottom of your Instant Pot unit .
Your best bet is to never exceed the maximum fill line indicated on the inside of your Instant Pot. This ensures that you don’t blow up an instant pot or cause an eruption of liquid by overfilling it.
You should also make sure that there’s enough liquid inside the instant pot when cooking recipes like rice and pasta. It’s okay if most of the liquid boils off during cooking, but not all of it!
Now you know what causes an Instant Pot explosion. Let’s discuss how to avoid this. What keeps an Instant pot from blowing up? Here are some top tips:
As I mentioned before, never open your lid until all of the steam is released. Pressure cooking works by trapping heat and steam inside your Instant Pot so that the food cooks at a consistent pressure along with consistent temperature. Opening it too early can cause some of this heat and steam to escape and suddenly drop leaving your recipe undercooked or moist on the outside and dry on the inside .
If you’re pressure cooking vegetables and you forgot to add some salt to your recipe, wait until the Instant Pot has released its steam before adding it in. If you try to add in spices or salt while the Instant Pot is under pressure, it may result in an Instant Pot pressure cooker explosion.
If you have overfilled your instant pot and liquid begins to spurt out of the vent, turn the pot off and allow it to naturally release. This will prevent food splattering everywhere and prevent accidents and potential burns.
If you’ve followed all the instructions and your Instant Pot appears faulty, for example, the lid does not lock in place, you may have a defective pressure cooker. Then you should contact the customer service immediately if you have any safety concerns, who will be happy to assist you/
All in all, blowouts and pressure cooker explosions rarely happen and you really don’t need to worry about it as Instant pots have many safety features to prevent this from occurring. Be sure to read your manual and follow all safety precautions when cooking with your pressure cooker and everything should be just fine.
The answer to the question, can an Instant Pot explode is Yes. However, will your Instant Pot explode? The chances are very unlikely! If you follow the guidelines and use the safety features correctly as guided by Instant Brands you have nothing to worry about.
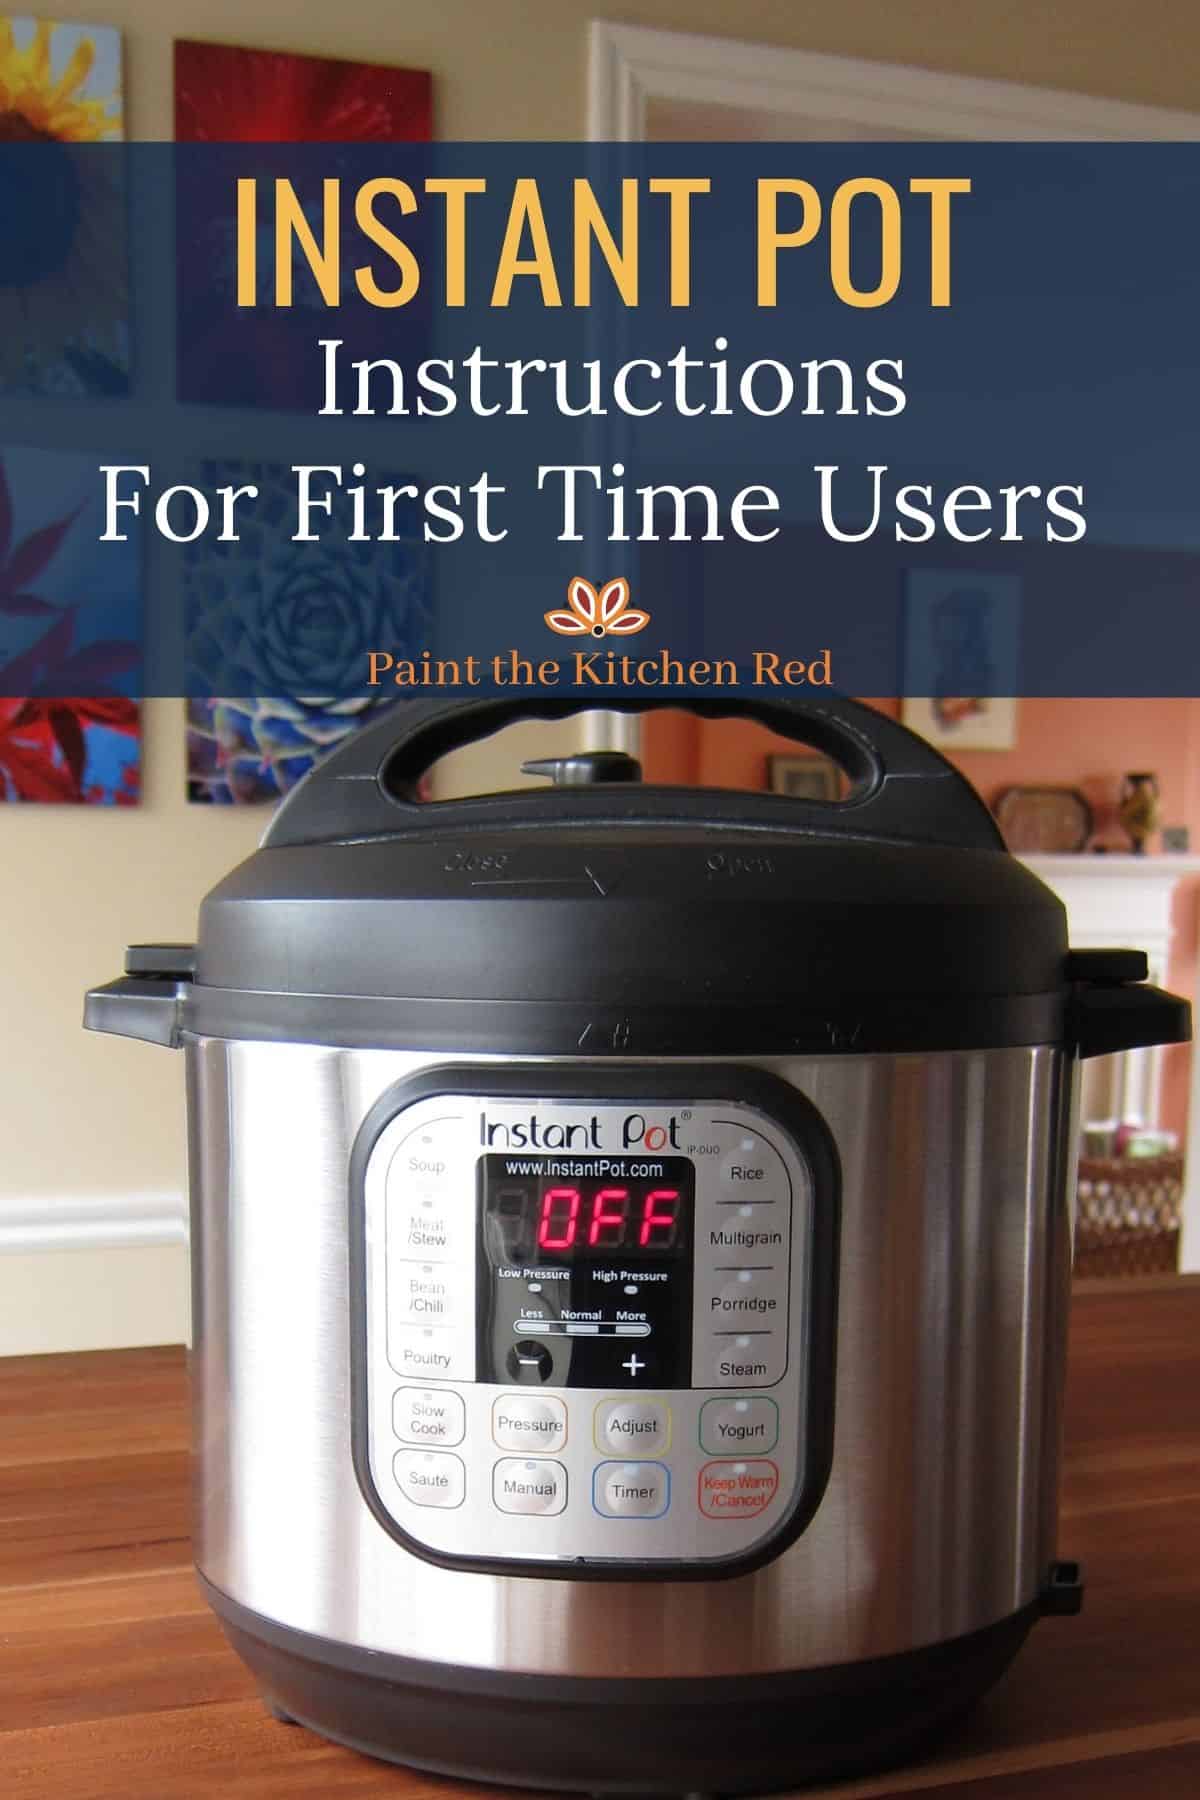
Wondering how to use your new Instant Pot? In this Instant Pot Guide, I’ll walk you through what you need to know to start cooking with your Instant Pot today. Safety features, how to do an Instant Pot water test, what’s the difference between a natural pressure release and a quick release, and what will happen step by step through the cooking process.
I’ll be honest – the first time I used my Instant Pot, I was overwhelmed and a bit scared. An Instant Pot can be intimidating for a new user. There are so many buttons and safety warnings.
However, I guarantee that once you get started, you’ll wonder what you ever did without your Instant Pot. I love mine so much that I now own two Instant Pots!
I’m going to help you get started with all of the tips and tricks that I have learned through trial, error and research. This Instant Pot manual will tell you everything you need to know to use your Instant Pot for the first time.
An Instant Pot is an electric pressure cooker. It is a multi-use appliance that can cook foods quickly at high pressure. Steam pressure builds up inside the pot, which creates a higher temperature environment that cooks foods faster. Unlike old fashioned pressure cookers, the Instant Pot has many safety features that make it safe and easy to use.
An Instant Pot is a pressure cooker, sauté pot, slow cooker, steamer, rice cooker, yogurt maker and warmer all in one. I’ve been amazed at the versatility of my Instant Pot and the flavor and texture of the foods that I am able to cook in it. The high pressure inside the Instant Pot can tenderize even tough cuts of meat. It creates rich, complex flavors – seriously, I’ve never had better chili than Instant Pot chili!
If you are not sure which Instant Pot to buy, check out my guide to the Best Instant Pots. I’ve also tested out many Instant Pot accessories so that I can share my favorites with you.
If you haven’t taken your Instant Pot out of the box, now would be a good time to do so. To open your Instant Pot, turn the lid counter clockwise and lift. To close turn clockwise. Remove any plastic wrap from the inner pot and the accessories.
The first thing you’ll want to do is wash the parts of your Instant Pot. The Instant Pot lid, steam release valve and stainless steel inner pot are dishwasher safe; however, I wash mine by hand. The base unit is not dishwasher safe – never immerse the base unit in water.
First, never put your face near the steam release valve or float valve while the Instant Pot is on. When I toggle the steam release valve, I use a long handled wooden spoon so my hand and arm are not near the valve opening. Any kitchen utensil with a long handle will do. Alternatively, you can use an oven mitt to carefully turn the steam release valve to the “venting” position when you are ready to release the pressure in your Instant Pot.
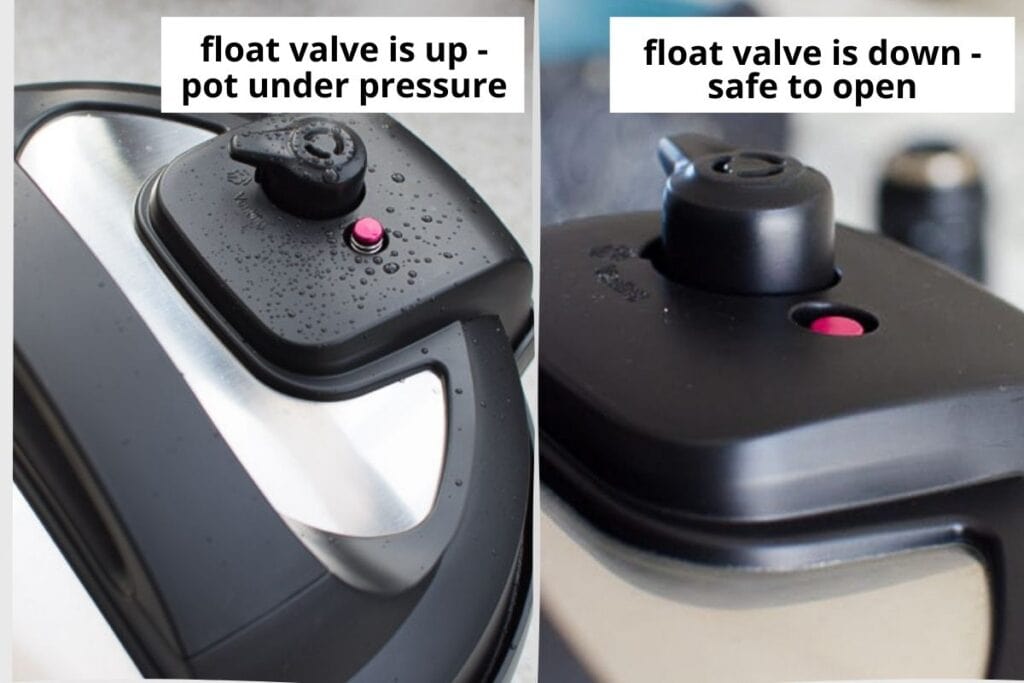
Second, never open the Instant Pot lid until the pressure has been released through the steam release valve. You will know that all the pressure has been released when the float valve (pin) drops down.
Depending on which Instant Pot model you have, the float valve may be red or silver. It may pop up above the level of the lid when the pot is pressurized, or it may pop up to be flush with the level of the lid. In my 6 quart LUX, the silver float valve is below lid level normally and pops up to be flush with the level of the lid when pressurized. You will get to know how your Instant Pot model works.
If a recipe calls for a natural release, wait for the natural release time specified in the recipe and then move the steam release valve to the “venting” position to make sure all of the steam and pressure have released. Make sure the float valve has dropped down and then it is safe to open the Instant Pot lid. Open the lid slowly, tilting it so any hot steam will not blow towards your face.
1. Remove the stainless steel inner pot and look inside the instant pot base. You will see the heating element. The heating element should always be free of debris and dry before you use you the Instant Pot. After washing, I always dry my stainless steel inner pot thoroughly before returning it to the base unit.
3. Remove the steam release valve from the Instant Pot lid by gently pulling it straight up. Make sure it is clean and free of debris. Some foods, such as applesauce, pasta and oatmeal may froth and foam when you cook them and can clog the steam release valve. Check the steam release valve each time you use your Instant Pot. If it is dirty clean it under running water and then put it back on the Instant Pot lid.
4. Check the float valve to ensure it is clean and free of debris. Clean it with warm water as needed. You may place the lid under running water as needed to wash it.
Making sure that all parts of your Instant Pot are clean and in good working condition can help you to have the best success with pressure cooking. My post about the Instant Pot burn message tells you both how to prevent getting this warning and what to do if you do get a burn message.
Before you use your Instant Pot for the first time, you should perform a water test. The Instant Pot water test is like an initial test run for your Instant Pot.
One of the Instant Pots that I purchased was defective. A water test helped me to determine that the Instant Pot wasn’t working properly. I was able to contact Instant Pot support and get a replacement.
Note: If you have the Instant Pot Ultra, you will use the dial to select cooking programs and change the cook time and then press “start.” Instead of a steam release valve that you turn, the Instant Pot Ultra has a steam release button that you will press if you want to manually release the pressure. The steam release valve will seal automatically on the Ultra, whereas on other models you turn the valve between a venting and a sealing position.
Check that the silicone sealing ring is fitted properly into the Instant Pot lid. Place the lid on the Instant Pot and turn it clockwise until it is in the closed position. Your Instant Pot will chime each time you close and open the lid (if the Instant Pot is plugged in).
Turn the steam release valve to the “sealing” position. (If you have an Instant Pot Ultra it will automatically set the steam release to “sealing” when you close the lid.)
Press the “Manual” or “Pressure Cook” button. (Some Instant Pot models have a button that says “Manual” and others have a “Pressure Cook” button. They do exactly the same thing.)
The Instant Pot will take anywhere from 5-15 minutes to reach pressure. Once it reaches pressure the float valve will pop up, the Instant Pot will beep once, and the cook time will begin to count down from 5 minutes. You might notice hissing sounds and some steam escaping from the steam release valve or float valve hole while the pressure builds – this is normal. You may also notice a plastic smell the first time you use your Instant Pot. This is also normal and shouldn’t happen again.
Once the 5 minute cook time ends, the Instant Pot will beep a few times. It will switch to the keep warm mode and the display will begin to count up minutes instead of down. During this time, you will know that the cook cycle has ended and the numbers are now counting up because there will be an “L” displayed before the numbers. The count-up timer is handy if you want to do a certain number of minutes of natural release.
For the water test, you will do a quick release (QR) to release the pressure in the Instant Pot. I will tell you more about a quick release vs. a natural pressure release (NPR) below. To do a quick release, carefully turn the steam release valve to the “venting” position. Use the handle of a long spoon to toggle the valve to keep your hand safe from the hot steam that will escape from the valve.
If the water test does not go as planned (and your Instant Pot does not reach pressure), be sure that you turned the steam release valve to the “sealing” position during the test. Also check that the sealing ring is fitted properly onto the lid. If neither of these was the problem, you may want to contact Instant Pot customer service for further assistance.
There are a few basic things that you need to know when using an Instant Pot electric pressure cooker. Once you use yours a few times, these will be like second nature. Depending on which Instant Pot model you own, the buttons may be labeled slightly differently. Consult the manual that came with your Instant Pot.
Minimum Liquid Required: As a general rule, you want to use at least 1 cup of liquid in your Instant Pot every time you cook with it. The Instant Pot uses steam and pressure to cook food, and you need liquid to create the steam and pressure. Some recipes may call for more or less liquid. I recommend following recipes from a trusted source while you are learning to use your Instant Pot.
Fill Level: Inside the Instant Pot inner pot, you will see a 1/2 and a 2/3 line marked. Never fill the Instant Pot higher than the 2/3 line with food or liquid (before cooking). If you are cooking food that will expand during the cook time such as rice, quinoa or beans, do not fill the Instant Pot higher than the 1/2 line.
“Pressure Cook” or “Manual” Button: Depending on which Instant Pot model you own, the Pressure Cook button is sometimes labeled “Manual” and sometimes “Pressure Cook.” This is the button that you will press to start a pressure cooking cycle. It’s your basic pressure cooking button.
“Keep Warm/Cancel” Button: Use this button to end a cooking program or turn on/off the keep warm function. (After a cooking cycle ends the Instant Pot automatically switches to keep warm.)
“Sauté” Button: Pressing this button allows you to sauté foods in your Instant Pot. This is convenient because you don’t have to use another pot on the stove. You can sauté and brown foods right in your Instant Pot. (Never place your Instant Pot base unit or inner pot on the stove top.) You can also use sauté mode to thicken sauces after pressure cooking. Never sauté with the lid on. When you press the sauté button the time will default to 30 minutes, but you can turn it off at any time by pressing the cancel button.
“Pressure” Button: The Pressure (sometimes labeled “Pressure Level”) button toggles between high and low pressure settings. Pretty much every Instant Pot recipe you will find will direct you to cook at high pressure. If you own the LUX series, you will not have this button since the Instant Pot LUX only has a high pressure setting.
Program Buttons: Depending on your Instant Pot model, the program options might include Soup/Broth, Bean/Chili, Meat/Stew, Cake, Egg, Rice, Multigrain, Porridge, Yogurt, Steam and Slow Cook. These programs have pre-set cook times. Honestly, I never use these buttons because I prefer to control the cook times myself.
Using the Trivet: Use the metal trivet that came with your Instant Pot when you want to raise food up so that it does not come in contact with the bottom of the pot. You might use the trivet if you want to keep certain foods out of the liquid in the base of the pot, or away from the direct heat on the bottom of the pot. If you cook hard boiled eggs or baked potatoes, for example, you will set them on the trivet.
Closing the Lid: You will see a track on the back upper edge of your Instant Pot base. Hold the lid handle and fit the lid on using the track as a guide, turning the lid clockwise to close it. The arrow on the front of the Instant Pot lid should line up with the arrow next to a locked symbol on the base unit. If your Instant Pot is plugged in, you will hear a chime when the lid closes.
Sealing the Instant Pot: Turn the steam release valve to the “sealing” position to seal the Instant Pot. The steam release valve is meant to be a bit wobbly and will fit loosely. You will need to turn the valve to the sealing position every time you pressure cook in your Instant Pot.
Cooking Time vs. Total Time: The cooking cycle will take longer than the actual cook time of a recipe. Before the cook time starts, your Instant Pot will take some time to reach cooking pressure. This usually takes about 10 minutes and varies with the size of your Instant Pot, type and amount of food, and the temperature of the food and liquid in the pot. You also need to account for the time needed to release the pressure after the cooking cycle.
Natural Pressure Release (NPR): A natural pressure release is when you let the pressure release naturally by letting the Instant Pot sit after the cook cycle ends. This usually takes between 10 and 20 minutes. Use a natural release for foamy foods or when your Instant Pot is full to avoid hot foam coming out of the steam release valve or float valve.
Quick Release (QR): A quick release is when you manually force the pressure to begin releasing from the Instant Pot by turning the steam release valve to the “venting” position. You need to be careful when you turn the valve as hot steam will immediately begin to escape. I use the handle of a long spoon to slowly move the steam release valve so that my hand is not near the valve. You also want to keep your face away from the valve. Use a quick release when you want to stop the cooking process quickly to avoid over-cooked food, and for tender cuts of meat.
Safely Removing the Lid: Never attempt to remove the Instant Pot lid while the pot is pressurized. Wait until the float valve (pin) on the lid drops down to let you know that all of the pressure has been released. Then, hold the lid handle, turn the lid counterclockwise and carefully lift.
If you would like to double an Instant Pot recipe, you may double the ingredients (so long as you don’t exceed the max fill line). You do not need to double the cook time.
However, you may need to adjust the cook time based on the size/width of meat and vegetables. For example, a small 8 ounce chicken breast will cook faster than a large 12 ounce chicken breast and a small sweet potato will cook faster than a large sweet potato. Read all recipes and directions carefully to determine how long to cook your food.
Over the last decade the Instant Pot has elbowed its way onto many a kitchen counter. The multifunctional appliance earns its place with slow cooker, pressure cooker, and saute capabilities (just to name a few). So you can either set-it-and-forget-it before leaving for work or pressure cook a whole chicken in a fraction of the time it takes in the oven.
That’s all great, but when the Instant Pot’s many buttons and menacing-looking steam valve are staring you in the face, the appliance ($99.95, Amazon) can be intimidating. I promise it’s easy to use once you get started.
They’re not quite as user-friendly as a simple Crock-Pot, but it’s worth learning how to use the multicooker just for the time you’ll save in the kitchen. There are a few basic steps for most easy Instant Pot recipes, but you’ll get the hang of it. Here’s what you need to know about using an Instant Pot.
The Instant Pot is a pressure cooker that works by using steam to build pressure. As the pressure builds forcefully inside the pot, it produces temperatures high enough to quickly heat and cook the food inside.
Instant Pots have other built-in cooking programs, too. It can act as a, yogurt maker, rice maker, steamer, orsautepan — making it one of the most versatile smallon the market.
For starters, wash the pot and inside the lid with soap and water before using for the first time (and of course, between uses). When it’s plugged in and ready to go, here’s how to get going:
The Instant Pot comes with a few accessories, most of which you won’t use a lot. Your go-to accessory is the plastic condensation catcher. Snap it onto the back of the Instant Pot to collect condensation from the steam; otherwise, you’ll end up with water all over the counter.
Place the lid on top of the pot and push down as you turn it clockwise (in the direction of the arrows printed on the lid). This will seal the lid to the pot so that the Instant Pot can pressure cook the food inside. Turn the valve (the little knob on top of the lid) to the sealing position.
Once you’re ready to cook, set the time and pressure controls according to your recipe instructions. Select “pressure cook” and use the + and – buttons on the control panel to set the time. Almost every Instant Pot recipe involves the pressure cook option, but note that other modes may differ. The “saute” mode should always be used with the lid off, and if you’re using the “slow cook” setting, make sure the valve is set to venting rather than sealing.
When your food is cooked, move the pressure release valve from the “sealing” position to the “venting” position. When you do this, all the hot steam from inside the pot will come out of the valve, so be careful not to burn yourself. It’s easiest to do this while wearing an oven mitt or by using a long-handled spatula to turn the knob so your arm is never directly over the steam. When all the steam has been released, you can open the lid.
When you hit “pressure cook,” your Instant Pot will default to the amount of time last used. Simply use the + and – buttons to adjust the time according to the recipe you’re making.
The Instant Pot takes a few minutes to reach the proper pressure to cook. If you set it at 10 minutes, it won’t actually be done in 10 minutes. Allow 3 – 4 extra minutes per recipe for the appliance to heat. The machine is smart enough to know how long you set it for, so even with the added minutes, after exactly 10 minutes of cook time, it’ll turn off and your food is done.
To start the Instant Pot Duo, plug it in and add the food you want to cook. Then use the control panel to set the pressure (high or low), and set it to the appropriate time. The confusing thing about the Instant Pot Duo is that it doesn’t actually have a start button — as soon as you set a time, it’ll start heating.
Since your Instant Pot works by using steam to create pressure, you’ll need to add at least one cup of liquid to your Instant Pot for any meal you cook.
Inside your inner pot, you’ll see it says “PC MAX,” with a 2/3 line and a 1/2 line. It’s important to never fill your inner pot past than the 2/3 max line.
The steam valve sits on top of your Instant Pot lid and has two settings:sealingandventing.The steam release handle allows you to move from one setting to the other.
Make sure the steam release handle is in thesealingposition before using any of the pressure cooking programs. This will prevent steam from escaping the Instant Pot and allow pressure to build inside.
To vent the steam valve,you’ll need to have the steam release handle in theventingposition — either by pushing it back yourself (also known as a manual or “quick release”) or on its own via a “natural release.”
Natural Release:Your Instant Pot releases pressure on its own until the float valve (next to the steam valve on top of your lid) drops down. A natural release takes a bit longer, but it’s best for recipes with meats, soups, broths, beans, starchy foods, and foods with lots of liquid.
Quick Release:You manually release pressure from your Instant Pot by pushing the steam release handle back to the venting position until the float valve drops down. A quick release is much faster and is best for recipes with vegetables, fish, and fragile or fast-cooking foods.
The sealing ringis an Instant Pot accessory and safeguard that keeps your lid locked tight during pressure cooking. It helps your machine withstand the high forces of pressure needed to cook the food inside.
That’s why it’s always good to have a spare sealing ring to use for different types of Instant Pot recipes. I recommend using one sealing ring for sweets and another sealing ring for savory dishes.
If you’d rather NOT use the Keep Warm setting on your Instant Pot, you can switch it off on the control panel and avoid the risk of overcooked food altogether.
Depending on the recipe and the amount of food you’re cooking, it can take up to 40 minutes for your Instant Pot to fully build pressure. But remember, releasing that pressure from your Instant Pot takes time, too.
Before starting your Instant Pot recipe, don’t forget to factor in the time it takes to build and release pressure. A 15-minute recipe can quickly turn into a 35-minute recipe when you account for the whole process.
Instant Pots are best known for their pressure cooking abilities, but that doesn’t mean its other programs (like slow cooking andsauteeing) aren’t as good.
Thesauteprogram works the same as a stovetop pot or pan, but it’s definitely a game-changer. You can stir-fry veggies, thicken sauces, and brown meats without adding another pot to your pile of dishes.

Seriously? Today’s modern pressure cookers’ safety features mean that it’s impossible to open your pot in the middle of cooking. So not to worry if you’re tempted!
When the Instant Pot valve tip is up and lined up with the black plastic, your Instant Pot is fully pressurized at a high pressure of 11-12 psi. A safety feature prevents the lid from being opened.
Some electric pressure cooker models have more than one pressure release valve – the one on the lid and another on the bottom of the pot. These valves allow steam from the food to escape during the pressure-cooking process.
It’s also an excellent way to avoid hot liquid from spurting out of the steam release valve when making Instant Pot potato soup, beans, grains, and recipes with a large liquid volume or high starch content like congee and porridge.
With the Natural Release method, the skin on foods like a whole chicken or turkey breasts stays intact since the pressure and temperature go down gradually, and there’s less movement in the Instant Pot.
The intermittent pressure release method is used to prevent the formation of foam. It’s also used so that foamy foods and foods with high starch content like congee, rice, grains, and pasta don’t burn and stick to the bottom of the pot.
1. Do a (or another) Quick Release. Then wait 10-15 minutes. This gives your Instant Pot time to cool down a bit. And maybe it won’t give you a false reading in case there was some food stuck in the valves or a problem with the float valve tip.
1. Plug your Instant Pot into the wall. (It’s a good idea to move your pressure cooker by the sink and away from cabinets and walls. That way, hot steam goes into the sink.)
5. Place the lid on the Instant Pot and turn it clockwise until it is in the closed position. When plugged in, the Instant Pot chimes when you close and open the lid.
6. Make sure to turn the steam release valve to the Sealing position. (An Instant Pot Ultra automatically sets the steam release to Sealing when the lid is closed.)
9. Your appliance will take up to 15 minutes to reach pressure. Once it does, the float valve pin will pop up, the Instant Pot will beep, and cook time will begin to count down from 5 minutes.
If you notice a plastic smell the first time you use your Instant Pot, don’t panic. This is also normal and shouldn’t happen again. (Best reason to do a water test, in my opinion!)
12. When doing the quick release method, wear an oven mitt, or use tongs or a cooking spoon to carefully turn the steam release valve to the venting position. Remember to keep the jet of steam away from your skin and face.
If neither of these was the problem, contact Instant Pot customer service for further assistance by phone at 1-800-828-7280 Monday to Friday, 9:00 am – 4:00 pm ET.
Quick pressure release or natural pressure release?It’s one of the most common questions I get. Electric pressure cookers and multi-cookers like the Instant Pot, Ninja Foodi, and Crockpot Express have the ability to release pressure two ways. Instant Pot Natural Release is a frequent search term. Let me explain the difference!
Those are often the first questions new pressure cooker users ask. So I thought it would be a perfect time for a post explaining it for all those who have an electric pressure cooker or multi-cooker like the Instant Pot waiting for them under the tree.
When the cook time ends, your pressure cooker will beep. At this point, the recipe will direct you to release the pressure in the cooking pot. You can release the pressure two ways: a quick pressure release or a natural pressure release.
A quick pressure release is when you turn the pressure release switch to the Venting position and let the steam to release quickly when the cook time ends. This will result in a strong jet of steam coming from the pressure release valve. This is normal.If drops of liquid or foam start to emerge from the pressure release valve, simply switch the valve back to the Sealed position and use an Intermittent Pressure Release (more on that below).
Other pressure cookers may have different labels, but it’s the same basic principle. Turn the valve to allow the steam to escape / pressure to release.
When the pressure is fully released, the float valve will drop and the lid will unlock to open. For safety reasons, the pressure cooker will not open until the pressure is released and the float valve has dropped.
A natural pressure release is when you leave the pressure release switch in the Sealed position when the cook time ends. This lets the pressure release slowly, without you doing anything. When the pressure is fully released, the float valve will drop and the lid will unlock and open.
A natural pressure release is a bit anticlimactic in comparison to a quick pressure release. There is no jet of steam when the natural pressure release starts. There’s also no clear way to tell when the pressure is fully released, and no beep or signal when the lid unlocks. Sometimes you can hear the float valve drop if you’re close by.
Using a natural pressure release allows the cooking to stop gradually. You don’t want to open the valve quickly when the ingredients inside could be foaming. You’ll get foam shooting out through the valve, so use a natural pressure release when making steel cut oats, a large pot of soup or pasta.
With this method, you open and close the pressure release valve in short intervals. This allows the pressure to escape more quickly than a natural pressure release and also prevents foam from coming out of the pressure release valve.
With some foods, one or two closed intervals is all I need before I can leave the valve in the Venting position; with other foods, if the foaming is particularly bad, I will close the valve and wait a minute or two, then slide the valve to Venting again and continue opening and closing the valve as needed.
There is some debate about whether or not the pressure releases more slowly if it’s on the Keep Warm Setting. The Instant Pot Company’s official position is that it does not release more slowly on the Keep Warm Setting because the Keep Warm heat does not turn on until the pressure has been released.

Opening a pressure cooker too soon can be disastrous and has the potential to injure anyone nearby. This is due to pressure that has built up inside the appliance and hasn’t had time to be released. When you open a pressure cooker too soon, unreleased pressure can cause the appliance to explode, causing severe burns and other serious injuries.
While this is the safest method to open your pressure cooker, not everyone has 15 minutes to spare. If that’s the case, consider using one of the following tips to help you open your pressure cooker safely:Dowse in cold water. Run cold water over your pressure cooker until the pressure valve releases. It should take about 20 seconds. Once the valve releases, it will be safe to open your pressure cooker as soon as you’d like.This method is only recommended for stovetop pressure cookers and should never be used for electric appliances. To make sure it’s safe for your cooker, read the manufacturer’s instructions to see if they advise against it.
Manually open pressure valve. Open the pressure valve and let the steam and pressure evacuate your cooker. Be careful, as you could potentially be burned by the sudden expulsion of steam. We recommend wearing an oven mitt to stay safe.
In this Instant Pot For Beginners post, we are going to cover some of the basics of how the Instant Pot actually works. We will look at key parts of this multi-function pressure cooker and explain 3 main stages of cooking. For the purpose of this post, we are using Instant Pot Duo Nova (recommended for beginners) as a model to illustrate the key functions but the principles are pretty much the same across all Instant Pot models.
However, having so many functions and buttons can often confuse a brand new user. We will cover all the buttons and what they do in a separate post (coming up!). The main thing to remember, most of these functions cook the food in a pressurized environment inside the pot – either on HIGH or LOW setting – for a set amount of time.
Once the timer is done, the heat will cool down and the pressure will start to release naturally if you leave the pot undisturbed (this is called Natural Pressure Release) or you can release the pressure manually (known as Quick Release). This is the depressurizing stage.
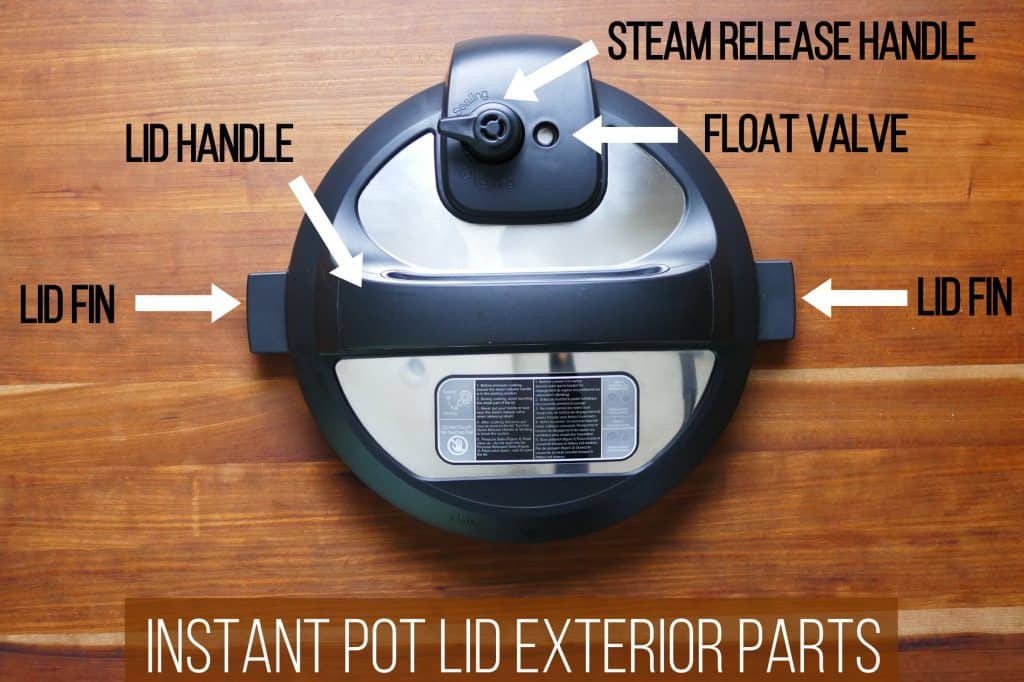
Before we discuss each stage in more detail, let’s quickly look at your Instant Pot so you know what we’re talking about when we refer to certain things. Once you read this article, jump to How To Use The Instant Pot For Beginners and to Instant Pot Settings & Buttons Explained to continue learning.
You should get a pretty clear idea of different parts of the Instant Pot Duo Nova from the provided manualbut in a nutshell, the Instant Pot consists of:
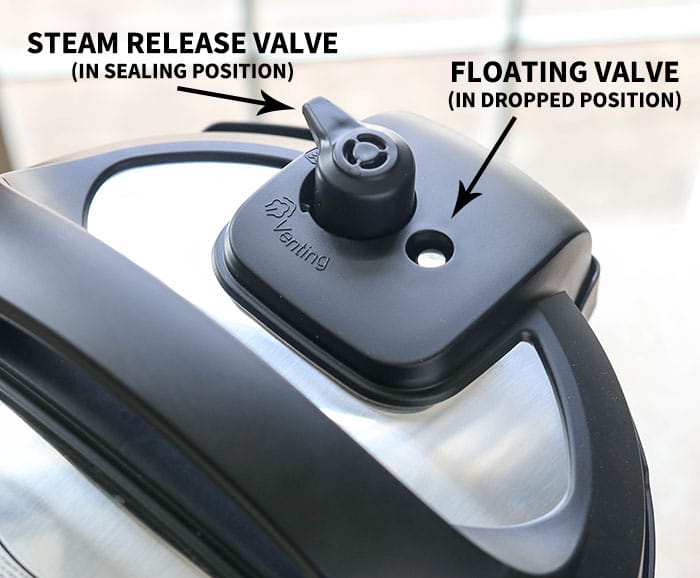
The lid – which has a sealing ring on the inside that keeps all the pressure and steam in the pot, as well as the following key features on top that you will use on regular basis.
This float valve tells you if the Instant Pot is pressurised or depressurized. When it floats up, the pot is pressurized – you will not be able to open the lid. When it floats back down into its inset, you know the pressure is completely released; you will be able to open the lid.
When the cooker releases pressure, steam ejects from the top of this valve. When the pressure releases naturally you won’t really notice the steam coming out but when you use the quick release method (more on this below), a rapid steam jet will shoot out from the valve. This steam is HOT so you have to stand back and keep your hands and face away from the valve.
This is an integral part of Instant Pot’s safety and necessary for pressure cooking. It’s a removable part so you can clean it but it must be installed back in before use.
This button – or knob – allows you to control the steam release valve manually. You can use it to release the built-up pressure quickly, as soon as the cooking timer has finished. For some recipes, you might want to leave the pot on natural release for say 10 minutes and then use this button to let off the remaining pressure.
When it’s popped-up, it’s in Seal position and when you press it down, it locks into Vent position and the steam will eject from the steam release valve. You can also press it gradually, allowing the steam to eject in smaller batches. This can be handy with certain dishes that contain a lot of liquid or have some foam built-up (e.g when cooking pasta).
On Classic Duo models: On the original model, there are only two features on the lid: the float valve and the steam release valve, which is also a manual release handle. You can point the handle to Sealing or Venting position. Make sure it’s always in Sealing position before you start cooking, and turn it down to Venting if you want to perform a quick release of the pressure.
Kitchen storage tip: You can store the Instant Pot anywhere you want but pay attention to where it is when you cook in it. As the steam ejects from the lid up in the air and that jet can reach pretty high, you might want to make sure there is plenty of space above the Instant Pot and the steam doesn’t hit anything you don’t want to get wet or moist.
Once you’ve plugged the Instant Pot’s into the power unit in the wall, the cooker will come on and the control panel will simply display the OFF statusto indicate standby mode.
Or, you can use the smart program setting for RICE to initiate the cooking process. Using manual settings often gives you more control and can produce better results than the smart program settings (sorry, Instant Pot creators, but it’s true!), so ideally you want to follow the recommended instructions in a particular recipe.
Once you lock the lid and select your desired cooking setting, the Instant pot will kick into the Pre-Heating & Pressurizing Stage. The status symbols on the control panel will show two icons for Element Heating & Pressure Cooking In Progressand it will say ON. It might take 5-10 seconds for these to appear.
When heated, the liquid inside the inner pot boils and turns into steam. Without an escape route, the build-up of steam creates pressure. Once the steam inside comes to full pressure, the float valve pops up and locks the lid of the cooker in place for safe pressure cooking. This, in turn, triggers the silicone cap attached to the bottom of the float valve (on the underside of the lid) to seal the steam inside the inner pot and allows the pressure to rise even higher, which means higher cooking temperature. You might see some steam escaping through the float valve during Pre-Heating.
After the float valve pops up, the cooker needs a few minutes to finish building pressure. When the required pressure level is reached, cooking begins. The display switches from ON to the cooking countdown timer you’ve set, displayed in HH:MM (hours : minutes) format.
Important: Pressure cooking requires liquid. Always. Whether you’re cooking rice, chicken breasts, pot roast, carrots, stew or cheesecake, you will need at least a cup of liquid for the Instant Pot to do its job. This is a total amount of liquid and can be in the form of water, stock, tomato sauce, juice, wine and liquids released from the food while cooking (e.g. from frozen veggies, from mushrooms, meat juices etc), or a combination of such.
The pre-heating and pressurizing stage is something many Instant Pot recipesdon’t mention in the time required for cooking. The Instant Pot must come to pressure before the timer begins counting down, and the time it takes depends on a few factors.
First, the amount of liquid. For example, cooking food with one cup of water should only take a few minutes to come to pressure. On the other hand, a large pot of soup reaching the maximum fill line may take 20-30 minutes to come to pressure.
Another factor to consider is the temperature of the contents of the pot. If you begin the recipe by sauteing your contents and heating up the liquid, it will come to pressure more quickly than cold water. On average, it will take 10-15 minutes to come to pressure. This is important to know so you can better plan how long your meal will actually take to cook.
While this stage is often thought to precede cooking, it is actually where cooking begins. For example, in the case of delicate items such as broccoli or cauliflower, bringing the pot to pressure is the only cooking that needs to be done.
TROUBLESHOOTING: If during the pressurizing stage you find that your pot is losing pressure or not reaching pressure for longer than is reasonable, it is important to check the valve and make sure it is not turned to ‘vent.’ Your Instant Pot will never reach pressure if the valve isn’t shut. It is also necessary to check the seal before putting the lid on. Old or dirty seals can loosen over time and cause the lid to not seal properly. Simply ensure that it is well-fitted prior to screwing on the lid. The lid itself is easy to screw on. Get accustomed to taking it on and off and the sounds associated with it. This way, you will always recognise when it’s sealed. It is normal to lose some steam, but this should settle rather quickly.
This is the hands-off, trust-the-process phase. Once the pot comes to pressure, the timer you initially set will begin counting down and this is considered the cooking time. The status symbol on the control panel will only show P = Pressure Cooking In Progress. The float valve is up.
The Instant Pot has a clever feedback loop mechanism that maintains a certain of amount of heat to make sure that the pot keeps the same amount of pressure for your specified amount of time (or that set in the program setting). This pressure pushes the steam inside the pot into the food, which enables it to cook at a much faster rate.
Once the timer is up, the cooking stage is complete. The heating stops, which signals the internal mechanisms that any trapped steam and pressure can start escaping through the steam release valve – the depressurization stage begins.
Natural pressure release means that you will not manually release this pressure or vent the Instant Pot and instead you will let the pressure come out naturally. This can take anywhere between 10-20 minutes and depends on the volume of contents in the pot and the amount of steam that was built up as a result.
Cooking continues: It’s important to note that while the heating stops, there is still a significant amount of steam and pressure inside the pot during this stage, which means that the food continues to cook at a slower rate. Take this into account so you don’t overcook heat-sensitive foods like pasta, rice and vegetables.
If a recipe calls for NPR or Natural Pressure Release at the end of cooking, simply leave the Instant pot undisturbed until that float valve drops down but keep an eye on it as you might not notice when it happens. The food will simply stay warm until you press Cancel.
Some recipes might ask for some natural release followed by a quick release. In the case of rice, it’s best to leave the pot for 2-3 minutes on NPR followed by the quick release.
In some cases, you might want to perform a quick release method, which will let off the steam in one go and depressurize pot immediately. This will prevent any continued cooking and is useful if you’re in a rush and want to enjoy your meal as soon as possible.
Thequick releasescares a lot of people! When you press the quick release button or point the steam release handle on older models to Venting, the steam begins to rise through the top valve and a loud venting or hissing sound occurs.
What is the difference between low pressure and high pressure on the Instant Pot? Like the pressure in a tire, the difference is in psi or pound-force per square inch.
Almost all recipes are designed for high pressure and it will likely be the default setting for you once you get used to manually set your Instant Pot. Low pressure is useful for cooking more delicate foods such as fish, vegetables, or boiled eggs. However, there are still high-pressure recipes adapted for these foods that work just as well. If you are confused, the low-pressure option can be ignored altogether. We rarely use the low-pressure setting.
If old tales of exploding pots have kept you from jumping on the pressure cooker bandwagon, it’s time to reconsider. These days, the best pressure cookers are not only versatile and easy to use, but they’re brimming with safety features — and they’re capable of making great meals faster and easier than ever.
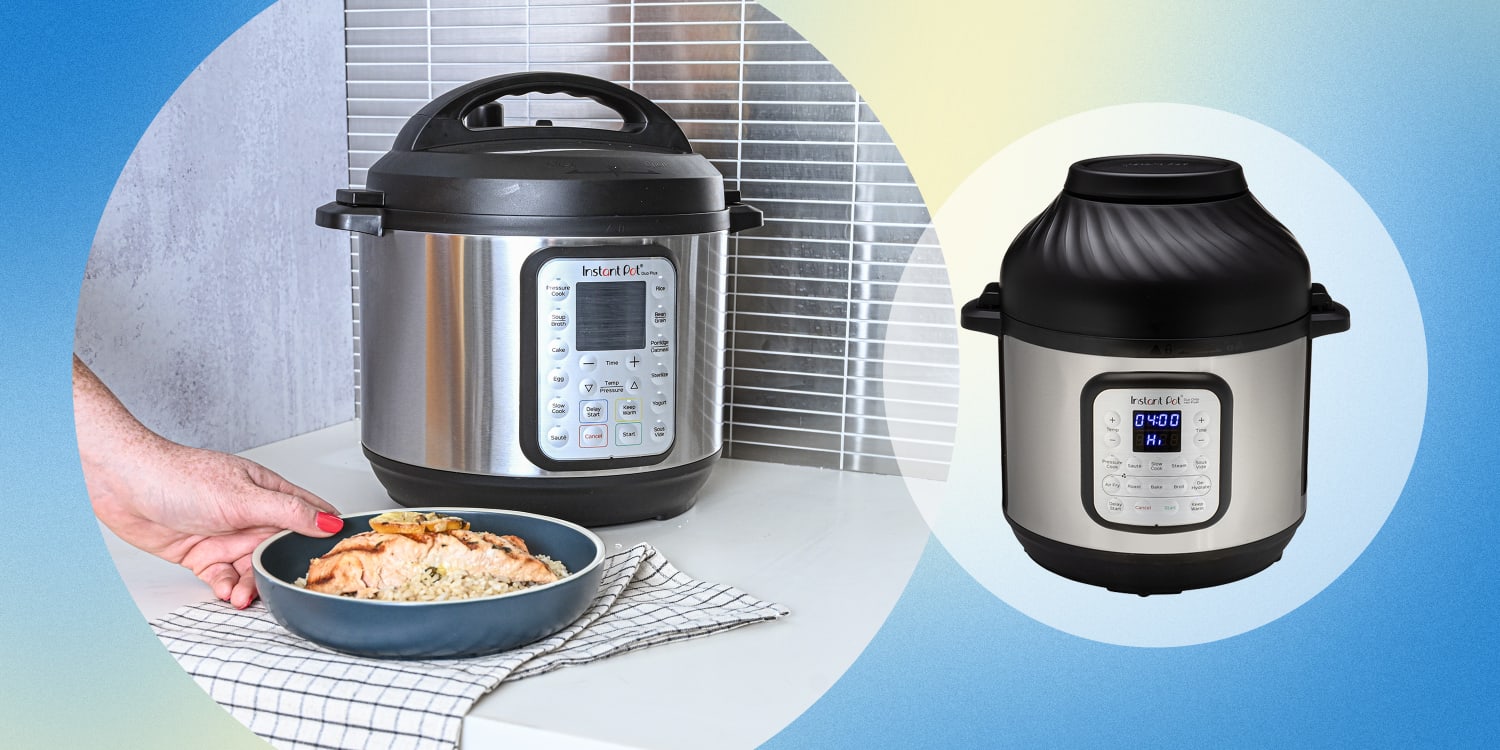
This app-enabled version of the popular Instant Pot may cost a bit more than the brand’s other models, but it gave us the best results, has the simplest, easiest-to-use interface and even allows you to release steam via app.
The most popular Instant Pot doesn’t have the convenience features of its Pro siblings, but it impressed us with its simplicity, ease of maintenance and — most importantly — good results at a low price.
It cooks rice — and slow cooks. It can make yogurt — and cook sous vide. With 10 preset functions and app control, the Instant Pot Pro Plus promises to be the holy grail of small kitchen appliances, and delivers on a lot of its promise. First and foremost, though, it’s a great electric pressure cooker, with a simple interface, solid build and useful pressure-release functions that let us easily get great results on all of our test recipes.
Even better, the Pro Plus made getting these results easy. Its touch control panel is so intuitive that we were up and running with just a glance at the user manual (and honestly would have been just fine without it). Unlike most other models tested, the digital panel features super-helpful status messages that ensure you always know what’s happening inside the pot: from preheating to cooking to keeping your food warm. You can select from 10 program modes (pressure cook, slow cook, rice, steamer, canning, yogurt, saute, sous vide, a self-stirring feature called NutriBoost and keep warm) or customize your own, with the option to choose from low, high or maximum pressure as well as preset low, high or custom temperatures. A dial allows you to adjust the time or temperature quickly and a delay start option lets you start cooking at a designated time and doubles as a kitchen timer. The touch screen also gets bonuses for being easier to clean than a button-heavy control panel.
The Pro Plus is built using three-ply stainless steel with silicone handles (making it easy to move the cooker to the stovetop or sink or to pour its contents into a bowl or container), and the 6-quart inner pot can be on the stovetop or in the oven for added convenience. An anti-spin feature keeps the pot from rattling around during the cooking process. It comes with a stainless steel steaming rack and extra sealing ring and the cooking pot, rack and lid are all dishwasher-safe. It’s also nice and compact at 13.2-inches long by 13-inches wide by 12.7-inches high and weighs about 20 pounds, so it doesn’t take up too much cabinet or counter space and isn’t a huge chore to lug around.
The Pro Plus only comes in 6-quart size, where some other Instant Pot models are also available in 3- and 8-quart options, which may be a detractor for those feeding large groups or households. It also is not compatible with the brand’s air fryer lids that some may find useful. The one-year limited warranty could be more generous and at $169.95, it’s certainly pricier than the already very capable Instant Pot Duo (see review below). But we think the Pro Plus’s app controls, simple interface, progress status bars and excellent cooking results give it the edge over the other Instant Pot models and make it the best choice overall among the electric pressure cookers we tested.
Instant Pot’s best-selling model comes with seven built-in functions (pressure cook, slow cook, rice cooker, yogurt maker, steamer, saute pan and food warmer), and also features 13 customizable programs. The digital and push-button display is large and easy to read and we appreciated that the lid can be detached for easier cleanup. The stainless steel inner pot can be tossed in the dishwasher and it’s simple to switch between low and high pressure, while a keep warm option and included steam rack offer added convenience.
While it doesn’t offer remote steam release like the Instant Pot Pro Plus, an auto steam release button allows you to depressurize hands-free by setting quick, pulse or natural release for your recipe in advance. The lid is hinged, removable and (hooray!) dishwasher-safe and the silicone seal was easy to remove and put back in place. It comes with a ceramic-coated inner pot, stainless steamer basket and rack and a hard-bound recipe book.
If you prefer a simple, straightforward stovetop pressure cooker, the Kuhn Rikon Duromatic looks lovely on the stovetop and does an impressive job cooking food. We tested the 8.5-quart option (Kuhn Rikon offers the Duromatic in a wide range of sizes) and found the two-handle design easy to grab, the pressure indicator simple to read and, while the company doesn’t recommend cleaning the heavy stainless steel pot in the dishwasher, it was no big deal to hand wash it (and we know folks who have tossed their own Kuhn Rikons in the dishwasher for years with no damage).
Using the Duromatic is a snap: Add your ingredients, lock the conical lid into place, heat the pot on high and watch the spring-loaded pressure gauge rise in the center of the lid. When you see one red line, it’s at low pressure; two red lines delineate high pressure, letting you know it’s time to turn the heat down for an evenly pressurized cook. Yes, you’ll need to keep an eye on it and adjust your burner heat accordingly, but if you get distracted, steam is automatically released to keep the pot from overpressurizing (we had to do minimal adjusting during our tests). When your cook time is done, depending on the recipe you can let the pressure come down naturally, or quick-release by moving the pot to the sink and running cool water over the rim of the lid, or press the gauge down to release pressure, with steam releasing evenly.
The T-fal Clipso is a breeze to use. In our tests, the Clipso pressurized very quickly. As with all stovetop models, you bring up the heat to your desired setting, and once steam begins to release through the valve, it’s time to reduce the heat and set your timer. We quickly found the sweet spot and noted that the pot held its pressure nicely throughout the cooking time, with little need for turning the heat up or down.
The model comes with a steam basket and tripod and is dishwasher safe when you remove the gasket and pressure valve. It comes with a 10-year warranty against defects or premature deterioration and, for other parts, a one-year warranty is included. And we appreciate the side handles on the pot that allow for easy maneuvering. But what sets the T-fal apart from other models is its unique lid. Designed for one-hand use, the lid clamps down on the pot with jaws that lock into place with the press of a button. Once you’re done cooking and the pressure is released (you can release it by twisting the steam release valve from the cooking icon to the steam icon), the lid opens by pressing the top of a large knob. As a safety feature, the lid will not open until all pressure is released.
By trapping steam inside a tightly sealed pot, pressure cookers raise the pressure under which your food cooks (typically to around twice atmospheric pressure), thus raising the boiling point of water and significantly speeding up cooking times.
While folk wisdom holds that pressure cookers are dangerous, accidents are in reality rare (and m


 8613371530291