
living well pressure cooker safety valve in stock

Slow Cookers└ Small Kitchen Appliances└ Kitchen, Dining & Bar└ Home & GardenAll CategoriesAntiquesArtBabyBooks & MagazinesBusiness & IndustrialCameras & PhotoCell Phones & AccessoriesClothing, Shoes & AccessoriesCoins & Paper MoneyCollectiblesComputers/Tablets & NetworkingConsumer ElectronicsCraftsDolls & BearsMovies & TVEntertainment MemorabiliaGift Cards & CouponsHealth & BeautyHome & GardenJewelry & WatchesMusicMusical Instruments & GearPet SuppliesPottery & GlassReal EstateSpecialty ServicesSporting GoodsSports Mem, Cards & Fan ShopStampsTickets & ExperiencesToys & HobbiesTravelVideo Games & ConsolesEverything Else

Pressure cooking is a wonderful way to prepare food that cooks thoroughly and quickly at a high temperature. Some are worried about the dangers of using a pressure cooker, so it is helpful to find out how to check your pressure cooker safety valve for safe operation.
For those worried that a pressure cooker might explode, the safety valve is the design feature that prevents this from happening. If the cooker has a safety valve, you can see it installed on the cooker’s lid.
A pressure cooker is designed to trap the steam inside to increase the pressure. However, too much pressure is not safe. The valve must release pressure if it gets too high.
The blog of pressure cooking today has many recipes that are delicious. There are 25 recipes for pasta so you can try a new one every day for nearly a month.
There is a weight inside many of the safety valves that is lifted by the internal steam pressure when it reaches a certain amount. When the pressure lifts the weight inside the valve, this allows some steam to escape.
Jeffrey Eisner who says “he is a nice Jewish boy from Long Island.” He started with pressure cooking by making a simple mac and cheese dish with a recipe that he shared on YouTube. The video was an immediate success and led to his making new recipes for pressure cooking.
In a sealed cooker, as the pressure builds up, the boiling point of water rises. This phenomenon is the cause of the increased heat that cooks the food more thoroughly and faster.
The science that explains this is fascinating. The normal boiling point of water under standard atmospheric pressure of 15 pounds per square inch (psi) is 212°F (100°C). In a pressure cooker, the atmospheric pressure doubles from 15 psi to 30 psi. This added pressure raises the boiling point of water from 212°F (100°C) to 250°F (121°C).
If you see steam escaping from the safely valve do not worry. The steam escaping from the safety valve is its normal function, which means the valve is working properly.
If the internal pressure within the cooker gets high enough, this lifts a weight in the safety valve that allows steam to escape. The escaping vapor lowers the pressure. You can hear the steam escaping, making a whistling sound, or rattling the valve.
The first pressure cooking devices were used in the 17th century. They were useful to remove fat and collagen from bones so that the bones could then be ground down to make a pure bone meal.
The inventor of the device, Denis Papin, called it a “steam digester” or “bone digester.” His invention was the precursor to both pressure cookers and the steam engine. Surprisingly, the early designs did not have any safety features, and this caused some of the first ones to explode while being used.
The legacy of those early pressure-cooking devices may be why some still fear this problem even today. Papin, to his credit, came up with a design improvement that is what we call a safety valve to avoid the dangers of these explosions.
By the 1930s, the modern pressure cooker design became useful in a home kitchen. The Flex-Seal Speed Cooker, invented by Alfred Vischer, came out in 1938.
These home cookers became even more popular in 1939 with the release of the design by the National Pressure Cooker Company (now called National Presto Industries), which is still manufacturing these cookers today.
The first-generation cookers had a safety valve that worked with a weight. When the internal pressure rises high enough to lift the weight, some steam escapes, and the valve makes a distinctive rattling sound.
Second-generation cookers use a spring-loaded valve that makes less noise and is adjustable for pressure sensitivity by using a dial, which is on the cooker.
Third-generation models are the most recent versions. They use an electric heating source that is regulated by the internal pressure. These devices do not need a safety valve because the heat source automatically shuts off before the pressure gets too high.
Suppose you are thinking about getting a new cooker. In that case, there is another device that you might consider called a food dehydrator, which I describe in the article entitled, “How Much Electricity Does a Dehydrator Use?” here.
For the styles of cookers with a safety valve, it may not be obvious when the valve is not working if it is blocked. You may notice the lack of steam while the cooker is heated. The valve could rarely be blocked, but if not cleaned properly, it is possible.
Alternatively, the valve may be broken, missing, or the pot may not seal properly. These problems might allow too much steam to escape. This leakage may cause the cooker not to heat up properly and not allow the internal pressure to build up to the proper level.
One of the signs of a problem with a lack of pressure is that the food takes much longer to cook than you normally expect when using a cooker of this type.
One tip in the video is not to open the cooker after finishing cooking and take the lid to run it under cold water. This sudden temperature change can make the safety valve work less well and may cause the need to change the valve more frequently.
If you use a cooker that needs a valve to work properly and the valve is broken or missing, you can replace it with a new valve. Be sure to get the manufacturer’s specifications to ensure you use the correct replacement part.
Some of these problems include the ventilation knob being open or not enough liquid is in the cooker (requires at least one cup). Another cause is the sealing ring is missing, damaged, covered with food particles, or not in the proper position.
The video narrator shows how she cleans her float valve for her instant pot that she uses as a cooker. If you use too little liquid or too much, the cooker may not pressurize.
For the type with screws, hold the valve from the bottom of the lid with the pliers and use the screwdriver to remove the screws from the top to remove the broken part. Replace it with the new one and tighten the screws that hold it in place by holding it with the pliers from the bottom of the lid again and tightening the screws from the top.
For the type with a nut, use the wrench to loosen it for removal and perhaps a socket when you put on the new valve to tighten it with enough torque to hold it securely in the proper position.
Modern pressure cookers that are in good repair are quite safe. The one caution to remember is not to overfill the cooker so that the food might block the safety valve. This overfilling with food would be very difficult to do and not something to worry about for normal use.
Be careful where you keep your cooker on the countertop because it is important to know how hot a stovetop can get. Even when turned off, a stovetop may still be very hot, which I discuss in this article.
Now you know everything you need to know about a pressure cooker safety valve. You know what they do, how they work, and how to replace one if it needs repair. Enjoy your pressure-cooking recipes without worrying about the safety valve.
If having a safety valve on your cooker still bothers you, consider buying an electric cooker without a valve that instead has a built-in safety feature that automatically shuts off power if the pressure gets too high.

The pressure relief valve is a warning device that is designed to provide both visual and audio signals to indicate that the vent pipe has been blocked and is no longer regulating pressure and there is excessive pressure in the cooker.
This part is for use only with the models 0136511 Presto® 6-Quart Stainless Steel Pressure Cooker and 0137005 Presto® 8-Quart Stainless Steel Pressure Cooker.
If old tales of exploding pots have kept you from jumping on the pressure cooker bandwagon, it’s time to reconsider. These days, the best pressure cookers are not only versatile and easy to use, but they’re brimming with safety features — and they’re capable of making great meals faster and easier than ever.
Perfect for busy families or feeding guests without having to spend the whole night in the kitchen, pressure cookers are great for whipping up stews, soups and tough meat cuts as well as whole chickens, rice, beans and more. To determine which popular and highly rated models are best, we put 15 electric and stovetop cookers to the test, using each to make a no-stir risotto, unsoaked beans and a simple beef stew. Here’s what we found.
The creamiest risotto in five minutes? Perfectly cooked beans and oh-so-tender stew meat? Precision cooking, hands-free steam release and a sleek, intuitive display make this pressure cooker worth the price.
With a unique one-handed lid design, durable base and easy-to-grip handles, this stovetop cooker is simple to use and delivers great cooking results for under $100.
It cooks rice — and slow cooks. It can make yogurt — and cook sous vide. With 10 preset functions and app control, the Instant Pot Pro Plus promises to be the holy grail of small kitchen appliances, and delivers on a lot of its promise. First and foremost, though, it’s a great electric pressure cooker, with a simple interface, solid build and useful pressure-release functions that let us easily get great results on all of our test recipes.
Even better, the Pro Plus made getting these results easy. Its touch control panel is so intuitive that we were up and running with just a glance at the user manual (and honestly would have been just fine without it). Unlike most other models tested, the digital panel features super-helpful status messages that ensure you always know what’s happening inside the pot: from preheating to cooking to keeping your food warm. You can select from 10 program modes (pressure cook, slow cook, rice, steamer, canning, yogurt, saute, sous vide, a self-stirring feature called NutriBoost and keep warm) or customize your own, with the option to choose from low, high or maximum pressure as well as preset low, high or custom temperatures. A dial allows you to adjust the time or temperature quickly and a delay start option lets you start cooking at a designated time and doubles as a kitchen timer. The touch screen also gets bonuses for being easier to clean than a button-heavy control panel.
Beyond the touch screen, the ability to control the Pro Plus with an app (which gives you access to more than 1,000 recipes) was genuinely useful. Not only does the Pro Plus give you stovetop-like control over pressure release, with quick, pulse or natural release options, but you can control the release from across the kitchen if you’re at all skittish about jets of hot steam.
The Pro Plus is built using three-ply stainless steel with silicone handles (making it easy to move the cooker to the stovetop or sink or to pour its contents into a bowl or container), and the 6-quart inner pot can be on the stovetop or in the oven for added convenience. An anti-spin feature keeps the pot from rattling around during the cooking process. It comes with a stainless steel steaming rack and extra sealing ring and the cooking pot, rack and lid are all dishwasher-safe. It’s also nice and compact at 13.2-inches long by 13-inches wide by 12.7-inches high and weighs about 20 pounds, so it doesn’t take up too much cabinet or counter space and isn’t a huge chore to lug around.
The Pro Plus only comes in 6-quart size, where some other Instant Pot models are also available in 3- and 8-quart options, which may be a detractor for those feeding large groups or households. It also is not compatible with the brand’s air fryer lids that some may find useful. The one-year limited warranty could be more generous and at $169.95, it’s certainly pricier than the already very capable Instant Pot Duo (see review below). But we think the Pro Plus’s app controls, simple interface, progress status bars and excellent cooking results give it the edge over the other Instant Pot models and make it the best choice overall among the electric pressure cookers we tested.
Instant Pot’s best-selling model comes with seven built-in functions (pressure cook, slow cook, rice cooker, yogurt maker, steamer, saute pan and food warmer), and also features 13 customizable programs. The digital and push-button display is large and easy to read and we appreciated that the lid can be detached for easier cleanup. The stainless steel inner pot can be tossed in the dishwasher and it’s simple to switch between low and high pressure, while a keep warm option and included steam rack offer added convenience.
During our recipe tests, we found the beans were cooked well overall, but did find some inconsistencies, with some softer than others. The risotto needed a bit more time at the end on the saute function to get it to the right creamy consistency and the stew veggies were a bit too tender, but still resulted in a tasty dish.
The Pro Plus upgrade performed better on all three recipes, and has the added benefit of a more streamlined interface, auto steam release and progress indicator. But if you’re just testing out the pressure cooker waters, this is a great option for wading in.
With sleek design and solid performance typical of Breville’s products, we gave the brushed stainless steel Fast Slow Pro high marks for performance and features, which should satisfy advanced pressure cooker aficionados and hands-on cooks. The Breville gives you finer control over pressure (you can adjust in tiny 0.5 psi increments) than the other models we tested. Dual sensors at both the top and bottom of the machine offer even more control when it comes to pressure and temperature, and an auto warm function kicks into gear when it’s done cooking.
And we loved how simple the cooker was to operate. The bright and easy-to-read LCD display and dials allow you to quickly choose from 11 pressure cook settings (vegetables, rice, risotto, soup, stock, beans, poultry, meat, bone-in meat, chili and stew and dessert), from low to high, and you can customize settings as well. We appreciated that the display changes colors denoting whether it’s in pressurize, cook or steam release mode. And the auto altitude adjuster is great for those cooking at higher elevations, since a longer cook time is needed as atmospheric pressure drops the higher you get above sea level.
If you intend to use your electric pressure cooker often, love having the ability to really fine-tune your pressure levels, appreciate the convenience of hands-free steam release and aren’t too worried about a hefty price tag, we think the Breville Fast Slow Pro is a kitchen tool you’ll look forward to putting to work again and again.
If you prefer a simple, straightforward stovetop pressure cooker, the Kuhn Rikon Duromatic looks lovely on the stovetop and does an impressive job cooking food. We tested the 8.5-quart option (Kuhn Rikon offers the Duromatic in a wide range of sizes) and found the two-handle design easy to grab, the pressure indicator simple to read and, while the company doesn’t recommend cleaning the heavy stainless steel pot in the dishwasher, it was no big deal to hand wash it (and we know folks who have tossed their own Kuhn Rikons in the dishwasher for years with no damage).
Using the Duromatic is a snap: Add your ingredients, lock the conical lid into place, heat the pot on high and watch the spring-loaded pressure gauge rise in the center of the lid. When you see one red line, it’s at low pressure; two red lines delineate high pressure, letting you know it’s time to turn the heat down for an evenly pressurized cook. Yes, you’ll need to keep an eye on it and adjust your burner heat accordingly, but if you get distracted, steam is automatically released to keep the pot from overpressurizing (we had to do minimal adjusting during our tests). When your cook time is done, depending on the recipe you can let the pressure come down naturally, or quick-release by moving the pot to the sink and running cool water over the rim of the lid, or press the gauge down to release pressure, with steam releasing evenly.
The T-fal Clipso is a breeze to use. In our tests, the Clipso pressurized very quickly. As with all stovetop models, you bring up the heat to your desired setting, and once steam begins to release through the valve, it’s time to reduce the heat and set your timer. We quickly found the sweet spot and noted that the pot held its pressure nicely throughout the cooking time, with little need for turning the heat up or down.
Like the electric pressure cookers, all the stovetop models performed well in our recipe tests, although some earned more points for better consistency, texture and faster cook time. So while the Kuhn Rikon beat out the T-fal when it came to making beans, risotto and stew, for about $155 less, the T-fal still did an admirable job.
The model comes with a steam basket and tripod and is dishwasher safe when you remove the gasket and pressure valve. It comes with a 10-year warranty against defects or premature deterioration and, for other parts, a one-year warranty is included. And we appreciate the side handles on the pot that allow for easy maneuvering. But what sets the T-fal apart from other models is its unique lid. Designed for one-hand use, the lid clamps down on the pot with jaws that lock into place with the press of a button. Once you’re done cooking and the pressure is released (you can release it by twisting the steam release valve from the cooking icon to the steam icon), the lid opens by pressing the top of a large knob. As a safety feature, the lid will not open until all pressure is released.
The Clipso is only offered in a 6.3-quart capacity, which offers plenty of room to cook for a family of four, and is still compact for storage. For convenience and price, we believe this is a great pressure cooker for beginners and veterans alike.
By trapping steam inside a tightly sealed pot, pressure cookers raise the pressure under which your food cooks (typically to around twice atmospheric pressure), thus raising the boiling point of water and significantly speeding up cooking times.
Simple stovetop cookers use the heat source of your stove and need a bit of attention as you’ll need to adjust your burner to maintain proper pressure, while newer electric versions do the job automatically (and often include functions ranging from air fryer to slow cooker to yogurt maker).
While folk wisdom holds that pressure cookers are dangerous, accidents are in reality rare (and many of those that have been documented have been the result of poor maintenance or misuse). All the pressure cookers we tested come with multiple safety features and lids that lock into place, and are designed so that all pressure must be released before the lid can be removed (with some release techniques, steam is released rather loudly and aggressively and definitely startled us a few times). Some models spit out a bit of moisture as steam condenses, but many of the electric versions include condensation collectors that catch any water before it drips onto your counter.
So, electric or stovetop? Both netted similar cooking results, so it really does come down to personal preference: Do you like your cooking to be hands-on or hands-off? If you want a lot of options (Slow cook! Air fry! Sous vide!) and want to simply add your ingredients and let the machine do the heavy lifting, an electric version is for you. They generally take up more counter space, but if you use your cooker several times a week, you won’t mind and may even save space if it allows you to get rid of your rice cooker, air fryer and crock pot.
We found the stovetop pressure cookers to be simple to use and discovered they come to pressure faster than their electric counterparts. Start on high heat until the desired pressure level is achieved, then simply lower the heat to keep the pressure constant for the duration of your cook time. Of course, you’ll need to keep an eye on your cooker most of the time to be sure the pressure is at the right level.
Our testing pool included 15 pressure cookers in all — nine electric and six stovetop — ranging in price from less than $50 to $330, and in 6- and 8-quart capacities. And while all the models performed well in our recipe tests, which included making unsoaked pinto beans, pea and mushroom risotto and a hearty beef stew, details including construction, interface, ease, cook time and versatility resulted in varied scores. All models were easy to clean, as most pots, inserts and parts are dishwasher safe, although many lids need to be hand-washed fairly rigorously to keep odors from hanging on. And while we didn’t record any particularly bad recipe results, some required more cooking time and some definitely netted better results.
Since many of the electric models are billed as multicookers, we did take versatility into account, noting how many settings, functions and features were available, but looked at these models as pressure cookers first and foremost. We did pay careful attention to ease of setup and use, noted what accessories were included and their usefulness in actual cooking, and looked at the overall quality of the user interface elements of each cooker. By and large, even the electric versions were relatively intuitive to use, but we made sure to note when we had to turn to the instruction manual (and when we needed technical translation!); for stovetop cookers we checked to make sure pressure settings were easy to read, steam valves simple to manipulate, and seals and other moving parts easy to manage.
Unsoaked pinto beans: We cooked the same amount of dry pinto beans either at high pressure with the same cook time or using the bean function if offered, noting texture, consistency, how well cooked they were and whether they needed more or less cook time than called for.
Mushroom and pea risotto: We used the same recipe, using high pressure and the same cook time or the risotto function if included, to make the no-stir dish, first sautéing onions in oil before adding arborio rice, chicken broth, wine and other ingredients, taking note of any sticking to the pan, fluffiness and how well the dish came out overall.
Beef stew:Using the same recipe and duration for each step, and cooking on high pressure, we recorded how well the stew cooked in each model, paying special note to the tenderness of the meat, potatoes, carrots and turnips, as well as the consistency of the broth.
In the course of our assessment, we paid careful attention to overall design and build quality, examining materials used, noting any unique features such as handle, inner pot and lid design, pressure release valves and gauges and safety enhancements. We checked to see how much storage and counter space the various models took up, and whether they were heavy or light and easy or difficult to handle. And while most of the inner pots and parts of the pressure cookers tested were deemed dishwasher-safe by the manufacturers, we noticed that lids were largely hand-wash only, so we checked to make sure how much elbow grease it took to remove food, and whether our efforts left behind any staining or remaining food odor.
If you love the Instant Pot Duo and also love using an air fryer, this may be just the electric pressure cooker option for you. We found it performed identically to the Duo when it came to pressure-cooking our three recipes, and the interface is also essentially the same as the Duo, though it has four more cooking functions than that model (all 11 include roast, slow cooker, pressure cooker, air fry, saute, sous vide, bake, broil, steam, warm and dehydrate).
However, it’s about twice as heavy as the Duo, and with the air fryer lid (it also comes with a regular lid), it requires a lot of vertical storage and counter space (though not as much as two separate appliances). Included are a broil/dehydrating tray, multi-level air fryer basket, air fryer basket base, protective pad, storage cover and rack. So, if you think an air fryer-pressure cooker combo would save room and you’d use it frequently, this model is certainly worth considering. Otherwise, the Duo will work just fine and the Pro Plus will perform even better.
There was a lot we liked about Cuisinart’s pressure cooker: It has a unique squarish shape, 12 pre-programmed settings, a large and easy-to-read LCD display, both dial and push-button controls and it comes with a handy trivet and stand. The nonstick cooking pot made cleaning a snap and we liked the way the lid locked into place with little effort by simply turning a knob. Cook times were a little longer than for the other machines we tested, but results were good so long as we compensated: we had to cook the beans five minutes longer than the recipe called for, but they turned out nicely with the added time. The risotto had a nice texture after we sauteed it for a few extra minutes to finish the rice and the stew was nice and tender. A big plus for this machine is the steam release button and preheat indicator that allow you to see your cooking progress. We didn’t like that the lid is attached at the back (most of its competitors are attached on the side or lift off completely), because it makes opening the machine a little scary, as any remaining steam is pointed right at your face. The controls were also a bit less intuitive than our winning models.
It takes practically no time to get the Farberware pressure cooker working once you take it from the box: Just a quick wash and a scan of the instruction manual and you’re off. It comes with nine presets (rice, meat, chicken, fish, vegetables, beans/lentils, browning/searing, soups/stews and slow cooking), a straightforward LED display, and includes a cooling stand and plastic measuring cup and spoon. User reviews give it high marks, but we found the risotto to be gummy, the beans to be inconsistent and the stew a bit overly cooked (the veggies were on the mushy side, for example). “I wouldn’t complain if I was served this at a school cafeteria, but would be mad if I got it at a restaurant,” one taster remarked. The machine is stainless steel, though it felt less sturdy than its competitors. We think it’s worth it to spend a little more money to get an Instant Pot Duo.
The Zavor LUX is a high-quality pressure cooker: It is simple to set up, with an intuitive digital LED display, including a super-handy preheating indicator, a lock icon, and screen that changes colors so you know when cooking has started; the LUX also has a custom setting that lets you program your favorite recipes. There are 10 cooking functions (pressure cook high and low, slow cook high and low, steam, saute, sous vide, simmer, yogurt, grains, eggs, dessert, keep warm and time delay) and it comes with a steamer basket and trivet. We liked that the pressure valve includes a clean option that pops the piece out for easy maintenance.
Unfortunately, the LUX didn’t perform as well as our winners. The risotto was a bit overcooked and the beans and stew both took extra time to finish. It also doesn’t include an automatic steam release feature and seemed to rattle more than others while in use. Steam released aggressively and the lid felt hotter than other models. It’s a solid machine, but the Instant Pot Pro Plus gave better results and can be found at a lower price.
With a whopping 14 programmable cooking functions (pressure cook, steam and crisp, steam and bake, air fry, broil, bake/roast, dehydrate, sear/saute, steam, sous vide, slow cook, yogurt, keep warm and proof), Ninja’s take on the pressure cooker offers a whole lot of versatility. It comes not only with an 8-quart ceramic-coated pot, but also a 5-quart cook and crisp basket for air frying, a reversible rack to double your cooking capacity and more. We thought the “SmartLid Slider” was clever and easy to use: just slide a toggle to Pressure Cooker, Steam Fryer or Air Fryer to unlock different cooking modes and functions on the large, intuitive digital display.
The Foodi performed well on our recipe tests, but not as well as our winners. And while we found it easy to clean, its size was our biggest concern, especially for a device that is meant to replace multiple appliances. The priciest pressure cooker we tested, it was also the biggest. At 15.4-inches long by 14.2-inches wide by 14.25-inches high, it was too big to fit in any of our kitchen cabinets or under our standard-height countertop cabinets for that matter. It’s also really heavy at 25 pounds, making it a pain to haul out of storage if there’s no room for it in your kitchen. For us, the size and price kept it from the winner’s circle, but if you really need all of the functions it offers and have a lot of space, it might be worth a look.
For those looking for a step up from the original Instant Pot Duo, the Pro offers a few more bells and whistles that allow for more precision cooking. Rather than seven functions, the Pro features 10 (pressure cook, slow cook, rice/grain, saute, steam, yogurt, warm, sous vide, sterilizer and canning). It adds twice as many one-touch programs, bringing the number to 28, and the pressure release valve on the lid has a plastic steam diffuser cap that really did result in a quieter release. It has a more advanced interface than the Duo, the display has a cooking progress status bar, and the inner pot has silicone inner pot handles; the steaming rack also has an extra sealing ring. The recipes all turned out well, although not quite as well as our winners. It’s a great pressure cooker, but we prefer the added convenience of the Pro Plus for about $20 more.
With a strong and sturdy stainless steel pot and a lid that easily locks into place, we were big fans of the Vitaquick. For one, its large blue pressure indicator is easy to see, with two white ring markings: one ring means it’s at low (or gentle) pressure, two means it’s at high pressure. Other great features: a removable handle that makes cleaning a snap (remove the gasket in the lid and it’s all dishwasher-safe), clear measuring markings on the inside of the pot that mean you don’t need to dirty extra dishes, and a handy helper handle to carry it without fear of dropping the thing. The materials are high quality and we appreciated the added safety feature of a lid with a button that turns green and clicks when it’s locked into place. We also really liked the steam release function in the handle that requires just the push of a button to begin rapid release, and that it comes with a lifetime warranty. So what kept it from winning? The Kuhn Rikon did just a bit better job on the risotto and costs a little less. But the Vitaquick was a very close runner-up.
Like the Vitaquick, the Fissler Vitavit is a wonderful stovetop pressure cooker. With a polished stainless steel finish and removable handle, it also includes a locking indicator that makes positioning the lid into place easier than other models we tested. But our favorite feature is the traffic light-like indicator that delineates between the three pressure indicators: yellow (building pressure), green (correct pressure) and red (too much pressure) so you can adjust your burner accordingly. There is also a no-pressure steam setting and the cooker has settings for gentle and fast cooking. As for the build, the long looped handle and helper handle make it comfy to grab and we appreciated the contrast in the inner pot’s measurement guide (most models are etched and hard to read). We also like that the steam release function can be used from the handle or directly from the control valve. The recipe results were similar to Kuhn Rikon and Vitaquick so, while we really liked this model, the lower price and solid build of the Kuhn Rikon tipped the scales in its favor.
If an entry-level stovetop pressure cooker is something you’re interested in trying out, the popular Presto is a nice place to start. It did an OK job compared to the higher end models, though the risotto was on the soupy side when time was up, the beans needed an extra 10 minutes and weren’t cooked as consistently as our winners, the stew veggies were a bit overly cooked and the broth needed to thicken up a tad more. Once we compensated for the longer required cooking times, we saw good results.
The pressure gauge can be difficult to read, and the pot rattled more than others and also required more babysitting to keep the temperature right. And the handle isn’t comfortable compared to the other models we tested (plus the Presto ships disassembled, so you’ll need to grab a screwdriver to attach the handle). But we appreciated that it’s made of stainless steel when other inexpensive pots are often aluminum—which is a must for those with an induction cooktop or who like to make tomato-based or other acidic dishes. Overall, it’s a pressure cooker that will get the job done. And it has a whopping 12-year limited warranty, where most other affordable models top out at one year. Still, for an additional $20, we preferred the T-fal Clipso.
The stainless steel stovetop version of the Zavor Duo comes to pressure in just a couple of minutes. It features a lid that’s easy to lock into place: align the lid and pot handles and switch the yellow lock tab down, and it will stay firmly sealed until all pressure is released. A pressure regulator knob allows you to choose low or high pressure, as well as steam release and clean. And the pressure indicator was easy enough to read at the top of the lid handle. It’s dishwasher safe and comes with a steamer basket and trivet, and we liked the addition of a helper handle plus its generous 10-year warranty. It did well on our recipe tests as well. The risotto, beans and stew all required longer cook times than other models, but reached their desired consistencies eventually. So, while we liked the Zavor Duo quite a bit, the T-fal Clipso performs similarly and costs $30 less, thus getting our budget nod. But if you prefer a longer handle on your stovetop pressure cooker, we think you’ll have great success with this model.

That ensures that nothing interferes with the lid of the pressure cooker, which is where most of the other safety systems are. Also, check that the primary valve is clean and clear before pressure cooking.
If something were to go side-ways, even before it gets to that point, the pressure cooker itself will detect that the pressure (temperature) inside is too high and turn off the pressure cooker. But, while that’s happening, though, the food inside is still boiling and building pressure so the cooker will release excess pressure from the valve on the lid. And, if the main valve were to be clogged the cooker will release pressure from the lid-lock or secondary valve. If that were to be blocked, the cooker will release pressure from the gasket.
The last safety system of for absent-minded cooks like me. Where at the last minute I realize, “Oh, I need to add some carrots” and try to open the pressure cooker during cooking. Well, the lid locks automatically the minute pressure starts to build. It means that if there is any pressure still inside the cooker, you cannot open the lid. It’s a mechanical system so even if there is no electricity you will still be prevented from opening the lid.
Make sure to have a look through the manual for your pressure cooker so you"re familiar with all the important parts before you start cooking. Here"s a basic rundown of what to look for.
Some pressure cookers (like mine!) have a locking mechanism you have to use to pressurize the cooker. Others just let you know when the pressure cooker has come to pressure and lock automatically - many electric pressure cookers do this!
Every pressure cooker will let you know when the pressure is reached. On my current stovetop pressure cooker, the pressure indicator is a little yellow button that pops up. On the electric pressure cooker I had, the red middle of the steam release valve popped up.
The steam release valve is one of the most important parts of the pressure cooker. This is the way you tell the pressure cooker to build pressure and also how you release pressure. Most models allow you to turn the valve to build or release pressure. The steam release valve is how you"ll quickly release the pressure if a recipe calls for that.
As your pressure cooker comes to and stays at pressure, you will see steam escaping. The major place steam exits the pressure cooker is called the steam release valve, which sometimes doubles as the pressure indicator. It"s super important to keep this clean - I always wash this part of the lid first!
Most stovetop cookers also have areas around the edge of the lid where steam can escape, and electric pressure cookers tend to have a large area on the back of the pressure cooker. Sometimes you"ll see a bit of condensation around these areas, too.
The gasket is the rubber/silicone/plastic ring that goes inside rim of the lid. The gasket should be treated with utmost care - without this thing you"re not going to be able to cook at pressure!
Check the inside of the cooking pot. Every modern pressure cooker I"ve ever used has fill lines on the inside - maximum and minimum. These will tell you at a glance how you"re doing fill-wise.

It"s good that the "green arrow valve" never popped up; that"s the safety fuse, and only "pops" (destructively, and probably spraying food onto the ceiling) when the cooker pressure goes way too high.
The missing part is the pressure regulator, gauge or counterweight. The pressure cooker won"t work without it. It blocks steam coming out of the vent until the steam pressure gets high enough to push the regulator up off the vent, thus limiting the internal pressure.
Your cooker is made by Presto. Presto calls that part a pressure regulator, as well as I can tell: http://www.pressurecooker-outlet.com/Presto-Pressure-Cooker-Parts.htm

To properly remove the floating valve, begin by removing the mini floating gasket on the underside of the lid. Removing the mini floating valve will disconnect the floating valve and it will drop out of the top of the lid.
To properly replace the floating valve, place it back into the top of the lid with the smaller dented end going in first. This dent is where the mini floating gasket will sit to secure the floating valve in place. Once you see the floating valve sticking out of the underside of the lid, secure it into place with the floating mini gasket.
This Instant Pot model offers more cooking control than our top pick does, and it has upgraded features such as a huge LCD screen, as well as a redesigned inner cooking pot with stay-cool handles for lifting the insert out or keeping the pot from spinning while you stir.
In 2021, Instant Pot released the Instant Pot Pro 6-Quart, which has some great features that make it a meaningful upgrade over the Duo, namely handles on the inner cooking pot, a large LCD, customizable and savable cooking presets, more temperature levels for sautéing, a sous vide function, and a diffuser cap that makes the steam release just a bit gentler (you’ll still get a jet of steam spurting out from the top, but it won’t be as loud, strong, or long). The Pro also comes with an extra silicone sealing ring for the lid and works with Instant Pot’s QuickCool Tray (sold separately) if you want to depressurize foods faster before serving. Of Instant Pot’s costlier models, the Pro and its features are most worth the jump in price, especially if you plan to use your multi-cooker frequently. Instant Pot’s midlevel offering, the Duo Plus, usually costs about $20 less than the Pro at this writing, but the Duo Plus’s features are less impressive.
Despite the Pro’s extra features, its basic cooking functions—pressure, slow, steam, yogurt, rice and grain—are essentially the same as on other Instant Pot models. We do like that the Pro has five custom sauté temperature settings (compared with the Duo’s three) in addition to the low, high, and medium presets. It also has a sous vide setting that, for all intents and purposes, does the job. The Pro has a bake function, as well, but we were unable to fit three different 8-inch cake pans into the Pro, so we weren’t able to successfully bake a cake in our tests (Instant Pot sells a proprietary baking pan, but we didn’t test it). We tried with some smaller cake rounds and ended up with uncooked goo even after an hour. You can make a cheesecake in all Instant Pot models, and you can use steam to bake in models without the air-fryer lid. (A representative from Instant Pot told us that on its Instant Brands Connect app, the company offers baking recipes—such as for brownies, cornbread, and coconut cake—that are tailored to the Pro. We didn’t try these recipes in our tests, but if you’re especially interested in using your Instant Pot to bake on top of all the other uses, we might suggest considering one of the air-fryer models (or lids), which we discuss more below.
Of the Instant Pots we’ve tested, the Pro has the most intuitive interface, with a large, bright LCD. It has buttons for you to select your cooking program (such as pressure, sauté, or steam) and a dial that toggles between presets within each program, as well as the option to set your own time and temperature. The screen has white lettering with a blue background and is readable from a distance, with large icons and a progress bar so you always know where the Pro is in the cooking process. In contrast, the Duo’s pared-down red and black screen indicates only that it’s heating up with an “On” message before counting down once it has reached temperature or pressure. The Duo also doesn’t have a start button—it starts automatically—which can feel counterintuitive if you’re just getting into pressure cooking. You can also turn off beeping noises on the Pro, whereas you cannot disable sounds on the Duo or Duo Plus.
The Pro’s lid has a steam-release valve that promises to make the release quieter than on other Instant Pots, but in our tests, we didn’t notice a significant difference in noise levels. If you’ve used pressure cookers in the past, you know that using the quick-release method produces a loud and forceful geyser of steam. The valve cover on the Pro diffuses the force of the steam, though it doesn’t minimize the noise (sorry). In 2021, Instant Pot added an automatic sealing feature and a quick steam-release switch to all of its models, including the Pro: You won’t be left wondering whether the pot is sealed, and you won’t have to dodge the jet of steam after twisting the valve (which you used to have to do with the older models). Unlike the Duo, the Pro has two reminders you can set for steam release at five and 10 minutes. The Pro also has a clearly marked venting system that includes a red pressure indicator, a vent/seal switch that automatically seals when you close the lid, and a steam-valve diffuser.
You also get two silicone sealing rings (which ensure that the lid maintains a tight seal) with the Pro. Silicone absorbs food odors, so having the extra ring is handy if you use your pressure cooker for both savory and sweet recipes and don’t want to go to the trouble of making a cheesecake only to have it come out with the faint scent of beef stew. Using dedicated gaskets for pungent and mild foods, respectively, helps you avoid that.
In 2021, Instant Pot has advertised that the Pro preheats 20% faster than the brand’s other pots. We timed how long the updated versions of the Duo, Duo Plus, and Pro took to pressurize while cooking a pot of beans, and we didn’t find a significant difference. The Pro preheated in 14 minutes 24 seconds, while the Duo took 14 minutes 48 seconds and the Duo Plus took 16 minutes 8 seconds. All pressure cookers take time to pressurize, but you can still walk away from the machine instead of standing over the stove.
The Pro is also one of the few Instant Pots that work with the QuickCool Tray, which you can buy separately for about $10; this tray sits on the lid and allows you to cool the pot down faster, reducing the time it takes to depressurize during natural release. In our 2019 tests with the Duo Evo Plus, we found that the QuickCool Tray reduced depressurization time by half, from just over 30 minutes down to 15 minutes. Here’s how it works: You fill the tray’s reservoir with water and freeze it until solid (about three hours). When you’re done pressure cooking, turn off the pot—double-check that it’s not on “Keep warm”—remove the vented plastic cover from the lid, and place the frozen tray on the exposed metal area beneath. By the time the pressure indicator in the lid drops, signaling that it’s depressurized, the QuickCool Tray and the water inside are pretty hot—so maybe use a dish towel or a mitt to protect your hands.
Although we wish the QuickCool Tray were not sold separately, it does give you a pressure-release method tha isn’t as jarring as releasing a geyser of steam and is faster than waiting for the pot to depressurize naturally.

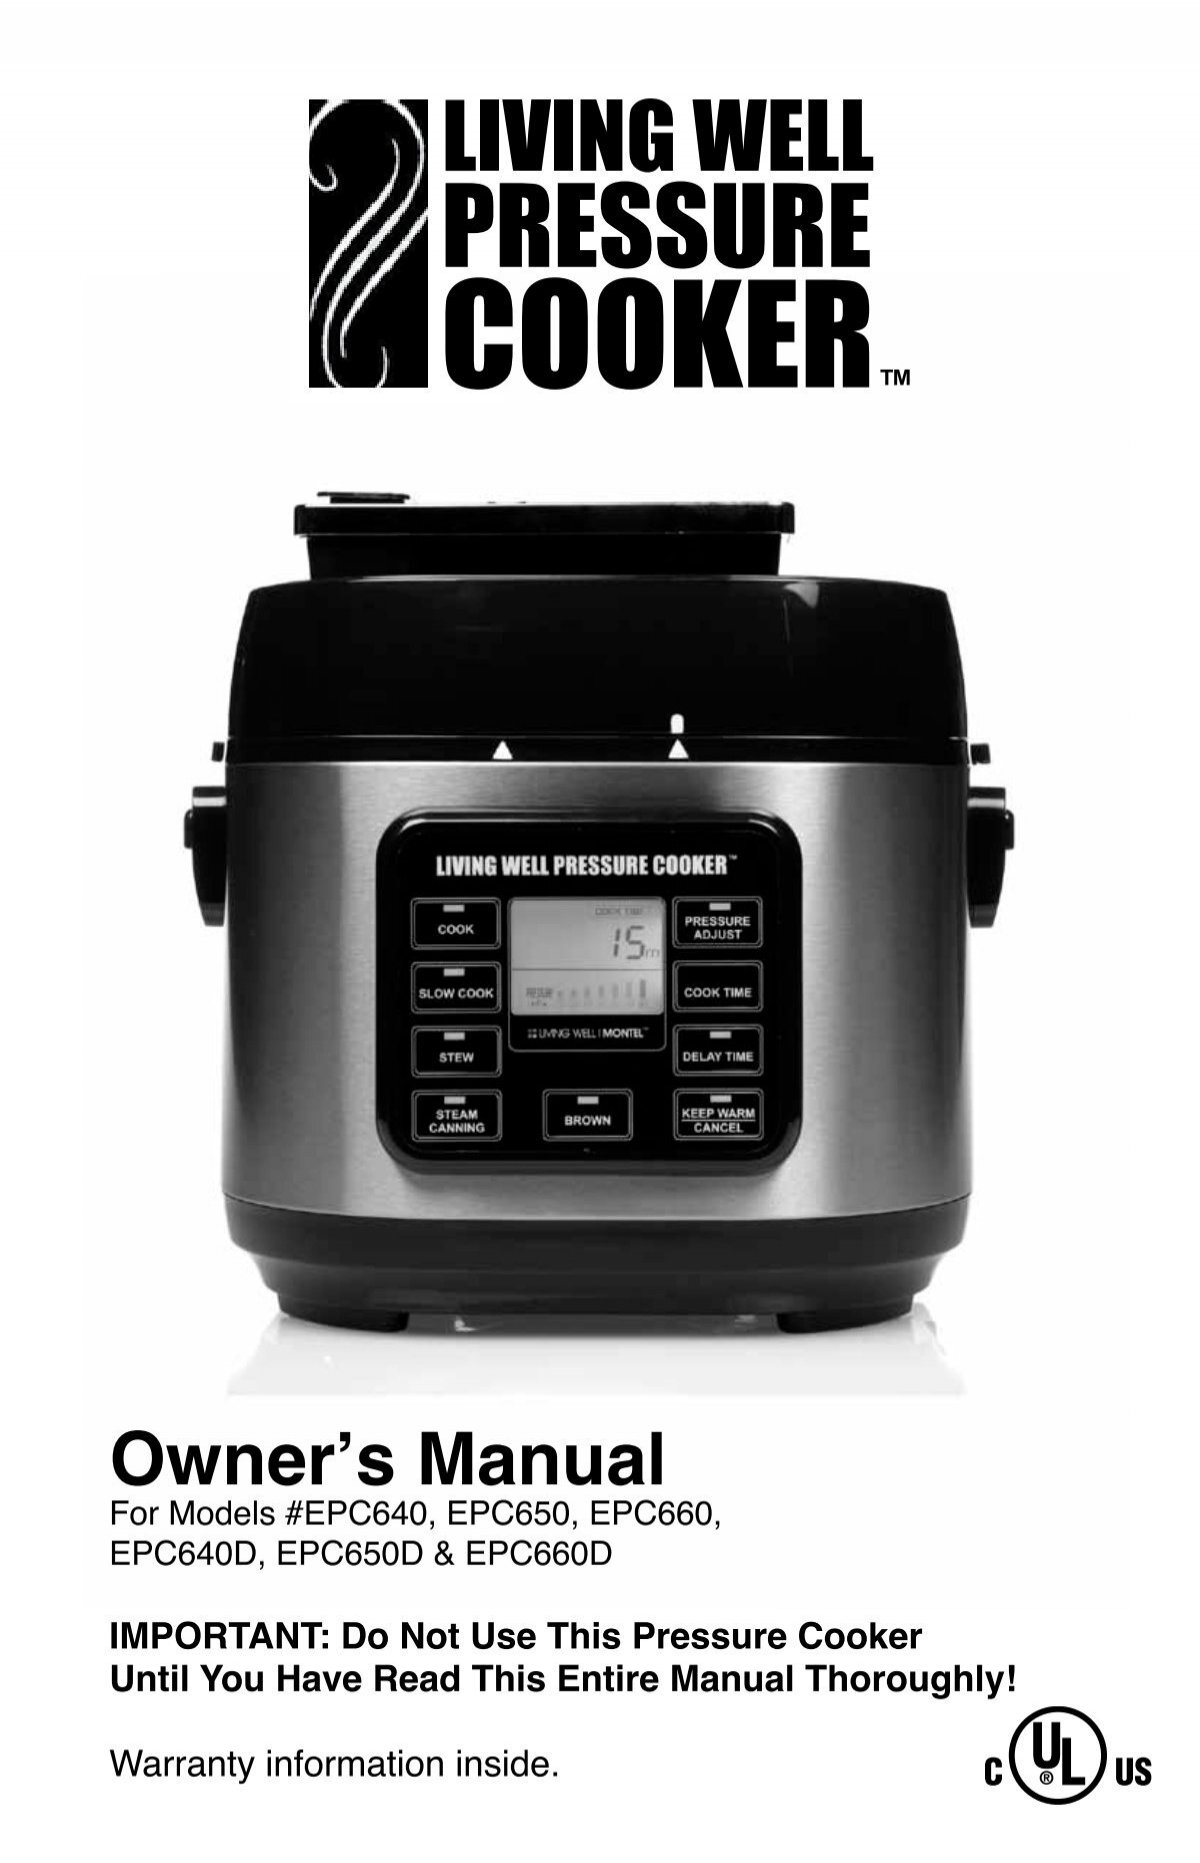
To address this concern Living well pressure cookers have come up with the fastest and the most convenient way to cook any cuisines. I took a trail of this pressure cooker and to my surprise I found all these features listed below.
Along with the pressure cooker I found a few accessories which completes the kitchen like spoon, measuring cup, steam basket, glass cover, spring loaded cake pan, float valve seal kit and a wire rack. All this is accompanied with a 6-qt pressure cooker
There are many second hand pressure cookers too available. I would recommend you to put in the extra money and go for a fresh piece and if you plan to buy one second hand piece make sure that your country extension office checks the seal and pressure for you properly to ensure your safety.
Don"t buy this pressure cooker. There are many reasons why I am not suggest you to buy this. For the same price you get better digital pressure cooker which its replacement parts are available and better company provide reliable support.
Found some complaint about this pressure cooker, such as the seal leaking all around and got an F2 error after use several times. I think it is better not to waste your money, spend it on something with a quality name on a better pressure cooker that will work for you.
After a long day of work, the last thing you want to deal with is cooking a giant pot roast in the oven for hours. Or what if you forgot to soak those beans for dinner? Dishes like beef roast and home-cooked beans are usually weekend-only endeavors, requiring hours of free time to prepare. Or so you thought. You can save valuable time and streamline dinner prep with the help of a pressure cooker, turning weekend meals into weeknight solutions.
Pressure cookers have come a long way since their heyday in the 1940s and "50s. Modern stovetop pressure cookers are equipped with multiple safety features-the design of the lid-locking system makes it impossible for the lid to be removed when the pot is under pressure. New-generation pressure cookers, equipped with spring-valve pressure regulators, are quiet, streamlined and safe.
A real game-changer in recent years is the electric pressure cooker and multicooker. Popular devices like the Instant Pot have introduced pressure-cooking to the mainstream with easy, safe operation and hands-off cooking. Simply snap on the lid and press a few buttons. The cooker does the rest. Note that electric cookers operate at a slightly lower level of pressure, so cook times are a little longer than for their stovetop counterparts.
A pressure cooker works by trapping steam inside the sealed pot. This causes the atmospheric pressure to rise, which increases the boiling temperature of water. So, instead of cooking food at 212°F (if you are at sea level), you cook it at 250°F, resulting in dramatically faster cooking times without harsh boiling.
This also translates into major energy savings. Depending on the type of food and the type of cooker, a pressure cooker can help you green up your kitchen with an energy savings of up to 50 to 80 percent, according to manufacturers.
Modern pressure cooking is safer than ever, energy-efficient and will save you time and effort with hands-free cooking. But the cookers do require a bit of a learning curve for best use. Below are the basic steps for how to use your pressure cooker (electric or stovetop).
Check to make sure everything is in place before cooking. For electric pressure cookers, a clean and dry inner pot sits inside of the cooker, and food should only be added to the inner pot. The gasket, a silicone ring that snaps into the lid, should be clean and properly fitted into the lid. For stovetop pressure cookers, check that the inner part of the lid rim, outer rim of the pot and the valve are clean. Check that the gasket is flexible and not dried out; replace it if necessary.
Add the ingredients to your pressure cooker. Do not fill the cooker more than two-thirds full (or half full for foods that may froth, e.g., beans and grains, or dishes that are mostly liquid and require a quick release).
Program your pressure level and cook time into your electric pressure cooker,and skip to step 6. For stovetop pressure cookers, bring the pot to high pressure. Once the cooker reaches high pressure, it is important to lower the heat immediately. If left over high heat, the food may become overcooked. If using an electric stove, use the two-burner system: While the cooker comes to high pressure over high heat, heat a second burner to medium-low or low heat. When the cooker reaches high pressure, move it to the second burner and keep it just hot enough to maintain high pressure.
Release the pressure. Once cooking has finished, you must release the pressure before you can remove the lid. You have a few options: Natural Release: This method is recommended for frothy and high-liquid foods, as well as big pieces of meats and other foods that aren"t at risk of overcooking. You simply leave the cooker alone and let the pressure come down naturally. This process can take anywhere from 5 to 20 or more minutes depending on your cook time and how full your cooker is.
Quick Release: This method is recommended for ingredients with short cook times, like some vegetables and seafood, or for staggering ingredients, such as adding a vegetable partway through a stew. For both types of cookers, press or turn the steam release valve once cooking is complete to release the steam. Be careful to immediately move your hand and other body parts out of the way of the steam, and don"t position the cooker under cabinets or other obstacles. Do not use a quick release when cooking foods that tend to froth or for liquidy foods that fill the cooker halfway or more. These foods can clog the valve or spray hot liquid.
Cold-Water Release: This is the fastest method for stovetop pressure cookers and a good option when you want to stop the cooking quickly. DO NOT use this method with electric pressure cookers, or you risk electrocution. For stovetop models, place the pressure cooker in the sink. Hold the cooker at a slight angle and run cold water over the outer edge of the lid so that it flows over the lid and down the sides. Do not let water run directly over the vent or valve.
If you live at an altitude of 2,000 feet or higher, a pressure cooker may be your best friend in the kitchen. The lower atmospheric pressure at high altitudes allows water to boil at lower temperatures than at sea level. By increasing the pressure, a pressure cooker raises the temperature at which water boils, thus helping to compensate for the longer cooking times caused by high altitude. Adjust pressure-cooking times according to the following formula: for every 1,000 feet above 2,000 feet elevation, increase the cooking time by 5 percent.
There"s a good reason canned beans are so popular: they don"t take hours to cook. Dried beans are superior in texture, flavor, price and nutrition, but they can be a real pain to prepare since they take lots of forethought. Dried beans are typically soaked overnight before cooking for at least an hour (sometimes two or three hours), making them less than ideal for a last-minute meal. In comes the pressure cooker. It can turn beans from dried to creamy in 45 minutes or less, and the whole process is hands-off. Dried black beans take about 40 minutes to pressure-cook from start to finish, and free you up to assemble tacos or make Spanish rice. Rather than settle for canned, cook up a pot of beans and store any leftovers in their cooking liquid for meals throughout the week. Cooked beans will keep for about 3 days in the fridge.
How many times have you arrived home ready to make dinner when you realize you forgot to defrost a key ingredient? Frozen food is a great way to have fresh, healthy food on hand, but cooking frozen chicken thighs, for example, takes some thinking ahead. If you"re pressure-cooking those chicken thighs, then you"ve got nothing to worry about. You can safely pressure-cook a number of frozen ingredients and it will only add a few minutes to your cook time. The general rule with frozen meat is to add 50 percent more cook time (if an ingredient normally takes 10 minutes to cook, cook it for 15 minutes) and allow more time for the cooker to build pressure. Frozen pieces of chicken, ground beef, cubed beef or thin pork are good for this method, and work well in stews and soups. Avoid using frozen giant roasts or other big hunks of meat-it"s best to defrost these items before cooking.
Speaking of big hunks of meat, Sunday pot roast isn"t just for Sunday anymore. Big pieces of beef or pork require long braises or stews using conventional methods, meaning hours of cook time. This is fine as a weekend project, but what if you want to serve pork shoulder on a Tuesday night and you don"t want to load up your slow cooker before work? The pressure cooker simulates long braises and turns tough meat perfectly tender after about an hour of high pressure. This means you can have your showstopping main dish on the table, start to finish, in less than two hours. While the meat cooks, prepare your side dishes, set the table and open a bottle of wine. No sweat.
And speaking of multitasking, a pressure cooker gives you freedom to utilize the rest of your kitchen. This may sound like a riddle, but the hands-off nature of pressure-cooking means that you don"t have to babysit the dish. Once you"ve clamped on the lid and started the timer, you"re free to ignore the cooker until the cook time is up. This leaves you free to toss a salad and sear a steak on the stovetop, or steam a cheesecake while you eat dinner. Even though you can make whole meals in the pressure cooker (stew, for example), you don"t have to. The cooker will cook your chosen dish perfectly without your help, letting you easily churn out a whole spread on a weeknight.
Why cook one dish in your pressure cooker when you can cook two? Using a steamer rack, basket or trivet, you can create layers within the pot and cook two dishes at once. Steam fish up top while a sauce or grain cooks below. Cook a vegetable stew or curry in the bottom of the pot and steam rice in a bowl or ramekin above. Steam "hard-boiled" eggs while oats, rice or grits cook below. The possibilities are endless, as long as your cook times match up. For example, if both items cook for 5 minutes at high pressure, and one is steamed on a rack or cooked pot-in-pot (meaning the dish cooks in a ramekin, bowl or other dish inside the cooker pot), then you can make both dishes at once. Pressure-cooking two dishes at once is kitchen multitasking at its finest.


 8613371530291