
oil safety valve installation pricelist
Standard materialsinclude 316 stainless steel bodies and removable seat glands with 17-4PH stainless steel removable stem and stem seats. Standard O-ring material on the stem is Viton Valves may be used up to 400° F.
Inlet connections are for 9/16" O.D. tubing (HF9) with adapters for other sizes available. Outlet connections are 1/2" NPT. These valves are not recommended for use below 1,500 psi, and are not readily adjustable in the field without proper test equipment. Pressure settings are made at the factory and valves are tagged accordingly.
HiP relief valves are now available with CE marking. These products will proudly be marked with the CE symbol, signifying they comply with the stringent requirements of the Pressure Equipment Directive (PED). To order, add -CE to your relief valve part number.
Standard materials include 316 stainless steel bodies and removable seat glands with 17-4PH stem and seal ring. Standard O-ring material on the stem is Viton. The seat material is Peek. Valves may be used up to 400°F with standard Vtion O-ring or 450°F with the Kalrez O-ring option.
Inlet connections are for 9/16" O.D. tubing (HF9) with adapters for other sizes available. Outlet connections are 1/2" NPT. These valves are not recommended for use below 1,500 psi, and are not readily adjustable in the field without proper test equipment. Pressure settings are made at the factory and valves are tagged accordingly.
HiP relief valves are now available with CE marking. These products will proudly be marked with the CE symbol, signifying they comply with the stringent requirements of the Pressure Equipment Directive (PED). To order, add -CE to your relief valve part number.
HiP relief valves are now available with CE marking. These products will proudly be marked with the CE symbol, signifying they comply with the stringent requirements of the Pressure Equipment Directive (PED). To order, add -CE to your relief valve part number.
Here we explain the installation, use, maintenance, and repair of oil filters used on oil-fired boilers, furnaces, and water heaters. We discuss tracking down air and oil leaks at or near the oil filter canister and we describe proper oil filter location and problems to check for during oil filter cartridge changes.
We include considerations of oil pipe leaks out (fuel oil leaks), oil piping leaks in (air in the system), clogged, damaged, noisy, or mis-routed fuel oil piping, and oil fill and vent piping size and location requirements. We also discuss the need for and location for heating oil or fuel oil filters and safety valves.
Discussed: . Common sources of oil leaks around the heating oil filter. Reasons to install double parallel heating oil filters on oil fired equipment - two oil filters? Best locations to install heating oil filters.
Proper placement of service valves & check valves on oil lines at oil filters. Oil leaks and air leaks at oil filters & oil filter fittings, connections - where to leaks occur, how are they diagnosed, how are oil line leaks corrected & prevented.
This oil burner fuel piping article series describes defects in heating oil piping, filters, safety valves, and oil tank fill and vent piping. All of these oil storage tank and piping installation defects can easily be found by visual inspection.
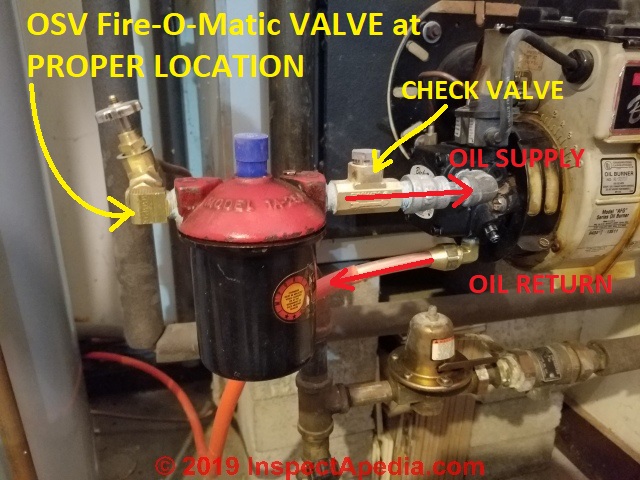
Photo at left: the red-capped heating oil filter is installed between the oil burner and the incoming single oil line. In this particular installation the oil safety valve (OSV) is on the "wrong side" of the heating oil filter.
While the valve can provide its fire-safety function in this position, this location makes servicing the oil filter (changing the cartridge) more difficult for the service technician.
To open this oil filter cartridge the heating service tech will have to find the heating oil tank where s/he will hope to find a second shut-off valve on the oil line to permit opening the filter cartridge without spilling oil all over the floor. A better location for the OSV would have been on the left hand or inlet side of the oil filter cartridge cap.
Modern heating oil quality varies depending on the oil fields from which the crude oil was refined. In much of North America a significant portion of heating oil comes from Venezuelan crude which produces a more tarry product than product from the Arabian oil fields.
A shift to alternative oil sources began in the 1970"s oil crisis. A result is that oil fired heating equipment that had worked fine for decades with no oil filter installed began failing due to oil fuel unit (oil pump) strainer clogging and oil burner nozzle clogging.
Sometimes the oil filter is installed at the oil storage tank outlet but the most common and recommended installation location is shown in our photographs at page top and above: the oil filter is installed close to the oil burner where it is easily accessible for service and where it filters oil immediately before the heating oil enters the oil burner assembly.
The best place for the fusible link oil valve (Fire-o-Matic Safety Valve™ for example) is on the oil supply line just before the inlet to the oil filter canister (red arrow, below left), not between the canister and the oil burner as shown at below right (orange arrow).
With the shutoff valve between the filter canister and the oil burner (below), changing the oil filter in the canister will require the service tech to go to the more distant oil tank to find and close a valve in that location (if one is even present).
Regarding "the best location of an oil filter", NFPA 31 (2011): 7.5.8, for indoor tanks up to 330 gallons, requires that a thermally activated shutoff valve be placed inline as close as practical to the outlet from a tank and that a proper filter or screen be installed downstream and WITHIN SIX INCHES of the required thermally actuated valve. If it"s required in the code, it doesn"t have to "the best" - it just has to comply with the code.
Many oil heat technicians sensibly want to install a fusible-link oil supply line valve at the oil burner, not only because this makes servicing the oil burner easier but because it also recognizes that the most-likely location of a fire is at the oil burner rather than possibly at a more distant oil storage tank.
Hard to access oil filter locations such as the stupid ceiling installation shown in our photo at left - just imagine spilling heating oil in your face as you try to carefully drop the oil filter canister base to change the filter.
Notice in our photo at above left that there is no fusible link oil shutoff valve installed on the oil return line exiting at the bottom of the fuel unit. A second valve in this location is a fire hazard.
Remote oil filter locations such as at the bottom of the oil tank located across the basement or in another room. Anything that makes the job more difficult for the heating service technician increases the chances of this important oil heat maintenance detail being ignored or delayed.
After any service procedure that disturbs oil line, filter, or burner oil piping fittings we recommend checking for evidence of oil leaks again after the system has been in use for a day or so, because slow leaks and small leaks in the oil piping system may not show up immediately.
Keep in mind that an oil leak out is an air leak in to the oil piping system as well, leading to improper oil burner operation, a dangerous puff-back, or
After any service procedure that disturbs oil line, filter, or burner oil piping fittings we recommend checking for evidence of oil leaks again after the system has been in use.
As we explained earlier, oil leaks anywhere in the oil piping and filter system may be hazardous. That"s because even though the absolute amount of oil that drips out may be trivial,an oil leak out is an air leak in to the oil piping system as well.
Here are more illustrations of places where we often find leaks at heating oil filters: at the canister air bleed screw (not tightened, stripped threads, or failure to install a fresh gasket), at the canister top center bolt (same), and at the joint between the oil filter canister lid and base.
Because oil flows from a leak anywhere on the canister top down the canister sides, you can be fooled about exactly where the heating oil leak is occurring. That"s why an expert cleans and dries all of the surfaces meticulously. That makes watching for leaks easy.
We examined the connections at the inlet side of the oil canister, the flare itself and the IPT threaded fitting entering the canister lid (above left). We examined the filter mounting bolt at the center of the canister lid (below).
Other tricks for finding an oil leak include using tracer powders on the cleaned surface, pressure tests, and even a paper towel on the floor below suspected drip points.
Below we indicate where you will often find wet heating oil - in the gap between the canister lid and canister base. But this is a confusing "wet oil" location. It could be wet in this spot for the following reasons:
The service tech did not adequately wipe everything clean after s/he installed the new oil canister. This is especially true if air is bled from the small bleeder screw (above left) allowing oil to run over the top of the assembly where it enters the gap at above right.
There is a leak at any point high on the oil canister assembly lid, including heating oil leaks at all three of the leak points in our first photo: the filter canister input side threaded fitting, the center mounting bolt, or the air bleeder screw.
Below at Frequently-Asked Questions (FAQs) about Heating Oil Filters on Boilers, Furnaces, Water Heaters we describe these oil filter leak points and how they occur in still more detail.
If the cartridge clogs and leads to service calls or heat loss between annual service calls then we suspect the oil tank is contaminated with water or sludge - problems that need to be corrected at the oil tank.
at OIL FILTER CHANGE STEPS The procedure for changing the oil filter cartridge is simple, but if it"s performed improperly you could be left with no heat.
In some difficult cases we found that we could not make it from one annual service call to the next without debris clogging in the oil filter and canister.
The copper oil line feeds a fusible-link oil valve shown at the left side of our photo. The oil piping then feeds a tee that in turn connects to two high-capacity oil filter canisters (center of the photo).
The outlets of each oil filter canister feed back into a common line that exits through a second tee, passes by an oil pressure (vacuum) gauge, and then connects by a flexible line to the oil burner inlet port.
Watch out: generally it"s preferable to remove sludge from an oil tank rather than add oil filters. In this case we had our oil company service technician check the indoor oil storage tank soundness before we elected to install the duplex oil filter system shown here. Had the tank not been sound it would have had to be replaced.
The same leak that allows oil to drip out of the oil filter or piping connections allows air to be drawn into the system when the oil fuel unit (oil pump for the water heater, oil fired boiler or furnace) is running.
That air leak into the system results in improper oil burner operation, soot clogging, and even a loud bang at oil burner start-up or worse, a dangerous puffback. Detailed explanation of why an oil line leak causes a bang or puffback at the oil burner, and loss of heat is
I recently replaced my oil filter (I actually replaced the entire oil canister with a new oil canister that included the filter already inside of it). The burner is working properly, the flame is on,and I"m getting hot water.
The problem is that I seem to have a small/minor leak from the oil canister itself. Oil is dripping from the canister (I think it"s leaking from the bottom of the canister). I"ve checked all the fittings to make sure they"re not loose. They"re all tight, as are all the connections in and out of the oil canister.
Do you know why the oil canister could be leaking? Was I supposed to tighten the bolt/screw that"s on the bottom of the canister (underneath the filter) as well? I assumed the oil canister came ready to install and that I wouldn"t have to adjust the top or bottom bolts on the canister.
Thanks to Mr. Salva for the Mitco oil filter canister photo (above left). Mr. Salva"s photo illustrates an important detail: place a suitable container below the oil filter canister to catch any spills before you attempt to service the unit.
The oil filter canister does not normally leak through its bottom as that is solid steel on the models I am familiar with. Only an older canister with rust perforation would leak there.
at OIL BURNER FUEL UNIT AIR BLEED PROCEDURE you can see a closeup of this oil filter air bleed outlet on another oil filter canister brand, and there you"ll see the fiber washer too.
If any of those three seals were omitted or damaged, that would make an oil leak that might begin at the edges of the canister or even its top but then run down the device and appear to be dripping off its bottom.
Leaks at the oil filter fittings entering and leaving the canister assembly, particularly at flare fittings that may have been wiggled and jiggled around by a heavy-handed service person who used just one wrench to loosen or tighten the top bolt.
Use two wrenches, one on the bolt and one on the rectangular inlet or outlet casting to avoid twisting oil piping and causing still more oil piping leaks.
If you never have opened the oil filter canister, I"d shut off oil at the fire-o-matic valve between canister and oil tank, turn off the oil burner of course, and open the canister - to be sure it contains a filter and to be sure that all of the gaskets and o-rings are in place and un-damaged.
I"m at work now but when I get home I"ll try to attach a picture of the oil filter. It actually looks very similar to the one in the picture on this website (the picture under "HEATING OIL FILTER - NONE - No Oil Filter Installed on Oil Fired Equipment"). The silver one.
I replace the filter yearly on my burner. This year, I decided to change the whole canister as I felt it needed to be changed (it"s the original canister that was installed 8 years ago). Then I ran into the problem of oil leaking from the oil canister.
When I first replaced the oil canister a couple of days ago, that"s when I noticed the oil leak. I thought immediately that I had bought a defective oil canister. So I decided to take it apart. Surprisingly, everything in the canister was intact (filter, o-ring, etc). Then I went back to the hardware store and purchased ANOTHER oil canister and installed this new one. Same problem, oil leak from bottom of oil canister.
Can the nozzle have anything to do with this leak? It"s not a major leak, just a few ounces per day. Nonetheless, any oil leak is not good and I want to stop the leakage if I can on my own.
I also noticed that the small leaks seems to be coming from the "OUT" part of the oil canister. I checked to make sure the fitting was tight, and it was. I will take the brass fittings off and put on pipe joint compound on the pipe threads. Then I"ll reattach the brass fittings to the oil canister/pipes and make sure that the lines are air tight. Hopefully, this will stop the leak.
Try using blue LeakLok™ thread sealing compound (available at auto supply stores, plumbing and heating suppliers, or from Argo [1]) on thoroughly cleaned threads at the outlet fitting on your canister. I"d clean the reads carefully on both mating surfaces and then use that product or a similar one rated for use on piping systems for heating oil.
Beware: an oil leak OUT is also an air leak IN under varying operating conditions and an air-leak in causes burner operating problems, sooting, and even risks a puffback.
I"ve been a heating contractor for over 40 years, and I can tell you that the vast majority of the oil filters are located at the tank, and for a very good reason- it protects the oil line coming from the tank to the burner. The only time I ever install an oil filter at the burner, or away from the tank is when there is an accessibility issue.
JD The oil filter is very inexpensive - (less than $2.00) - it my view it makes sense to replace it as part of annual oil burner service. So, in sum, once a year.
We use our oil furnace half the time between Oct & May, because we also have a pellet stove. We have a fairly new fiberglass oil tank. How often should we change the heating oil filter? Is there a time frame or does it depend on how many gallons of heating oil we use?
Is there any code that says you can’t put a filter at the boiler and one at the other end of the basement on the oil tank that the service guy is likely to mis when servicing the unit?
Sometimes when we refill an older oil storage tank, particularly if it"s an older tank or if the tag has accumulated sludge or water, then the delivery of oil canister that debris or water.
Then when you try to run your heating system the debris gets pushed into and clogs the filter or the oil pump screen or the oil burner nozzle. You need a service call to correct those conditions.
I have an outdoor oil tank that never had an oil filter installed. Last winter the nozzle continually clogged and on & off I had no heat. I need to have one installed but I"d like some kind of ballpark of what that standard charge may be.
My oil filter canister leaked? How common is that? My repair guy did not find the leak the first two times he came to check and, after the leak resulted in a mess to clean up, he claimed he had never seen a leak like that in the 40 years he has been doing heating work. Is this really so rare that a repair expert would not find it when looking for a leak?
The oil filter needs enough room under it"s canister body to slide in a pan to catch any drips or spills and to drop down the canister to remove it to change the oil filter. 3" or more should be ok.
I went outside today to check the oil level and noticed a white,chalky coating all over the filter which rubbed off on my hand and smelled very faintly of oil - is this normal or is there something wrong with the filter?
JC if the oil filter fits into the cartridge and seals properly it should be ok. Be SURE to check the oil filter part number and description to assure that it is intended to fit inside the oil filter canister on your system.
So the valve is "partially" open, but not fully open. I"m prepared to replace the valve in its entirety if necessary, but do you have any other suggestions as to how I can get my current valve fully open? Thanks.
I too, unfortunately, have the Mitco oil filter and have nothing but problems with them leaking through the bottom bolt. I don"t know why that bolt is there but it is a poor design and I wish my oil company didn"t use themly:
Clearly there"s a leak somewhere. I"d inspect the line and fittings carefully through the entire route for oil seepage - often we can find an air leak in by finding an oil leak out. A trained oil heat service technician will install a vacuum test gauge to see what"s going on with the oil piping.
OIL FILTERS on HEATING EQUIPMENT at InspectApedia.com - online encyclopedia of building & environmental inspection, testing, diagnosis, repair, & problem prevention advice.
Audels Oil Burner Guide, Installation, Servicing, Repairing, Frank D. Graham, 1940"s edition (obsolete). Updated versions of this guide are available in various editions, 1947, 1950, 1955, 1958, 1959, 1962, 1965, 1967, and at prices from around $3.00 to nearly $70.00 - useful for simple, clear, but not current, explanation of how heating equipment works. The original retail price was $1.00.
TECHNICAL REFERENCE GUIDE to manufacturer"s model and serial number information for heating and cooling equipment, useful for determining the age of heating boilers, furnaces, water heaters is provided by Carson Dunlop Weldon & Associates
The company has designed a new mobile test separator unit. The three-phase or four-phase test separator is an instrumented pressure vessel for onshore and offshore well testing. It is designed to efficiently separate well effluent into oil, gas and water, and sand with a four-phase separator. The test separator can operate as a stand-alone unit or in combination with the surge tank, reducing the dependency on the separation process for high-quality flow measurements. This separator unit has to be protected by a safety valve with a nominal diameter of 3″x4″ / DN80 x DN100. This separator is a vessel used to separate and measure small quantities of oil and gas. Each well is tested regularly by diverting the flow from the production separator to a test separator which determines the production rates of oil, gas and water in the well. The pilot-operated safety valve protects the separator vessel against overpressure that may occur under certain operating conditions. These conditions range from valve failure, e.g. check valves, to fires in the plant.
LESER was commissioned to supply a valve with an overall height of less than 400 mm. A springloaded API valve 3K4 has a height of 758 mm and with bellows even 796 mm. This design was therefore out of the question. The LESER Pilot-operated Safety Valve requires on average 30% less height compared to a spring-loaded safety valve. For nominal diameters > 4″ (DN100), the overall height is even lower in proportion.
The standard design of the LESER Pilot-operated Safety Valve, at 428 mm, comes very close to the requirement for maximum installation height. The 3″ x 4″ main valve body is designed according to the API 526 specification and achieves a main valve height of 392 mm, which is in accordance with the customer‘s requirements. This housing height cannot be undercut when considering the overall height because the flanges and leg dimensions are standardized.
This means that the pilot valve, which is not standardized in the specification, must be designed to maintain the desired height. The solution is to lower the valve and thus further reduce the overall valve height. The LESER designers developed a so-called compact adapter, which is mounted between the main and pilot valves. This allows the pilot valve to be lowered and the height reduced to a minimum – in this case to 392 mm. This means that the pilot and main valve are at the same height.
The LESER solution with compact adapter for particularly low installation heights is as robust as the standard design with pilot and manifold block connection to the main valve. The design is developed in such a way that it can be implemented for all nominal sizes. If very small installation spaces are available, the LESER Pilot-operated Safety Valve with compact adapter is the solution. Even a subsequent conversion is possible, as the existing function-determining pilot is retained. Only the compact adapter needs to be added and pipe segments replaced. This requires only little effort and standard tools for mounting.
Magnum Technology Center, based in Dubai, United Arab Emirates, is a company specializing in providing integrated solutions with advanced delivery to the oilfield industry. MTC designs and manufactures complete equipment packages and, using the latest technologies, offers innovative solutions to its customers.
“We are pleased to have found an innovative partner in LESER,” says Praseen Vakkayil, Supply Chain Manager, MTC. “The technical solution opens up the possibility for us to offer even better products to our customers in the oil and gas industry quickly and reliably
LESER develops individual solutions for its customers. The pilot-operated safety valve in the “chopped” version enables the customer to build his product more compact and to use all advantages of this safety valve.


 8613371530291