
wire rope lighting free sample

The following instructions are here to help you learn how to work with your rope lights and their accessories. Be sure to adapt these instructions as necessary to accommodate the particular type of rope light you are working with, LED vs. incandescent, 2-Wire vs. 3-Wire, etc.
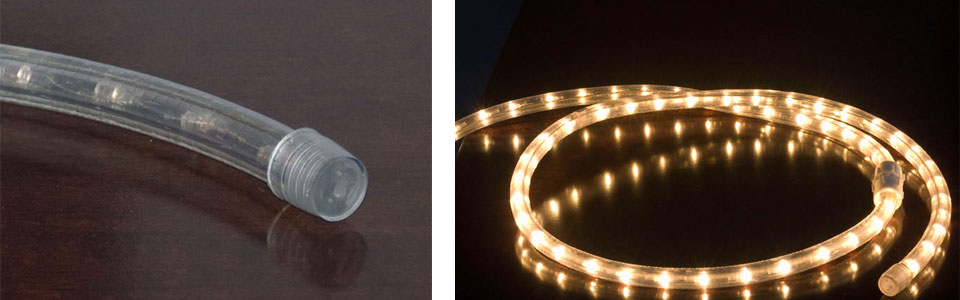
How do rope lights work? A rope light is comprised of bulbs (LED or incandescent) spaced along a set of inner wires. Rope lights are divided into sections and are wired in "series parallel". This means that if a bulb fails, only the section it is in will go dark; the rest of the rope light will stay lit. Due to this wiring method, rope lights can only be cut at the dividing points between sections.
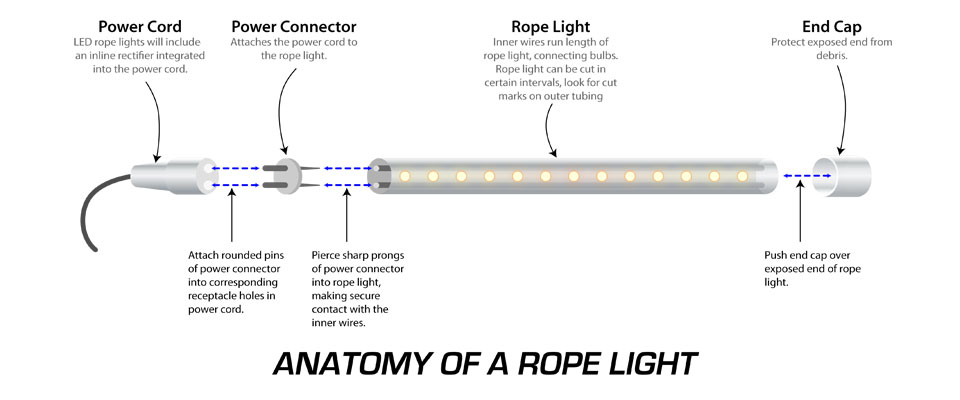
A basic run of rope light consists of four main parts. First is the power cord, which plugs your rope light into an outlet to give it power. Next is the power connector, a small plastic unit with metal pins that connect the power cord to the actual rope light. Then there"s the rope light itself, followed by the final piece, an end cap, which terminates the run.
One of the most important rules of rope light installation is that rope lights can only be cut in specific intervals. Depending on the type of rope light you"re using, this can range anywhere from every 18 inches to every 72 inches. After you have figured out what the ideal amount of rope light is that you are going to need for your project, take a second to make sure this length is divisible by the "cuttable interval" of your particular type of rope light. If it is not, you"ll want to round up or down to the nearest interval. (Make sure this new length will still work with your project.)
When it comes time to cut your rope light, you will find that at every cuttable interval, there will be tiny scissor icons, dashed lines, or other marking imprinted on the plastic outer tubing indicating where it is safe to cut the rope light. These marks are very small and may be hard to locate at first, but rest assured, they are there. If a rope light is cut in any location other than these pre-designated locations, it will damage that section of rope light and cause it to fail. When you are ready to cut your rope light, use a sharp pair of heavy-duty scissors, garden clippers, or a utility knife to make the cut. Be sure to make a smooth and clean vertical cut. The sharper your cutting blade is, the easier it will be to cut the rope light. Once you have made your cut, you will need to trim the inner wires to allow room for the connectors to insert correctly. Bend the end of the rope light sharply to the side. As you do this, you will see the wires inside the rope light protrude out. Trim off the ends of these wires so that when bending the rope light back again, the wires no longer stick out. This completes cutting the rope light and has prepared the end to receive any accessories that might be attached.
The power connector is the key component that links the power cord (along with various other accessories) to the rope light. The easiest way to begin is to attach the connector to the power cord first, then plug the power cord/connector assembly into the rope light. Plug in the "female" end of the power cord into the "male" pins of the power connector and secure with the attached threaded collar. Then separate the screw compression cover from the power connector and slide the cover over the rope light. Align the sharp pins of the connector with the small wire holes of the cut rope light end. Firmly and carefully push the connector and its pins into the rope light, making sure all the pins make contact with the corresponding rope light wires. Then slide the compression cover back over the top of the power connector and screw on. This will compress the power connector and secure it to the rope light. The power cord is designed to be plugged into a standard wall outlet. If you need to hardwire your rope light, simply cut off the plug and strip the outer jacket to expose the wires.
If you are using LED rope lights, note that LEDs are polarized and require the electrical current to be flowing in a particular direction. So if you plug in the power cord and the rope lights do not work, simply remove the power cord from the rope light and connect it to the opposite end.
End caps are a simple, but important, component of a rope light run. They shield the exposed end of the rope from debris as well as protect any protruding rope light wires from getting snagged. To attach an end cap, simply push it into place around the plastic tubing of the rope light until it stops. Optionally, you can further secure and waterproof the connection using PVC sealant.
There are many accessories that you can incorporate into your rope light design to help shape your rope light vision. These include inline splices, T-connectors, extensions, Y-connectors, etc. While they all provide different functions, the basics of how they attach to the rope lights is the same. Once you understand the basics of how a power cord attaches to a rope light, through the ubiquitous power connector and the alignment of its pins with the wires of the rope light, you"ll understand how to attach just about any other accessory. The power connector is the common component in every rope light accessory, and once you know how it works, there"s no limit to what you can do.
Knowing the basics of how to plug in rope lights makes it easy to hang rope lights in a straight line. But what if you need to trace around curves or attach various sections together? More complex rope light designs, such as outlining architectural features or highlighting landscaping, requires accessories. The most common rope lighting accessories are:
Rope lights can be mounted just about anywhere you can imagine, using a variety of methods, creating unlimited forms and shapes. But no matter how you chose to mount your lights, there are a few guidelines you"ll need to follow. After unspooling your rope light, not only should you plug it in to test it, but it is a good idea to keep it plugged in for a few minutes to warm up the outer plastic tubing, making it more pliable. (Be sure to unplug it again before installation.)
Rope lights are very flexible products, but they do not bend at 90-degree angles. Always provide a curved radius of at least 3-4 inches when turning a corner. Also, all rope lights generate some heat during operation and they need to be able to dissipate this heat throughout their length. When mounting, do not crowd the rope light and be sure to allow ample "breathing room" around it. This is also applicable in installations where two or more rope lights might run parallel to each other. Again, allow some ventilation room for heat dissipation and do not let the rope lights touch each other as this could potentially cause them to melt or fuse together. (This is the same reason why you should always unspool your roll of rope light before plugging it in.)
When installing rope light into place, it is very important that you do not pull on, tug on, stretch, or excessively flex the rope light! This can stress the inner wires and damage them, the result of which will be immediately burned out sections. And nobody wants that. Rope lights are a very flexible product, but please use care when handling and installing them.
If using rope lighting outdoors, be sure to use waterproof PVC or silicone sealant to secure all connections, power cords and end caps. Add a small bead of sealant on the inside of the connector, slide the rope light in place and then place another small bead along the outside rim to seal the connection. Remember to secure your end caps in the same manner. For added protection, we recommend using dielectric grease on all metal pins prior to inserting into both the rope light and connectors/power cord. This will prevent corrosion of the metal due to any residual moisture present in the connection.
Mounting clips are a general-purpose accessory that can be secured to just about any surface. Using screws or nails, place the clips at constant intervals along the path of the rope light and carefully snap the light into place, making sure the bulbs are facing outward for the best light.
Mounting tracks are very popular when you"re looking to mount the rope lights in a nice, straight line. Like the clips, they can be secured to a variety of surfaces with nails, screws, or even strong adhesives. After positioning the tracks into location, carefully snap the rope light into place.
Lastly, the common zip tie is a good choice when neither the mounting clips nor the mounting track are applicable for where the rope lights will be going. There"s really no rules to using zip ties. Just secure them to whatever you can, wherever you can, to hold your rope lights in place.
These three methods of mounting rope lights are certainly not the only ways to do it; they are just the three most common. You are certainly open to use your own methods if you like. Just be sure to observe the common mounting guidelines described above.
If you"re looking to introduce some special effects to your rope light creation, it"s time to look at controllers. By itself, a rope light will be in a solid, or "steady-on", state. With the use of a controller, you can have your rope lights flash, fade, chase, and more. Certain controllers will only work with certain types of rope lights. For example, two-wire rope lights can be used with fading or flashing controllers, but not with a chasing controller. Three or more wires are required for advanced effects such as chasing. Refer to the particular controller to see what rope lights it can work with. Attaching rope lights to a controller will usually occur in one of two ways. There can be a standard outlet in the back of the controller into which you simply plug in your rope light power cord. Or there may be an integral rope light power cord and power connector attached to the controller to which you will attach to rope light similar to how you would attach it to a normal power cord.
The lighting market is still quite confusing from an outside (and sometimes inside) perspective. There are many different products on the market, and we often get asked the question, “What is the difference between rope lighting and LED strip lighting?”.
A more playful explanation of this topic can be seen in our “Rope lighting vs. LED strip light” video (with a convincing “get ‘em” statement). After reading the comparisons below, you will be able to determine whether LED strip lighting or rope lighting will be best suited for your project.
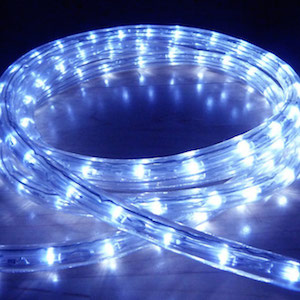
Rope lighting has been on the market for a long time and has a variety of uses. Basically, it is a long cylindrical tube that houses an internal light source placed every few inches that gives the appearance of a “glowing” or “twinkling” light. The tube can be plastic, epoxy, or other clear materials that allows the light to shine through. Specific uses forrope lighting are mainly decorative because the light output is minimal.
Lighting Source: Rope lighting can come with Incandescent bulbs or LED bulbs. LED are more commonly used because of their flexibility of uses and longevity. They can come in either 120/220vAC input or 12/24vDC input. They come in a variety of single colors but are not RGB color changeable.
Brightness: Low brightness. Best for decorative lighting and not suitable for the majority of accent lighting projects and will not be acceptable for any task lighting or display lighting.
Applications: They are suitable mainly for decorative applications or very low light level accent lighting. Due to their 360 degree viewing angles, they can be used to easily wrap around objects like trees or be bent into shapes and letters.
2. Run Length: Rope lights can be ran upwards of 250 feet when used with an AC input and around 50 feet when using DC input before requiring an additional power input.
1. Low Brightness: The main downfall of rope lighting is the low brightness levels. Rope lighting is not the correct choice for many types of applications that LED strips would excel in, such as under cabinet lighting, task lighting, high visibility applications, and many projects that need smaller working areas.
2. Yellowing of the tube: This is very common with rope lights. The epoxy or plastic tubing quickly becomes dried out and cracked in the sun. Over a short amount of time, the tube can appear yellow and sometimes brown. This will decrease the light output and change the color emitted.
These flexible LED strips boast a flat, low profile shape which allows you to install them anywhere and cut where needed (at any cut point), making it a more adaptable lighting tool. Because of their brightness and customizability, LED strip lights are used for a variety of applications that range from kitchen under cabinet lighting to replacing ceiling fluorescents, lighting a small hobby project, or a large conference room. They can controlled through wireless dimming systems, DMX controllers, and wall switches.
Lighting Source: Surface mounted LED chips in a variety of configurations of LED chip sizes and numbers. Read: What’s the difference between a 5050 LED, 3014 or a 3528 LED strip? They can come in either 120/220vAC input or 12/24vDC input. They can also come in a wide variety of single colors and color changing options.
Applications: They are used as accent lighting, general illumination task lighting, display lighting, backlighting and even inside and even space vehicles to grow plants. - Other options for use is TV backlighting, under kickboards, display / jewelry cases, bar and club lighting, architectural designs, terrariums / indoor garden lighting, above cabinet lighting, under counter lighting, refrigerator lighting or cove lighting. Search by application.
4. Installation Complexity: Most strip lighting kits are very self explanatory and able to be installed by a novice. For some projects that require hard-wiring to a wall dimmer, calculating wattage usage, or wiring in walls, an electrician will be needed to complete the installation.
The cost of LED strips lights and rope lighting can vary greatly, but the price does tend to match the quality too. If you plan on using your lights every day and having them for years to come it’s always worth investing a little extra in quality lighting.
While both rope lights and LED strips are great and versatile lighting options, we find that when it comes to a brighter light, customizing lengths, angles and colors LED strips provide our customers with much more leeway to materialize the vision of their projects.
If you’d like to speak to us about your lighting ideas or have any further questions just drop us an email at info@flexfireleds.com or give us a call at 1-844-FLEXFIRE and we’ll be there to help you every step of the way!
These LED rope lights can be cut at 2.5FT intervals so you can customize the length to suit your needs. High, durability, and flexibility, these rope lights will save you energy and money compared to incandescent rope lights.
Free Accessories Included! Install your rope lights right out of the box. Each spool includes an accessory kit that will get you up and running right away.
Product Installation: LED Rope Lights are pre-marked for cutting at specific intervals (2.5FT) and can be connected to a variety of accessories with minimal tools and expertise.
We strongly recommend the use of a surge protector with our rope lights. All connections must be sealed with a waterproof sealant or silicone when installing rope lights outdoors.
High quality wire cable display, sign and picture hanging systems. Innovative and fully expandable suspended displays offering incredible flexibility, so you can change shelving or layout configuration with ease.
We Have Wire Suspension Kits which allow you to fit our high quality LED panels to any flat surface, ceiling, or wall. Give Yourself The Benefits of LED Panel lighting Anywhere. A simple solution which compliments our panels and allows you to make a very neat and clean lighting solution.
In determining the working load of a cable or wire rope, the direct stress plus the shock in bending loads must be considered. To assure long life, a reasonable safety factor should be applied to the working load. Standard industry practice is a 5:1 safety factor for many applications. Higher safety factors are used under certain conditions such as extreme shock loads, aircraft control cables, etc.
The fatigue life of the cable or wire rope will be greatly enhanced with properly designed pulleys. The root, or pulley tread diameter, is critical to the life of the cable.
Our products have a wide range of applications inside the lighting fixture, flowerpot, billboards, vehicles such as brake, gear, window, and another hanging system.

Rope lights refer to LED lights that come in a round, tube-like casing. Typically, the casing for these lights is translucent, plastic, or PVC materials. This type of casing causes rope lights to show hotspots.
Inside, they connect the through-hole LEDs by wires. Because of the nature of wire connections, this allows the rope light to bend in multiple directions. However, this does make the fixture more fragile, and they will tend to become damage when bent and twisted repeatedly.
When you’re planning to mount rope lights, there isn’t a set mounting channel or clip on the market. People will use plastic clips or any other means they can find.
Since SMD fixtures have flexible PCBs (printed circuit boards), they are less flexible than rope lights. The PCB will only allow the fixture to bend in one direction (vertically or horizontally). However, with an SMD fixture you trade flexibility for durability. These can bend many times without causing damage.
The lifespan of SMD fixtures is longer thanks to the higher quality materials, heat sink design, and proper mounting hardware. GLLS SMD fixtures, such as those in our LED Neon Flex line, also have a Constant Current IC that is more efficient than the current limiting resistors found in rope lights. This part of the design also increases the lifespan of the product.
Depending on your project, different types of LED Lighting are going to be more suitable. However, if you want something that’s going to last, you’ll want to invest in a higher quality product.
Make the holidays even more magical by lighting the path to your kids’ room with string lights. Wrap them around your staircase banisters so that, when the kids run upstairs to sleep, they’re greeted by sparkling fairy lights that inspire their imagination. With a nearby outlet or extension cord, it’s quick to wrap lights around the banister. Just set your cords up free of tripping hazards to transform your space, whether seasonal or everyday occasions, completely hassle-free.
Stockings aren’t the only thing you can hang from your fireplace. Jazz up your living room by hanging rope lights right from your fireplace’s brick with brick clips. These clips are uniquely designed to hold onto bricks (a typical challenge with ordinary clips) without causing damage or leaving residue behind. Each clip comes with one or two hooks for hanging your colorful lights and adding some extra cheer throughout your home.
When using tape, apply it only to your lights’ wires and not the bulbs themselves. This way, you don’t obscure your lights and dial down the sharp impact your lights can have on properly setting the mood.
Let’s say you’re wondering how to hang lights in your room without nails because you’re worried about taking a hammer to the walls. You’re not worried about making tiny, nail-sized holes in the wall, though – those may be easier to patch and are overall less noticeable than a nail. In that case, stapling your string lights to the wall is a viable option. It’s a quick process that does minimal damage to your walls. Plus, most staples won’t obviously stand out from your wires or interfere with your transportive lighting.
You know that pile of pushpins you’ve somehow gathered over the years in a junk drawer but don’t really use? Well, nail-free lighting is the perfect way to put them to use! Though tiny, pushpins are mighty. You can easily insert them between the twisted, intertwined wires of fairy lights and string lights -- objects that aren’t heavy enough to yank on a pushpin.
Tacky substances like Blu Tack are reusable adhesives that support small items without leaving any holes in the wall. It works best with fairy lights or other lightweight items. To use it, simply press the wire or LED bulbs themselves into the putty at evenly spaced intervals. Once the putty is pushed on the wall, just turn on your lights. You’ll instantly transform your room into an enchanting space – and, in the process, transform your mind into something altogether calmer.
Don’t let windows get in the way of hanging long string lights. You can press hooked wire suckers, which are basically suction cups, onto windows to hang decorative lights for any occasion. Put up your red and green LEDs to greet Rudolph and his friends, then swap them out for heart-shaped lights for Valentine’s Day.
Case in point: the Sky Lite 2.0. It can fill every holiday, celebration, or relaxing night with glittering stars and multi-color nebula clouds that mentally transport you far beyond this planet. Control the colors, patterns, and effects right with just a single tap on your phone screen. Then, sit back, relax, and let your lighting take you miles away – all without nails and hammers.
When you ditch nails and hammers in your lighting, your lighting design should allow you to alternate among different setups and moods. You might even want to take your lights from one room to another to bring your favorite lighting with you wherever you go. With BlissLights, you can take your lights throughout your home without any hassle. Go from a stunning bedroom galaxy one night to a starry-sky living room the next. Browse the BlissLights collection to find nail-free lighting that elevates your surroundings whenever, wherever, and however you need.

While we loved the ability to dim these lights, we still wished that their max output was a bit brighter. We also felt the presets on the remote aren"t super intuitive. It"s also one of the shorter rope lights we tested, but if you"re only looking to add a little oomph with color and flashing lights to a small area, we think it"s a good pick.
There is still room for improvement, however. The Luminoodle comes with three magnet sliders that can hold the lights to a car, for example, but the magnets aren"t particularly strong, and if anything lightly catches on the rope it will pull the whole thing off. It also includes reusable zip ties, but we didn"t find them super useful. Still, we loved the included battery, and the Luminoodle offers practical lighting for camping and travel.
The Surnie LED is a bright, quality rope light for lighting up an interior or exterior space. It"s waterproof, cuttable, and mountable with included hardware, which makes it a versatile product. The square shape holds a spiral quite evenly and nicely, making it less twisty and lumpy than some of the tubular options.
The square makes it harder for the Surnie to lay flat without mounting it, however. We also wish that it had a dedicated on/off switch. One downside to the square shape is that lights are really only on one side of it, which means that you have to pay more attention to how you"re laying it out or mounting it to get the correct lighting. Still, we think this is a quality, modern-looking product for a variety of situations if you are willing to mount it semi-permanently.
The Govee LED is one of the smallest and most compact products in this review. The attached battery pack holds three AA batteries, so it"s quite small, and the actual rope is close to an eighth of an inch thick, so it"s quite skinny. It also comes with a remote control with multiple settings and dimming controls, and you can cycle through the settings via a button on the batteries. For how small and light it is, it"s a versatile product.
We found the durability lacking due to the thin wire between the lights and the adapter plug, which easily stretches and kinks. After a few days of use and repeated plugging and unplugging, it sometimes flickered when moved. We also wish it had more features, as it didn"t even come with mounting hardware or a switch. Additionally, it wasn"t as bright as similar products we tested, so it"s better for ambiance rather than illumination. It"s an option for connectable lights, but we think there are better products in this review.
That being said, it didn"t cast a ton of light for how long it is, as each light isn"t very powerful. It"s nice that it"s not overpowering, but for a big area it only adds ambiance, and it"s way too much for smaller spaces. We also weren"t impressed with the tiny, easily kinked, and stretched wire from the light to the plug. We"d recommend this for ambiance lighting for a long railing or something similar, but if you"re trying to light up an outdoor dance floor, something brighter might work better.
Our lead review editor, Ethan Newman, heads up the testing process for our hands-on review of rope lights. With over a decade of home improvement and backyard projects, Ethan is well-versed in creating a nice space, in which lighting plays an important part. We turn to him for home goods reviews because not only is he a homeowner, but he also manages three vacation rental units with patios and different outdoor and indoor lighting needs. Rentals can see more use and abuse than a typical home, so Ethan is always on the lookout for something that can both stand up to heavy use and is easy to use.
We independently purchased the products tested here after extensive research. We created a rubric to test them for what we thought were the most important performance areas and used measurable tests to evaluate them. We comparatively tested them for brightness, waterproofness, kinking, mounting, and ease of use. To measure brightness, we used a light meter app and measured both the cumulative brightness of the entire light as well as comparative brightness by measuring just 24 inches of each light. For durability, we left them in the sun in triple-digit (Fahrenheit) heatwaves, as well as soaking them for half an hour under a sprinkler to test waterproof claims. For ease of use and features, we field-tested them both outside and around our house in different situations where rope lights might be appropriate.
Although rope lights are rarely the only light used to illuminate a space, we did expect them to add a decent amount of illumination. However, if you are looking more for light to add ambiance over-illumination, also pay attention to the aesthetics and color temperature of the light rather than the brightness alone. Still, we think it"s an important aspect, and since brightness is measurable and aesthetics are subjective, we share our brightness results here.
We tested both overall brightness as well as how bright 24 inches of the lights are to accurately compare products. We did this by using a smartphone light meter app to measure the lux, which is the amount of light (lumens) cast within a square meter. For total brightness, we coiled the ropes up and measured how much light all the LEDs cast together. In general, the longer the rope, the brighter overall. We also wanted to measure them comparatively, so we blocked off everything but 24 inches of each rope, and then measured their lux. We found that the GuoTonG and the Amazon Basics were brightest in the 24-inch test, and the Torchstar brightest overall when coiled together.
Rope lights aren"t that complicated of a product, so using them shouldn"t be difficult. Products scored higher if they were easy to use, mount, or change settings. They score lower if they tangled easily, were hard to store, or otherwise persnickety to use. One thing we learned about these products is that if you"ll be setting them up and taking them down regularly, several shorter connectable lights are easier than one long one.
Like all the products we test, we expect a certain level of quality and durability. If a product says it"s waterproof, we expect it to be waterproof, so we tested this by leaving all the products under a sprinkler for half an hour to simulate a rain shower. We also tested all the products for damage after kinking, as well as leaving them in the hot sun with temperatures reaching over 100 degrees Fahrenheit for a week. Products scored lower if they faded in the sun, held kinks after being bent, wires that stretched or pulled out, or if there was evidence of water getting into the light tubes. We didn"t find any noticeable water or sun damage during our testing phase, which means all these products lived up to their IP67/IP44 waterproofness rating.
We found the Torchstar to be most durable; the whole light has a thick and burly housing, and the wire connecting it to the plug was thick enough that it would be really hard to kink or damage it. The GuoTonG and Surnie are durable due to their built-in backup plan—they are cuttable. If the end of the light dies or you desire a shorter length, you can cut, glue, and seal the end to have a shorter but fully functional light.
The weakest point we found on most of the products was the wire between the lights and the plug. Thicker wire housing, like what we found on the GuoTonG, Torchstar, or Amazon Basics, was far more durable than those with thinner wires. Thinner wires were easily damaged from someone accidentally tripping over them or pulling them out incorrectly. Some of the products with lower durability scores had issues with flickering after our field tests.
Rope lights are a fun, quick way to add style, brightness, and ambiance to a space, either indoors or outside. They can be helpful to draw a stylish perimeter or show off a particular architectural feature. We hope this review gave you the information you need to buy the right product for your needs the first time—and that you found it, well, illuminating.


 8613371530291