
simplex hydraulic pump manual in stock

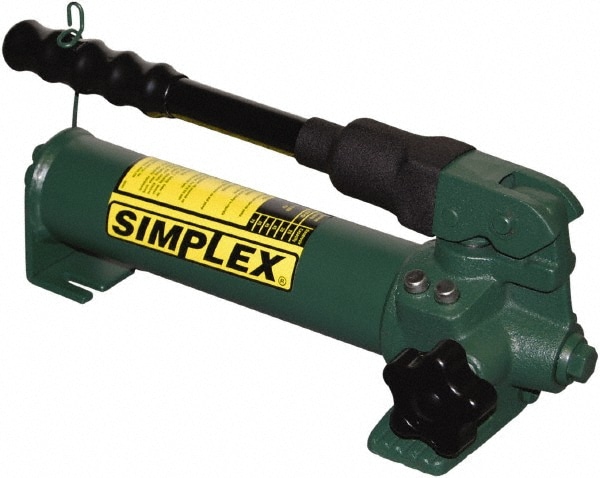
An intermittent 0.5 hp (0,37 kw) power pump that is best suited to power small to medium size tools or cylinders. It"s very lightweight, portable and works well for crimping, cutting, pressing, punching and bending applications.

A 1.13 hp (cv) continuous duty power pump that is best suited to power small to medium tools and cylinders. Ideal for systems that require high performance, large oil capacities with lightweight portability..
Findkits for hand pumps, pneumatic, electric, gasoline, and cordless hydraulic battery-driven power units for everything from bolting and tensioning units, hydraulic torque wrenches, Porto-power sets, cutters and crimpers, pipe and conduit benders, presses, and more.
Designed with a head shape that fits all API and ANSI flanges, the versatile Simplex nut splitters are available in 7 size options. By carefully cutting the nut so as to only detach the head without affecting the other areas of the bolt or stud, Simplex splitters can cut nuts up to grade 8 and 2H (ASTM A194/2H) with Brinell hardness level between 248-325.
Spreaders are the perfect choice for jobs with minimal available clearance. One of Simplex’s most versatile spreading tools, the SF5 spreader offers 5 tons of spreading force with a 13-inch starting clearance.
Simplex 35 Ton Single-Acting Portable Punches come with a mounted motor control handle (included with SPH35A), providing unmatched user safety during operation.
Simplex Steel RFS Series Cylinders provide the ideal fit and force required for most bridge lifting and pier cap maintenance jobs. High strength with chrome plated pistons, the parts resist corrosion because the piston rod automatically extends when the load is applied. There is no need for a rod cap when using Simplex cylinders as the rod wiper protects the piston. Constructed with performance Nitride/QPQ corrosion-resistant technology, the cylinders last for a long time despite working with varying load sizes.
A two-speed pump driven by an 115V – 60HZ, .5 HP universal motor running at 14,640 RPM, the G1 Series Electric Pump draws 10 amps at full load and features a low startup voltage.
Powered by an 115V – 60Hz, 1.13 HP universal motor at 21,000 RPM, the G3 Electric Pump is slightly stronger than the G1 as it draws 16 amps at full load. Designed with 1.5-20 gallon reservoirs and a 15′ remote power controlled pendant, it is the perfect pump for both medium and large applications.
Similar to the other G-Series Electric Pumps, the G4 has a reservoir capacity of 1.5-20 gallons at 10,000 PSI. It is a two-stage routine pump with a maximum flow of 55 in³/minute. Ideal for medium-sized cylinders, the G4 Electric Pump is available in a 230V model.
This high-performance pump runs on an 115V – 60Hz, 1.5 HP permanent magnet motor (3,000 RPM). Its reservoir, like the other G-series electric pumps, holds 1.5-20 gallons. Offering a low startup voltage and drawing 18 amps at full load, the G5 Electric Pump is best used on medium-or large-sized hydraulic cylinder or tool.
With the largest reservoir capacity of the G-series, the G6 Electric Pump reserves 5-40 gallons and operates at a maximum pressure of 100 in³/minute. It runs quietly at only 80dba. Powered by a multi-voltage, 3 phase, 3 HP AC motor at 3,450 RPM, its low startup voltage draws 9.5 amps (230V) at full load. This easy-to-use pump is a great fit for production and multi-cylinder lift systems.
Controlled by a rotary air vane, 3 HP motor at 3,000 RPM and fitted with an air muffler and filter-lubricator assembly, the G5 Air Power Pump is perfect for use with medium-sized hydraulic cylinders and tools. It has a reservoir capacity of 1.5-20 gallons and operates at a maximum pressure of 55 in³/minute and 10,000 PSI.
Powered by a 127 CC Briggs & Stratton gas motor, the G4 Series Gas Power Pump delivers fast cycles at 50 in³/minute at 10,000 PSI. Well suited for medium- and large-sized cylinders and tools, its reservoirs hold between 1.5-20 gallons.
The G6 Series is powered by a 163 CC Honda gas motor and was specifically designed for quick cycle equipment operation. Its reservoirs are available in 2.5-20 gallons and will flow at a maximum pressure of 100 in³/minute and at 10,000 PSI. The pump is welded into a steel design to work well with both medium and large hydraulic cylinders and tools.
Simplex offers three major types of jacks: hand lifting jacks, heavy duty toe jacks, and airlifting jacks. While each is designed to lift, they are intended for use in different applications.
Simplex hand jacks, used for material maintenance and handling, are frequently found at construction sites, factories, mines, oil fields, and other industrial sites. They have a capacity of up to 100 tons.
Hydraulic toe jacks from Simplex are the solution to low lifting problems. Offering capacities between 2 and 10 tons, there are a variety of toe jacks from which to choose.
Simplex lifting bags easily raise the toughest loads that are too hard for most conventional jacks. They are ideal for industrial applications with uniquely challenging lifting scenarios and are often used in railroad construction projects.
With distribution and repair centers all over the world, Simplex makes it quick and straightforward to find get the information and products you need when you need them. The brand makes customer communication easier than ever through its interactive website; the site provides instant answers for frequently asked questions and offers online training for all Simplex products.
For more information on Simplex products distributed by Metro Hydraulic Jack Co., or to work with a member of our engineering team to develop a solution for your mechanical jack or high-pressure hydraulic equipment issue, contact our team.

The submerged pump is best suited to power small to medium size cylinders or hydraulic tools or whenever a quiet, intermittent duty cycle is needed. With its low sound level and the addition of the optional oil cooler, the submerged pump is suited to light production work as well. Its lightweight and compact design also make it ideal for applications which require some transport of the pump.Two-speed operation reduces cycle times for improved productivity
Powerful 1/2 hp induction motor is submerged in the oil reservoir to run cooler, protect the motor simplify the pump interface, save space and reduce noise
••• 2 •••G5 Torque PumpIMPORTANT - READ CAREFULLYThis manual contains important information for the correct installation, operation and maintenance of thisequipment. All persons involved in the installation, operation and maintenance of this equipment must bethoroughly familiar with the contents of this manual. To safeguard against the possibility of personal injury orproperty damage, follow the recommendations and instructions of this manual. Keep this manual for reference.WARRANTY STATEMENTSIMPLEX products are warranted to be free of defects in materials and workmanship under normal use foras long as the original purchaser owns them, subject to the guidelines and limitations listed. This warranty doesnot cover: normal wear & tear, cosmetic items, abuse, overloading, alterations, improper fluid, or use in amanner for which they are not intended. If the customer believes a product is defective, the product must bedelivered, or shipped freight prepaid, to the nearest SIMPLEX Authorized Service Center for evaluation andrepair.1.0 RECEIVING INSTRUCTIONSImportant! Make sure to inspect all of the components for shipping damage. If damage is found, notify carrier atonce. Shipping damage will not be covered by warranty. The carrier is responsible for all loss associated withshipping damage.
2.0 SAFETY••• 3 •••Make sure to read the instructions, warnings and precautions carefully. Follow any recommended safety precautionsto avoid personal injury or damage to the unit. Simplex cannot be responsible for any damage or injury from unsafeuse, lack of maintenance or incorrect operation. In the event any questions or concerns arise, contact SIMPLEX or alocal Distributor for clarification.The pump’s maximum working pressure is 10,000 PSI (700kg/cm 2 ). Makesure that all hydraulic equipment such as tools, hoses, etc. used with thispump are rated at 10,000 PSI (700kg/cm 2 ) operating pressure.If you have never been trained on high-pressure hydraulic safety, consultyour distributor or service center for a free Simplex Hydraulic Safety Course.Failure to comply with the following cautions and warnings could cause equipment damage, property damage orpersonal injury.DANGER is only used when your action or lack of action may cause serious injury or even death.WARNING indicates a potential danger that requires correct procedures or practices to avoid personal injury.CAUTION is used to indicate correct operating or maintenance procedures and practices to prevent damageto, or destruction of equipment, or other property.WARNING: Wear proper personal protective gear when operating hydraulic equipment.DANGER: To avoid personal injury, keep hands and feet away from tool and work-piece during operation.WARNING: Do not exceed equipment ratings. Overloading causes equipment failure and possible personal injury.The tools are designed for a maximum pressure of 10,000 PSI (700kg/cm 2 ). Do not connect a tool to a pump with ahigher pressure rating. Never set the relief valve to a higher pressure than the maximum rated pressure of the pump.Higher settings may result in equipment damage and/or personal injury.WARNING: The system operating pressure must not exceed the pressure rating of the lowest rated component inthe system. Install pressure gauges in the system to monitor operating pressure. It is your window to what ishappening in the system.CAUTION: Avoid damaging hydraulic hose. Avoid sharp bends and kinks when routing hydraulic hoses. Using abent or kinked hose will cause severe back-pressure. Sharp bends and kinks will internally damage the hose, leadingto premature hose failure.Do not drop heavy objects on hose. A sharp impact may cause internal damage to hose wire strands. Applyingpressure to a damaged hose may cause it to rupture.IMPORTANT: Do not lift hydraulic equipment by the hose or swivel couplers. Use the carrying handle or other meansof safe transport.CAUTION: Keep hydraulic equipment away from flames and heat. Excessive heat will soften seals, resulting in fluidleaks. Heat also weakens hose materials. For optimum performance do not expose equipment to temperatures of65° C (170° F) or higher. Protect hoses and tools from weld spatter.DANGER: Do not handle pressurized hoses. Escaping oil under pressure can penetrate the skin, causing seriousinjury. If oil is injected under the skin, see a doctor immediately.DANGER: Only use hydraulic tools in a coupled system. Never use a tool with unconnected couplers. If the tool becomesseverely overloaded, components can fail catastrophically causing severe personal injury or death.www.tksimplex.com
3.0 TECHNICAL SPECIFICATIONS••• 4 •••G5 Electric Torque WrenchVoltage 115V 230VOperating Pressure 10,000 PSI (700kg/cm 2 )Electrical Power Source 20 Amps 115V Grounded 50/60 Hz 10 Amps 230V Grounded 50/60 HzMotor RatingFlow RateMaximum OperatingTemperature4.0 WORKING PRESSURE1.125 Hp Single Phase18 Amps @ 10,000 psi (700kg/cm 2 )1.125 Hp Single Phase10 Amps @ 10,000 psi (700kg/cm 2 )575 cu. in./ min. @ 1,100 psi, 55 cu. in / min. @ 10,000 psi170̊F - (65̊C)The pump’s maximum working pressure is 10,000 PSI (700kg/cm 2 ). Make sure that all hydraulic equipment such asrams, hoses, etc. used with this pump are rated at 10,000 PSI (700kg/cm 2 ) operating pressure.4.1 INSTALL VENT PLUGRemove SHIPPING PLUG (A) and install VENT PLUG (B) into fill plug.4.2 ADDING OILRemove OIL FILLER CAP (C) and add SIMPLEX Hydraulic Oil into reservoir.Oil level should not exceed 1” from the reservoir cover.BAC*As a “rule of thumb” oil should be visual in site window when the unit ispowered down and all connected tools are retracted.4.4 ELECTRICALCheck for proper electrical supply before connecting. Be sure the electrical connection is grounded. Check that yourpower supply agrees with the motor nameplate and/or Simplex model decal.NOTE: MOTOR MAY SPARK. DO NOT OPERATE IN AN EXPLOSIVE ATMOSPHERE OR IN THE PRESENCE OFCONDUCTIVE LIQUIDS.1. Do not use a power or extension cord that is damaged or has exposed wires.2. All single phase motors come equipped with a three prong grounding type plug to fit the proper groundedtype electrical outlet. Do not use a two prong ungrounded extension cord as the pump’s motor must begrounded.4.5 CONNECTING HYDRAULIC TOOLSUse only tools, hoses and accessories rated at 10,000 PSI (700kg/cm 2 ). When making connections with quickdisconnect couplings, make sure the couplings are fully engaged. Threaded connections such as fittings, gauges,etc. must be securely tightened and leak free. Use 1.5 wraps of Teflon tape (or suitable thread sealant) on all threads,leaving the first complete thread free of tape to ensure no foreign matter enters the hydraulic circuit.4.6 STARTING THE PUMP FOR THE FIRST TIME1. Locate the “ON” button on the pendant and Depress. Check for any leaks, repair as needed.2. Depress “ADV” button to advance tool and release to retract tool. Look for movement in tool,check for any leaks, repair as needed.
••• 5 •••CAUTION: Never operate the pump without tool movement for more than 1 minute. Leaving the valve in the advanceor retract position without the tool’s piston rod moving will overheat the oil.CAUTION: Never disconnect or connect any hydraulic hoses or fittings without first unloading the tool, then unplugthe electrical cord of the pump. Open manual relief valve to assure that the system has been depressurized. Viewthe gauge reading and double check the gauge to assure pressure has been released.4.7 PUMP MOUNTINGRefer to the chart for mounting dimensions to secure the pump to a fixed surface.1.5 gal.(6L) 2.5 gal.(10L) 5 gal. (20L)A 15.13 17 19.6B 1.68 2.75 4.69DBACC 3.57 4.37 5.03FD 1.43 1.93 2.93EE 8.75 9.75 11.75F1/4-20unc(4 places)1/4-20unc(4 places)1/4-20unc(4 places)5.0 CONTROL VALVES2 Position - 4 Way Solenoid2-Postion – 4 Way Solenoid Valve for Hydraulic Torque Wrenches.• To Advance......depress the Advance button.• To Retract.........release advance switch to Retract Tool.5.1 POWER CONTROL SWITCHESRemote pendant.Configured with motor control pendant:ADVANCE = Press and hold button to turn motor on.Energizes ADV. Coil.ON = Press button to turn motor on.OFF = Press button to turn motor off.Motor/Valve Control PendantNOTE: In the event multiple buttons are depressed for longer than 5 seconds,the unit is programmed to shut down. To restart, you will need to depress themotor “ON” to continue, or unplug / re-plug the unit into power supply, thendepress the motor “ON” to continue.www.tksimplex.com
5.2 PRESSURE TORQUE SETTING••• 6 •••WARNING: Make these adjustments BEFORE putting torque wrench on nut or bolt head. The pump pressuresetting may be above the pressure needed to provide the required torque for your application. Exceeding requiredtorque will cause equipment damage and may lead to serious personal injury.Adjusting Knob1. See torque wrench instructions for amount of pressure requiredto produce desired torque.2. Loosen lock nut and back out relief valve to prevent unintendedpressure build up.3. Turn pump on. Press and hold the “ADVANCE” button, and readpressure on the digital display on the pendant. (Manual Mode)4. While holding the button, turn relief valve in (clockwise)to increase pressure or out (counter-clockwise) to decrease maximumpressure.Repeat until correct pressure is obtained.5. Tighten lock nut on the relief valve to maintain setting.6. Run pump several times to test this setting before setting tool on the nut.DIAGNOSTIC MODELock NutValve Assembly• Highlight & Press “enter” to select DIAGNOSTIC MODE. ❶• DISPLAY TEST - Highlight & press “enter” to select DISPLAY TEST. Press“enter” again to end the test. ❷Press “left” arrow button to return to MAIN MENU.• KEYPAD TEST - Highlight & press “enter” to select KEYPAD TEST. Pressany button to test. Press “menu” to exit. ❸• CIRCUITRY TEST - Highlight & press “enter” to select CIRCUITRY TEST. Ifcircuit diagnostic is OK, press any key to exit. ➍Press “left” arrow key to return to MAIN MENU.5.3 AFTER COMPLETING THE JOB❷☞❸☞➍☞DIAGNOSTIC MODEDISPLAY TESTKEYPAD TESTCIRCUITRY TESTPower Control CenterADVANCEONBefore disconnecting hoses, fittings, etc., first be sure the tool is unloaded andretracted, then unplug the power cord. The pump is designed to cycle valveupon power down “off.”6.0 PERIODIC MAINTENANCECompletely change the hydraulic oil and clean the intake screen and magnet(located in the reservoir) twice a year. If equipped, change the external oil filtertwice a year (Use Simplex oil only, Model # AO1, 1 gallon). Change the oilmore frequently when used in extremely dusty areas or when the oil has beenoverheated. Using oil other than Simplex Brand may void the pump’s warranty.❶☞OFFMENUENTERThe following conditions require more frequent oil changes.• Rigorous duty, where oil temperature may reach 150˚ F.• High humidity environment and extreme changes in temperature that can result in condensation inside thereservoir.• Dirty or dusty environments that may contaminate the oil.• Frequent connection and disconnection of hydraulic hoses and components.WARNING: The electrical power cord must be disconnected from electrical outlets before performing maintenanceor repair procedures.
6.1 MAINTAIN OIL LEVEL••• 7 •••Check hydraulic oil level every 30 hours of operation (sight gauge should be completely covered in oil when all toolsare retracted. Add Simplex oil (Model # AO1 – 1 gallon) when necessary. Oil level should be no more than 1” from topof reservoir plate – with tools retracted and motor off.6.2 CLEAN OIL INTAKE SCREEN ONCE A YEARLoosen and remove reservoir plate bolts. Lift pump unit off the reservoir, being careful not to damage the gasket.Applies to the 1.5, 2 and 2.5 gallon reservoirs:Remove the 5 Allen socket head cap screws securing the screen to the first stage gear pump. Care should be takennot to remove the center plate and gears. Remove and clean with non-flamable solvent and blow dry clean. Reinstallin reverse order and torque bolts to 75 inch pounds. Keep the motor and pump as clean as possible.6.3 FLUSH THE PUMPIf you suspect your pump has been contaminated or discoversludge or other deposits on internal components, you shouldthoroughly flush the pump. Remove the old oil from the reservoir,then thoroughly clean the reservoir and refill with a clean,nonflammable flushing oil. Reassemble the pump and motor tothe reservoir.Run the pump in no load condition for 1 or 2 minutes maximum.Unplug the pump and remove the motor and pump assemblyagain. Now drain the flushing oil and re-clean the inside of thereservoir. (Make sure flushing fluid is also drained from pumpassembly). Refill the reservoir with Simplex hydraulic oil andreassemble the pump.Oil Fill (1.5 - 2.5 Gal. Models)Sight GaugeDrain Plug (1.5 - 10 Gal.)www.tksimplex.com
PENDANT OVERVIEW••• 8 •••LCD DISPLAYPower Control Center“ADVANCE” BUTTON”DEPRESSING BUTTON ACTIVATESMOTOR “ON” AND ADVANCES TOOL.ADVANCE“ON” BUTTON”DEPRESSING BUTTON ACTIVATESMOTOR “ON”ON“OFF” BUTTON”DEPRESSING BUTTON TURNSMOTOR “OFF” AND CYCLES VALVE TORELIEVE PRESSURE TRAP.OFFMENU / ENTER / ARROW BUTTONSEXECUTES A COMMANDMENUENTER• UP BUTTON MOVES CURSOR UPWARDCHANGES VALUE• DOWN BUTTON MOVES BUTTON DOWNWARDCHANGES VALUE• LEFT BUTTON MOVES CURSORLEFT OR RETURNS BACK• RIGHT BUTTON MOVES CURSORRIGHT OR CHANGES VALUENOTE: WHEN IN MANUAL MODE -PRESSING THE “UP” ARROW DARKENS CONTRASTPRESSING THE “DOWN” ARROW LIGHTENS CONTRAST
PENDANT - START UP••• 9 •••Upon “Power Up”, unit will perform system check. If critical fault(s) are detected, unit will not start and fault(s) will bedisplayed here (Fig.1). Warnings will not prevent the unit from starting.The “Manual Mode” screen will display after the system check is complete and will default to “Manual Mode”(Fig. 2). Screen displays pressure in selected units (PSI, Bar, MPa) and indicates the motor status.PERFORMING SYSTEMCHECKOKSOFTWARE VER. X.XTORQUE WRENCHPower Control CenterPower Control CenterADVANCEFIG. 1 FIG. 2ADVANCEONONOFFOFFMENUENTERMENUENTERwww.tksimplex.com
MAIN MENU - FIG. 3••• 10 •••FIG. 3To enter the “main menu”, depress “MENU/ENTER” button. By pressing the “up” or“down” arrow buttons, sub-menus can be highlighted. Once the preferred sub-menu is highlighted,press the “MENU/ENTER” button to go into that sub-menu mode. ❶To return to the “main menu” press the “left arrow button”.Power Control CenterUNIT SETTINGS - FIG. 4ADVANCE• Highlight & press “enter” to select UNIT SETTINGS. ❶ON• MODE - PRESSURE or TORQUE is chosen by highlighting & pressing “enter” button. ❶To return to the “main menu” press the “left arrow button”.• UNITS - In PRESSURE mode, units (kg/cm 2 , PSI, Bar and KPA) are displayed byhighlighting & pressing the “enter” button until desired form of measurement is displayed. ❸To return to the “main menu” press the “left arrow button”.• SAVE the data by pressing the “down” arrow button to “save” mode and press “enter”. ➎To return to the “main menu” press the “left arrow button”.❶☞OFFMENUENTER• UNITS - In TORQUE mode, “units” (lb-ft, NM, KPM,) are displayed by highlighting &pressing the “enter” button until desired form of measurement is displayed. ❸To return to the “main menu” press the “left arrow button”.• SAVE the data by pressing the “down” arrow button to “save” mode and press “enter”. ➎To return to the “main menu” press the “left arrow button”.❷☞❸☞➍☞➎☞FIG. 4• TOOL - Highlight & press “enter” and use the “arrow” buttons until the desired TOOL isselected. If the TOOL being used is not a SIMPLEX TOOL, select “other”. If no TOOL is beingused, select “none”. ➍To return to the “main menu” press the “left arrow button”.• SAVE the data by pressing the “down” arrow button to “save” mode and press “enter”. ➎To return to the “main menu” press the “left arrow button”.MANUAL MODE - FIG. 5❶☞Power Control CenterADVANCEONOFFMENUENTER• Highlight & press “enter” to select MANUAL MODE. ❶• To operate pump, press the “ADVANCE” button to turn pump motor on andadvance the tool. ❷To return to the “main menu” press the “menu/enter button”. FIG. 5❷☞Power Control CenterADVANCEONOFF❶☞MENUENTER
AUTO-CYCLE MODE••• 11 •••• Highlight & press “enter” to select AUTO-CYCLE mode. ❶• TOOL - Press “enter” and use the “arrow” buttons until the desired TOOL is selected.If the TOOL being used is not a SIMPLEX TOOL, select “other”. If no TOOL isbeing used, select “none”. ❷To return to the “main menu” press the “left arrow button”.❷☞❸☞➍☞AUTO CYCLE MODETOOLMODETARGET• MODE - PRESSURE or TORQUE is chosen by highlighting & pressing“enter” button. If TORQUE is selected, you must select a “tool” or “other” and“enter” data. ❸To return to the “main menu” press the “left arrow button”.Power Control CenterADVANCE• TARGET - Highlight & press “enter” to select TARGET and use the “up” and“down” keys to raise or lower the TARGET Pressure. Use the “right and “left” arrowkeys to select the desired digit column. ➍To return to the “main menu” press the “left arrow button”.• RUN - Highlight & press arrow key “down” and press “select” to run theAUTO-CYCLE mode. Unit will AUTO-CYCLE until the target goal is achieved. Tointerrupt during a cycle, depress any button.To return to the “main menu” press the “left arrow button”.❶☞ONOFFMENUENTERHISTORY MENU• Highlight & press “enter” to select HISTORY MENU. ❶• MOTOR RUN TIME - Highlight & press “enter” to view the total number of HOURSand CYCLES for the desired selection. ❷To return to the “main menu” press the “left arrow button”.• WARNING HOURS - Highlight & press “enter” to view the WARNING TIMEtotal. ❸To return to the “main menu” press the “left arrow button”.• FAULT TIMES - Highlight & press”enter” to view the FAULT TIMES TOTAL.To return to the “main menu” press the “left arrow button”. ➍❷☞❸☞➍☞HISTORY MENUMOTOR RUN TIMEWARNING HOURSFAULT TIMESPower Control CenterADVANCEONOFF❶☞MENUENTERwww.tksimplex.com
7.0 TROUBLESHOOTING••• 12 •••PROBLEMCAUSE-SOLUTIONSporadic Tool Action: • Air in the hydraulic system. Bleed the hydraulic circuit.• Check reservoir oil level.Motor Will Not Start: • Be sure power cord is not damaged.• Check for tripped circuit breaker; be sure breaker is of adequatesize.• Have motor checked for proper operation.• Have qualified electrician inspect for loose or faulty wiring or switch.• Check fuse on electical bracket.Noisy Operation: • Air in system.• Be sure the oil reservoir is filled to normal level.• Check all points where air might leak into system.• Clogged or blocked intake screen.Pump Oil is Over Heating: • Inspect for high pressure leakage at the pump (leaking at plug orrelief valve).• Oil level is low. Fill reservoir to normal level, or retrofit the pump withlarger reservoir or heat exchanger.Pump Runs But Will Not Pump Oil: • Pump is not primed. Run pump a few minutes tipping from side toside.• Inspect to make sure that external adjustable relief valve is setproperly.• Defective control valve, take to nearest Simplex Authorized ServiceCenter for repair.• Incorrect motor rotation, take to nearest Simplex Authorized ServiceCenter for repair.• Check to make sure the intake screen is not clogged. Clean ifneeded.• Check oil reservoir is low. Fill as needed.• Oil viscosity is too high. Replace with SIMPLEX oil.SIMPLEX PRODUCTS ARE WARRANTED TO BE FREE OF DEFECTS IN MATERIALS AND WORKMANSHIP UNDER NORMAL USE FOR AS LONG AS THEORIGINAL PURCHASER OWNS THEM, SUBJECT TO THE GUIDELINES AND LIMITATIONS LISTED. THIS WARRANTY DOES NOT COVER : NORMAL WEARAND TEAR, COSMETIC ITEMS, ABUSE, OVERLOADING, ALTERATIONS. IMPROPER FLUID, OR USE IN A MANNER FOR WHICH THEY ARE NOT INTENDED.IF THE CUSTOMER BELIEVES A PRODUCT IS DEFECTIVE, THE PRODUCT MUST BE DELIVERED, OR SHIPPED FREIGHT PREPAID, TO THE NEAREST SIM-PLEX AUTHORIZED SERVICE CENTER FOR EVALUATION AND REPAIR.2525 GARDNER ROAD, BROADVIEW, IL 601551.800.323.9114 • Outside U.S. 1.708.865.1500www.tksimplex.com


 8613371530291