
smg hydraulic pump free sample
Pentosin CHF 11S is a synthetic high performance hydraulic fluid for life-time application in modern vehicle aggregates. Pentosin CHF 11S is especially designed for hydraulics in the automotive industry with the highest technical requirements such as in: power steering, level control, shock absorber, hydro-pneumatic suspension, stability and traction control, hydraulics for convertible tops, central lock systems, etc.
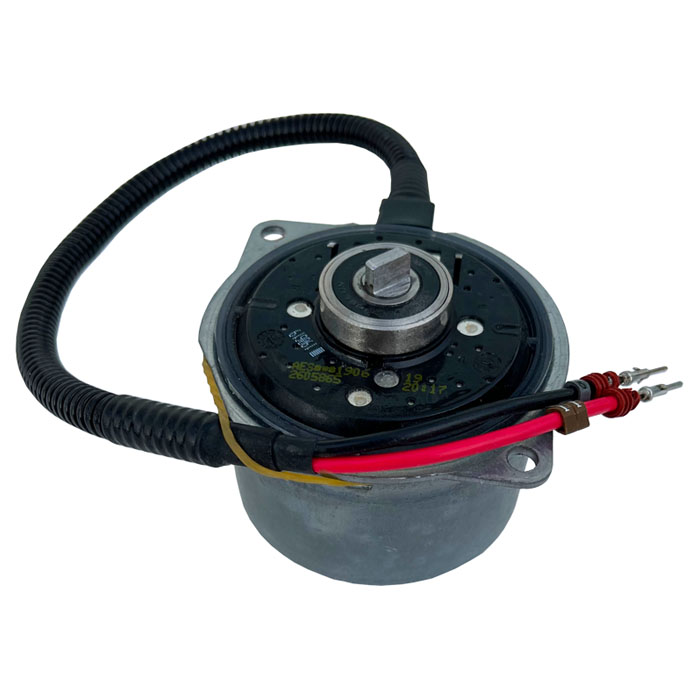
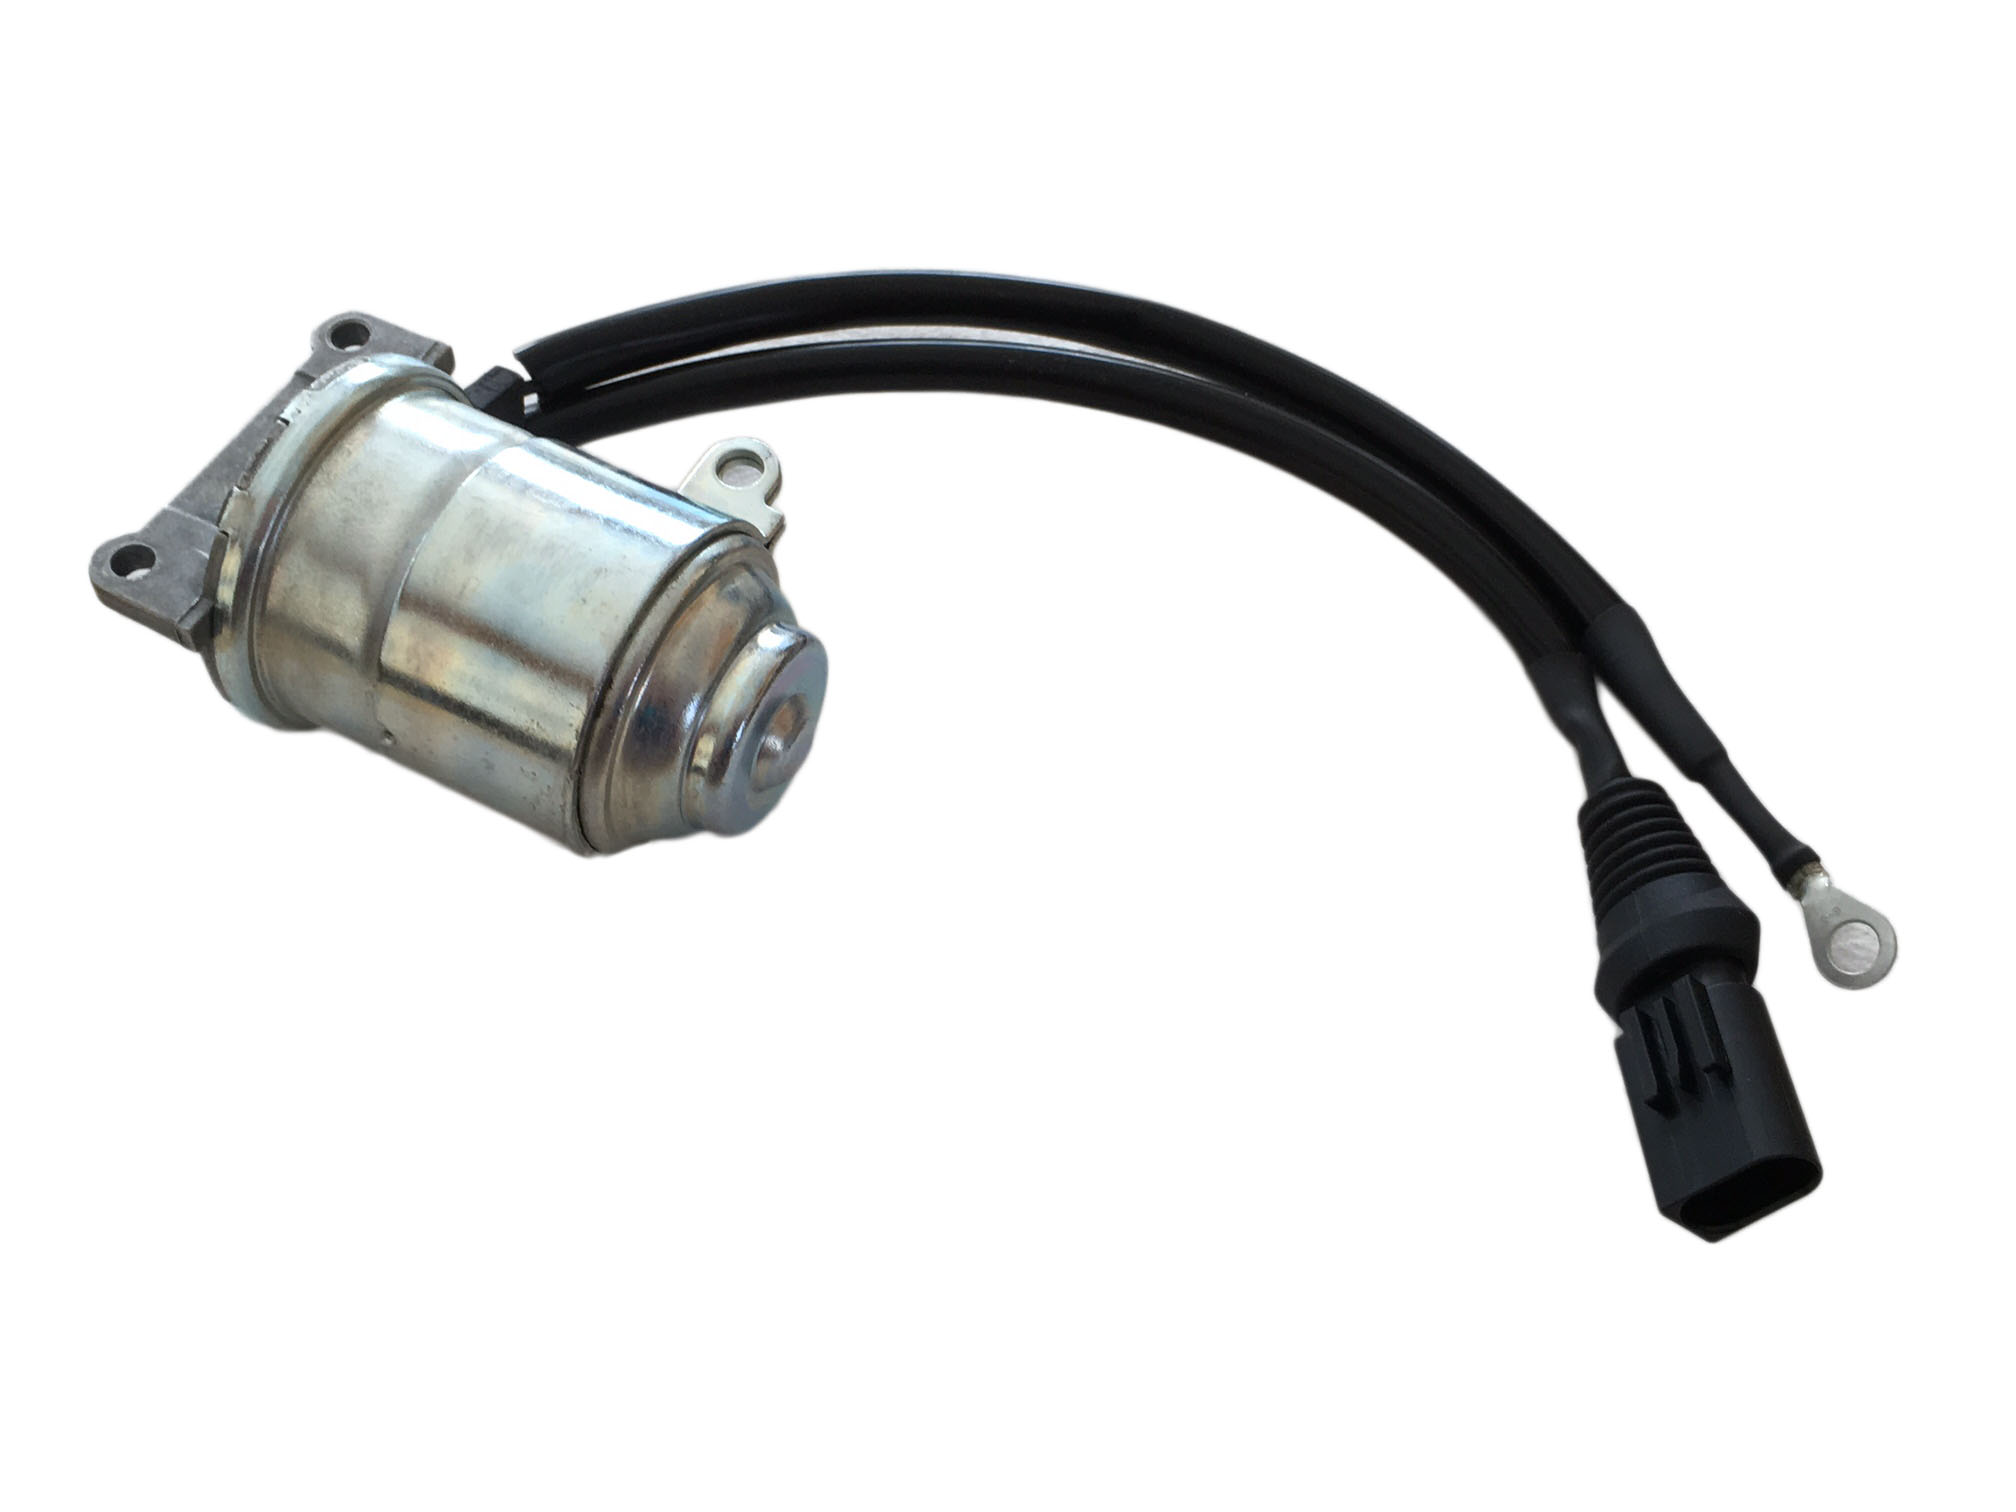
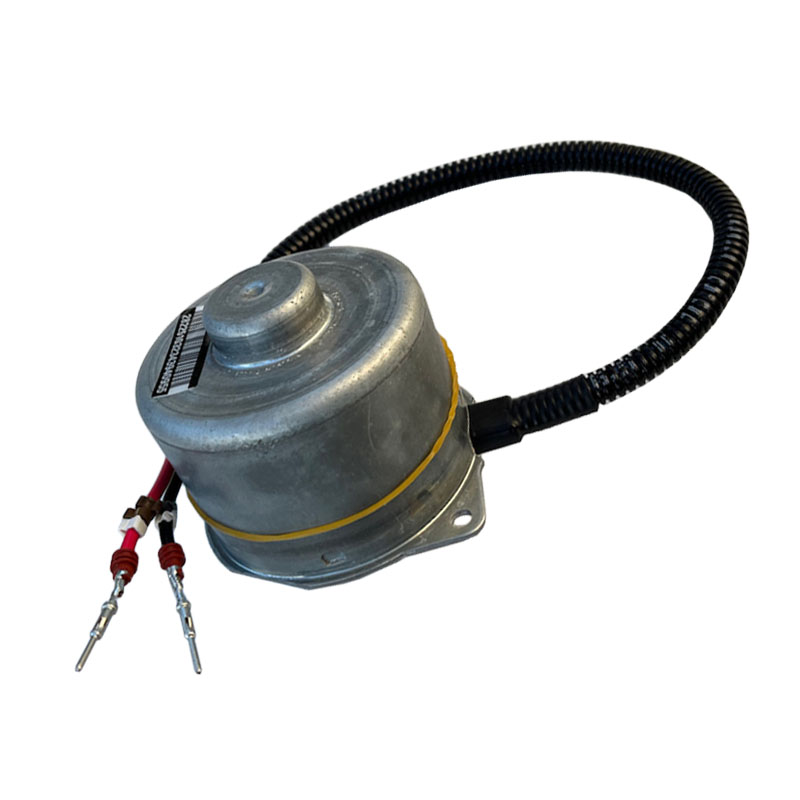
The pump motor drives the gear pump, which generates the pressure for the SMG transmission. Both parts together form the hydraulic pump. Without hydraulic pressure, the transmission cannot perform any action – neither change gears, nor operate the clutch. Therefore, the hydraulic pump is the most important component in the system.
In most cases, it is sufficient to replace only the electric motor, as this is a wearing part. The gear pump fails only very rarely. Another advantage is that when only the pump motor is changed, the hydraulic system does not need to be bled afterwards, unless it has been opened.

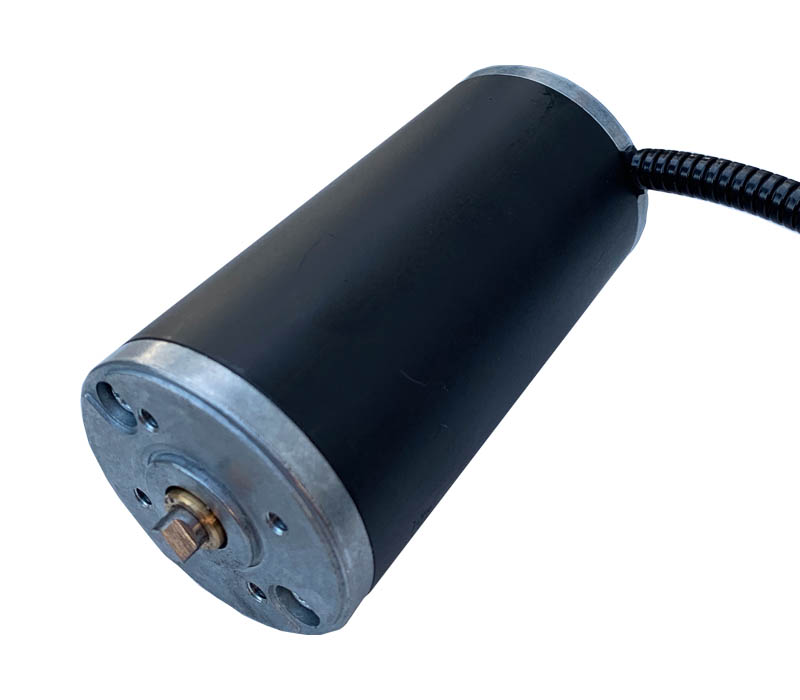
Renew your worn or burn"t out SMG pump with our remanufactured units! Our remanufactured pumps are disassembled, thoroughly cleaned and reassembled with all new components.
Burkhart Engineering, based in southern Germany, is a BMW specialist renowned worldwide for its expertise with the E46 M3 SMG2 transmission system. Through countless repairs and a refreshing approach to the problems the SMG system can present, Burkhart has since developed a range of rebuild kits and upgrades to make SMG ownership a worry-free experience.
The Burkhart Engineering SMG Hydraulic Pump Repair Kit can not only repair your pump, but also improves it to be ready for high temperature track use, traffic jams and hot summer weather.
In most cases this is caused by a worn electric motor, which drives the hydraulic pump in the SMG unit. Further the gap leakage in the hydraulic system increase massively during high temperatures. If additionally many hydraulic consumers are working (clutch slave cylinder and gearbox actuator), the hydraulic unit no longer produces enough pressure – for this issue Burkhart Engineering High Performance Hydraulic Fluid offers a huge improvement. The pump runs on pressure up to 25% fasterthan using the conventional Pentosin CHF 11s.
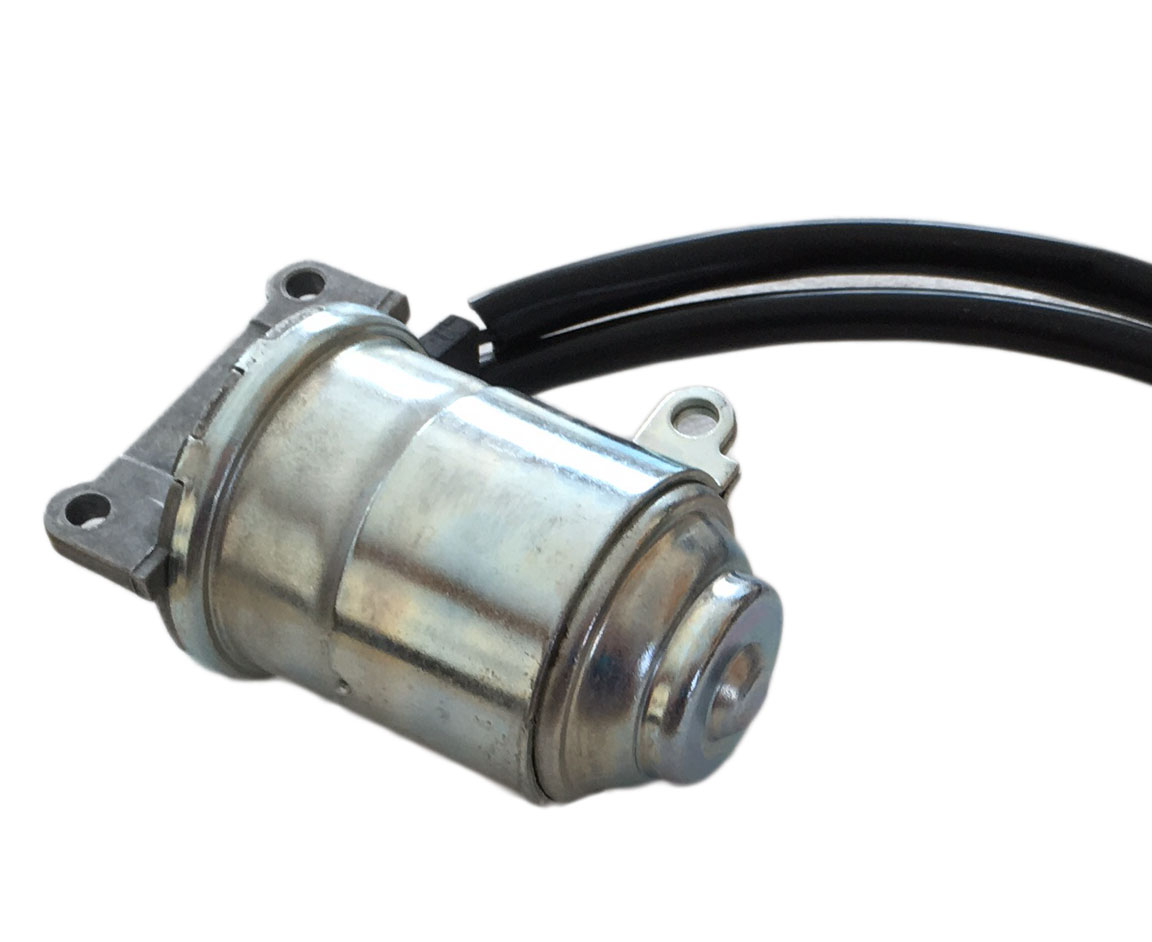
The old motor can be replaced by the new one as a plug and play swap. The replacement motor is equipped with the required pins and seals and can be directly installed with the original wiring loom. These are brand new spare parts in OEM quality – the alternative to save you from buying a complete new SMG hydraulic unit.
This Repair Kit only works if the rest of the hydraulic unit is functional. The accumulator for example needs a defined preload pressure. Should this not be the case, the accumulator has to be replaced, too. In Burkhart Engineering’s SMG-Wiki you can find instructions about how to check the preload pressure in the accumulator.

The car came with two transmission options — a 6-speed manual, and anSMG II gearbox. The latter turned out to be the cause of a serious issue that pulled many cars off the road. More specifically, the M3 E46 SMG pump issue is what caused all the ruckus, and today we’ll try to give you a brief rundown on what this issue means and how serious it is, or was.
Contrary to popular belief, the SMG II gearbox that BMW has installed in the E46 M3 isn’t an automatic gearbox, nor was it the first gearbox of its kind to be used ona BMW M3 car. Oh no, it was a fully manual setup with a clutch and everything, but no clutch pedal. Getrag and Sachs wanted to make something that is close to Getrag’s 6-speed manual in terms of build butwith a hint of Williams BMW F1 transmission mechanics.
Where most die-hard enthusiasts hit a divergence point with BMW as far as SMG transmission went, was the addition of the automatic mode. Despite this being a sequential box, this mode alone was enough for many to shun the SMG as inferior to the now legendary Getrag 6-speed manual.
Today, things are changing in favor of the SMG. However, some argue that such a change of heart was brought on by a severe lack of manual M3 E46s out there. That being said, there’s a reason why this is the case.
As it turns out, the manual gearbox elitists were correct to avoid the SMG II early on, but not because of their anti-anything-non-manual argument. No, they were right to avoid the sequential gearbox because it turned out to have a pretty serious Achilles’ heel.
If you own an M3 E46 with an SMG II gearbox, you’ve probably seen the dreaded cog wheel iconat least once during your time owning the car. On the odd chance that you’re among the lucky few who never had issues with their sequential transmissions, you either know someone who has had their car drop out of gear following the cog icon, or you’ve at least read one doom and gloom thread on your BMW enthusiasts forum of choice.
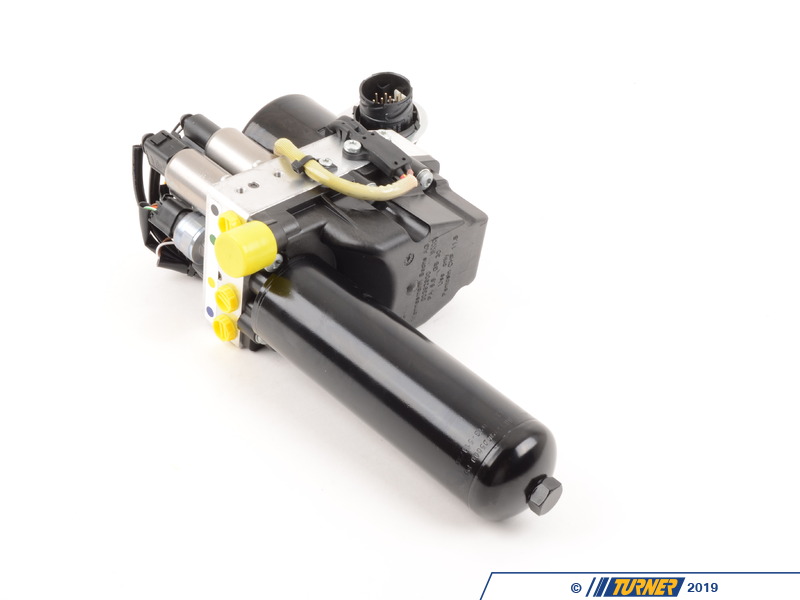
The sequential M gearbox is anything but simple. In essence, it’s ahydraulic-driven manual transmissionthat is packed full of extras and goodies such as an early version of a hill-assist, different shift programs, and more. To make all that happen, BMW had to use a fairly complex network of hydraulics, which were driven by the SMG hydraulic pump.
That pump is where most issues with this transmission start and end, at least the serious ones. Decades have passed since we first heard the horror stories of SMG II-equipped cars dropping out of gear while their owners were doing 70 MPH on the freeway, leaving them dead in the water with no real ability to limp the car to the nearest off-ramp.
Yet, despite so much time passing by, there are still conflicting reports of why these pumps, or more specifically the electric motors inside them, fail the way they do. The general consensus is that Bavarian engineers simply chose a bad spot to mount the pump, i.e. way too close to the engine block.
The heat from the engine would cut the lifetime of the electric motor short, causing it to grow weaker over time until it reaches a point where it can no longer deliver the necessary pressure to run the pump. Once the drop in pressure occurs, it usually renders the car unable to stay in gear. Most SMG pump issues of this nature manifest themselves well before the car has 100,000 miles on the odometer.
Another potential culprit that many feel affects the SMG II is the overly optimistic transmission fluid flush cycle. Many owners swear by doing a transmission fluid flush every 20,000 miles, using quality MTF-LT-2 fluids, thus keeping the fluid in a pretty good condition at all times.
So many SMG pumps were replaced within the first 10 years of the M3 E46 production that many owners contemplated a class action lawsuit against the German manufacturer.
The answer is that it depends. Back in the day, it was pretty much an unwritten rule to have a few grand stashed away somewhere just in case the hydraulic SMG pump decides to head for Valhalla.
BMW was pretty adamant about replacing the entire unit instead of just the electric motor inside the pump. Since there weren’t really any other options available, people did what they had to do, begrudgingly.
Now that we as a community have some hands-on experience with these pumps, their motors, and the SMG II as a whole, people have recognized that once you replace the motor, you should also replace the relay which tells the motor when to come online and when to turn off.
Faulty relays are right behind the SMG pump issue in terms of things that will leave you stranded on the side of the road. So much so that people often replace these relays as means of preemptive maintenance.
This is where things turn a little sour for most people. While the electric motor failure accounts for the majority of SMG pump issues, there are still the other 15-20% of cases where the motor could be fine. Well, you’re probably thinking, we can simply diagnose those other things and replace them as need be, right?
Unfortunately, that’s not the case. A failed pump results in a drop in oil pressure within the system, which triggers the SMG-specific codes. The trouble is that a failed solenoid or a relay will do the same. Many people have found themselves replacing the electric motor only to find out that it’s the solenoid that has triggered the code in the first place.
Like with most things in life, the answer to this question isn’t so simple. On one hand, the issues related to the SMG II gearboxes have made them somewhat notorious in the community. On the other hand, a byproduct of such a bad rap is a decent availability of fairly healthy cars that haven’t been ragged on all that much. You could find yourself an M3 with a decent amount of miles and a relatively fresh engine.
The information on this page is presented as a courtesy for our web guests. HFI Fluid Power Products does not actively involve itself with hydraulic fluid technical advice. We primarily sell hydraulic adapters, tube and
hose assemblies, as well as components such as valves. Hydraulic fluid is offered to our local customers, but we shy away from sales of hydraulic fluid outside of our local area.
If the information you are looking for is not on this page, we suggest you contact the technical support of one of the US"s larger hydraulic fluid producers, such as Shell Global. Their technical support phone

In most cases the reason for this is because of worn electric motor, which drives the hydraulic pump in the hydraulic unit. In addition, the gap losses in the hydraulic system increase enormously at high temperatures. If many hydraulic consumers are now active (clutch slave cylinder and transmission actuator), the hydraulic unit can no longer keep up with the pressure build-up. We have ours for that Burkhart Engineering High performance hydraulic oil developed. The required system pressure we up to 25% faster built up than is the case with the normal pentosine CHF 11s.
The worn original engine can "Plug & Play" exchanged for our repair engine. The replacement engine is equipped with the required pins and seals and can be pinned directly into the original BMW wiring harness. It is a replacement part OEM quality. The alternative to avoid having to buy a new hydraulic unit.
Examine pool surfaces to identify conditions that might interfere with the proper bonding of coating. Look for algae, mold, mildew, dirt, paint, mortar droppings, efflorescence, patching compounds, loose tile, cracked plaster, et cetera. Identify hollow spots in plaster by sounding. Clean pool surfaces of all material that might interfere with the proper bonding of coatings. Clean with high-pressure water or by sandblasting. Wash with chlorine until algae, mold, and mildew are gone. Wash oil and grease spots using tri-sodium phosphate or equivalent and water; soak if necessary. Remove all cleaning solutions via high-pressure washing. Remove and repair all hollow and de-laminated plaster. Saw cut an area three (3) inches around bad spots and remove plaster inside the saw cut. Undercut the edges of the remaining plaster. Fill holes with specified patching cement SGM HSR High Strength Render to a level of existing plaster. Remove loose tile and fittings; undercut existing plaster two (2) inches below the tile line, and around return lines and fittings to a depth of 3/8 inch. Stop water penetration from the outside pool. Plug cracks and leaks around fittings using hydraulic cement (SGM Dynamite Pool Patch). Etch clean the surface with a muriatic acid solution. Use concentration necessary to clean and roughen the surface; smooth surfaces may require higher concentration. Neutralize surface with a solution of baking soda and water to eliminate acid residue, which can cause bond failure. Remove remaining acid solutions via high-pressure washing. Plug pool inlets and outlets to prevent clogging with expandable plugs or threaded caps. Mark location of fittings using tape on coping or on a measured drawing. Place the sump pump at the main drain to remove all running and standing water. Do not begin installation until the concrete pool shell has cured at least 28 days. For renovation projects (plastering over an existing plaster pool finish) and poured or formed concrete shells apply SGM BOND-KOTE™ as directed. Allow BOND-KOTE to cure for at least six (6) hours before plastering. The plaster should be applied to BOND-KOTE within three (3) to five (5) days. If left for a longer period before the finish is applied, ensure Bond Kote is clean and free of dirt, efflorescence, and other contaminants. If necessary, clean BOND-KOTE by brushing vigorously while spraying with water; chlorine may be used as needed.
Jobsite additives, such as calcium chloride solutions, pump-aides, or bonding agents can affect the color of this product. For best results mix product using only cool clean, potable water. If adding any other approved additives, hold a portion of the mix water to dissolve the additives, screen and add the final amount to mixer. Additives should be introduced at the end of the mixing process. Ensure that the additives are mixed with water and pre-dissolved.
Although it is not necessary to use a plaster pump, many contractors do. Included here are some helpful hints for successful pumping. Increase the size of the pump manifold from three (3) inches to four (4) inches. Change the valve ball from plastic to steel to improve longevity. Set a plaster pump to the lowest gear by moving the belt. Always begin pumping with a full stroke on the main piston. This is accomplished by advancing the wheel until the cam is at its highest position. Prepare a slurry of cement and water or pump aid and run it through the pump first to prime the pump and lubricate the hoses. Pour the mixed plaster slowly into the pump hopper. Do not pour all the material in at once. Agitate the material in the hopper to prevent separation of the cement and aggregate. Avoid unnecessary stopping during the pumping process. Diamond Brite aggregate will tend to settle in the pump manifold and hoses when the pump is stopped. Agitate the remaining material left in the hopper to reduce clogging. Do not try to clear a blockage using the pump. Disassemble and clean the manifold and hoses when clogged. Do not over-water mix. This will only cause the material to separate, clogging the pump and hoses.
When the Diamond Brite has lost its sheen or is no longer damp, it may be ready for exposure with soft bristle brushes and water. The material must be sufficiently set up to allow applicators to walk on the floor without leaving footprints. Wear white cotton socks or foam shoes when exposing Diamond Brite. Boots and bare feet are not recommended. Test the plaster for readiness by carefully washing a small area with a soft bristle brush. If the cream washes away without losing aggregate the exposure process may begin. Starting with sunny or fast setting areas begin washing away cement paste with water and brushes. Use a bucket first then progress to a soft flow of water from a garden hose as the material begins to harden. Begin using stiff bristle brushes as the set progresses. Examine the plaster for hot spots that may be set quickly. Mist these areas with water to allow longer exposure time. Over-cured cement paste will not remove easily and may require stiff bristle brushes to remove. Avoid slow setting areas like shady walls and the bowl. Washing too soon in these areas will cause washouts. If an area washes out it must be re-troweled immediately. Keep some extra Diamond Brite mixed up for use in patching washout areas. Keep a sump pump running in the main drain at all times to discharge the wash solution. Dispose of wash as directed by local requirements. Avoid leaving hoses, buckets or any other items on the plaster during exposure. Any object left on the plaster during this critical phase may leave a “shadow” on the surface. In the event of shadowing heat may be carefully applied to remove the discoloration. When all of the cement paste has been removed from the surface uniformly, the brush phase is complete. If done thoroughly, this will complete the exposure process. The process of acid washing as described below is optional. If desired, an acid wash may now be performed using a 25% solution of muriatic acid (higher concentrations may be needed for stubborn areas) and water to remove the thin film that may remain on the surface. Proper safety equipment must be worn at all times. Begin washing the bowl first and work up to the shallow end. Following this procedure will minimize “rivers” or streaks on the floor. The use of an acid wash additive to reduce fumes and ensure uniform coverage is highly recommended. Neutralize and discard the wash solution according to local requirements. Neutralize acid remaining on the Diamond Brite with Soda Ash and water to avoid discoloration.
After troweling, allow the plaster to fully set up. This may take anywhere from one to a few hours or overnight, depending on local job site conditions. Begin acid washing by using a 25% solution of muriatic acid (higher concentrations may be needed for stubborn areas) and water to remove the cement film that may remain on the surface. Increase the concentration of the acid solution as needed. Proper safety equipment must be worn at all times. Begin washing the bowl first and work up to the shallow end. Following this procedure will minimize “rivers” or streaks on the floor. Acid wash walls and steps last. Do not allow acid wash solution to puddle in the bowl area. Use a sump pump to constantly discard the runoff after it is diluted and neutralized. The use of an acid wash additive to reduce fumes and ensure uniform coverage is highly recommended. Neutralize and discard the wash solution according to local requirements. Neutralize acid remaining on the Diamond Brite with Soda Ash and water to avoid discoloration.
Powerwash Exposure Technique: Hard trowel pool to a uniform smooth finish. Let finish air dry for 1-3 hours after completion. Begin the acid wash process by filling a pool with eight (8) to ten (10) inches of water. This water will buffer the acid solution during the exposure process. Acid wash with 100% muriatic acid starting with walls working down to the bowl. Leave acid on for approximately one (1) to two (2) minutes before rinsing off with a hose. Keep constant water on the floor to diffuse acid solution avoiding streaks. Keep acid-washed areas wet through the entire process or cement paste will re-set. Complete the acid wash on the floor and the bowl of the pool, finish by pumping out water. Begin the power-washing phase with 2,500 psi machine using a 45-degree nozzle. Keep tip twelve (12) to eighteen (18) inches away from the surface perpendicular to the plaster finish. Power wash surface with approximately 20% of overlap to ensure complete exposure. Start power-washing walls from tile line thru cove of the pool, finish with the floor. Pump out remaining water; install main drain covers, lights, and fittings.
Adjust circulating pump timer to normal operating hours. Brush the pool walls and floor daily for the first two (2) weeks. Do not vacuum pool with wheeled vacuum for 14 days. Putting a wheel cleaner in the pool prematurely can cause wheel marks/ tracks to show up on the pool finish. Do not install an automatic pool cleaner for 28 days. No salt should be added for 28 days. Please make sure the water pH and alkalinity is balanced prior to the use of salt chlorine generators.

People shopping for BMWs often come across the term SMG. It stands for sequential manual gearbox. In essence, it means the clutch is digitalized, and there is a way to drive the vehicle like an automatic. However, many drivers have stated that doing so causes vehicle failure. Not everyone agrees.
For example, an SMG transmission is said to be able to provide two driving experiences: automatic or manual. When set to automatic mode, the driver doesn’t have to press the clutch. Instead, they just choose the right gear (done via standard stick/shifters on steering wheel).
If you’re in a rush, or gearing up for a bunch of stop and go driving in the city or suburbs, you might consider throwing the car’sSMG Transmissioninto manual mode. Doing so could save you some time, energy, and frustration.
This question, however, is making mechanics and BMW fans mad in several corners of the Internet and in garages across America:Is the SMG Manual or Automatic?
Other mechanics disagree. They want to call it an automatic because one small part of the process is hydraulic and digitalized. They believe, it’s a question of semantics.
What’s the answer? To be determined by your state of mind (or your mechanic’s!). It’s neither/nor. We don’t like trying to put pieces in a mold if they can hold their own. As far as we’re concerned, it’s not automatic. It’s not manual. It’s SMG.
SMG Transmissionscame into the conversation in 2002 with BMW. The system offered a six-speed manual gearbox with a clutch and gearbox powered via electro-hydraulics, all wrapped up in a digital system. There was, however, no clutch pedal.
The experts point out that SMG transmissions aren’t automatics that can be adjusted manually while driving. Instead, they have a clutch without the clutch pedal. The pedal control is elsewhere.
Automatic mode provides a simpler experience. Most car owners with an SMG Transmission don’t mess around with the manual mode when doing busy city driving. All of the stopping and going for pedestrians, for example, can making this mode feel like it’s more trouble than it’s worth.
Do SMG Transmissions breakdown a lot? According to the fanatics, no. One driver claims to have driven over 140,000 miles for thirteen years without transmission problems. Considering the average vehicle lasts twelve years, that’s pretty good!
If you’re on the fence about the SMG transmission, and you’re worried about power, the current fans say don’t be. It’s a fast setup, they argue. The shifting, the actual change of the gears, is better than any manual driver could do, so that’s the finesse that makes the SMG transmission so evocative.
The way we see it, there are two drawbacks to having a car with anSMG Transmission. The first is that people will be quick to judge your car purchase if they don’t like BMW’s selection on this one. Secondly, the parts involved in the transmission system can still bust down although overall it has fewer problems.
Today, vehicles with anSMG Transmissionhave a bit of a fan club, though. There are plenty of vehicle owners out there who admire the digital aspect of the ride or they like feeling like speed race coming down the expressway.

Mice were anesthetized with 2% isoflurane with 1% oxygen followed by 1% isoflurane with 1% oxygen to maintain anaesthesia. After shaving and sterilization of the abdomen, mice were placed on a sterile surgical pad on top of a heating pad and covered with a sterile surgical drape. Ophthalmic ointment was placed over the eyes to prevent dehydration and the incision site was sterilized. Upon loss of recoil paw compression, a midline incision was made through the abdominal wall exposing the peritoneal cavity. For injections into the CG-SMG or duodenum an additional incision was made laterally to allow for better access. The duodenum, ileum, colon, or CG-SMG were located and exposed for injection. All injections were made with a pulled glass pipette using a Nanoject III. Following injection, the abdominal wall was closed using absorbable sutures and the skin was closed using surgical staples. Antibiotic ointment was applied to the closed surgical site and mice were given 0.05 mg/kg buprenorphine every 12 h for 2 days.
Mice were anaesthetized under isofluorane and positioned in a stereotaxic frame (Kopf Instruments). The skull was exposed and a 26-gauge stainless steel guide cannula (PlasticsOne) was implanted into the lateral ventricle (midline −0.2 mm, 1.0 mm posterior from bregma, depth 2.3 mm from skull surface). The cannula was secured to the skull with dental cement and temporarily occluded with a dummy cannula (PlasticsOne). After surgery, the mice were singly-housed and given at least 1 week to recover. Prior to the study, cannula placement was verified by a positive dipsogenic response to angiotensin II (1 nmol in 1 μl; Sigma-Aldrich). I.c.v. injections were performed using a 30-gauge needle that extended 0.5 mm below the guide cannula (PlasticsOne), connected by cannula connector to a 5 μl Hamilton syringe and infused over 1 min using a microinfusion pump (Harvard Apparatus). Mice were habituated to i.c.v. infusions for at least 5 days prior to the experiment. An oral gavage of streptomycin (20mg at 200mg/mL) was given and then later artificial cerebrospinal fluid (aCSF) or SCFA (100uM sodium acetate, 10uM sodium propionate, and 10um sodium butyrate) dissolved in aCSF were delivered through the cannula. 16 hours later another i.c.v infusion of aCSF or SCFA was given and the CG-SMG was dissected 8 hours after the second infusion.
Mice were given sdVx as described above, followed by injection of a 1 μL mixture of (0.5 μL PRV-152 and 0.5 μL CTB594) into the proximal colon. The inclusion of CTB was necessary to confirm successful vagotomy and to ensure that nodose neurons observed came from retrograde transport of PRV originating in the CG-SMG and traveling through the CNS. Following the procedure, the abdominal wall was closed using absorbable sutures and the skin was closed using surgical staples. Antibiotic ointment was applied to the closed surgical site and mice were given 0.05 mg/kg buprenorphine every 12 h for 2 days. For sham-operated animals the vagus nerve was similarly exposed but not cut.
Mice were anesthetized as described above and the ileal vein and artery to the distal ileum was identified. A cauterizer was used to sever the main ileal artery/vein and surrounding nerves. Once the mesentery was resected, 0.5uL of CTB594 or CTB647 with 0.1% FastGreen was injected with a pulled glass pipette using a Nanoject III was injected into the distal ileum between the two most distal lymph nodes. The tissue was carefully washed several times with PBS to prevent possible spill over of tracer to other tissues. LNG, RNG, and CG-SMG tissues were then dissected after 2 days post-injection followed by overnight fixation in 4% PFA. Following the procedure, the abdominal wall was closed using absorbable sutures and the skin was closed using surgical staples. Antibiotic ointment was applied to the closed surgical site and mice were given 0.05 mg/kg buprenorphine every 12 h for 2 days. Sham was identical to the previous procedure, but the mesentery was left intact.
CTB488 was injected into the duodenum, ileum, and proximal colon. Mice were sacrificed by cervical dislocation and the CG-SMG and NG were harvested and fixed overnight in 4% PFA. Tissue was then washed four times in DPBS at RT and permeabilized in PTxwH for 4 hr at RT. Primary antibody anti-AlexaFluor488 (1:400, Thermo Fisher Scientific, A-11094) was added to the samples in PTxwH and incubated at 4°C for 48 h. Samples were washed four times in PTxwH at RT and then stained with goat-anti rabbit AF555/568/647 at 4°C for 24 h. Samples were washed four times in PTxwH at RT, covered in Fluormount G, and coverslipped for confocal imaging. Each ganglion was captured in full by multiple z-stacks and the total number of CTB+ neurons were counted.
Mice were anesthetized and operated on as described above. 1.5 uL of AAVrg-hSyn1-Cre with 0.1% FastGreen was injected into the CG-SMG of Rosa26lsl-tdTomato mice. 1.5 uL of AAV2-CAG-FLEX-tdTomato with 0.1% FastGreen was injected into the CG-SMG of Snap25cre mice. Intestine samples were dissected after 2.5 weeks for AdipoClear, RIMS, or Focus Clear analysis.
Mice were anesthetized and operated on as described above. 1.5 uL of AAV6-CAG-FLEX-tdTomato with 0.1% FastGreen was injected into the ileum wall of Snap25cre mice. CG-SMG samples were then dissected after 2.5 weeks for whole mount immunofluorescence analysis.
Mice were anesthetized and operated as described above. PRV Bartha 152 (GFP) or 614 (RFP) were a gift of L. Enquist. 3uL with 0.1% FastGreen was injected with a pulled glass pipette using a Nanoject III into the wall of the ileum, duodenum, and colon. Brains and spinal columns were harvested three (CG-SMG, spinal cord, and brain) and four days (brain) after injection.
1 μL of AAV2-hSyn-hM3Dq-mCherry or AAV2-hSyn-hM4Di-mCherry (Addgene) was injected into the CG-SMG of C57BL/6J mice. Mice were then sutured, and staples were applied. Antibiotic ointment was applied to the closed surgical site and mice were given 0.05 mg/kg buprenorphine every 12 h for 2 days. After 2 weeks mice were habituated to i.p. injections for 5 days before administration of 1 mg/kg or 10mg/kg Compound 21.
Mice were sacrificed and a midline incision was made, and the viscera were reflected out of the peritoneal cavity. The intersection of the descending aorta and left renal artery was identified, from which the superior mesenteric artery was located. The CG-SMG is wrapped around the superior mesenteric artery and associated lymphatic vessels. Fine forceps and micro-dissection scissors were used to remove the CG-SMG.
Heterozygous or homozygous Snap25RPL22HA were used for TRAP-seq analysis as no differences were found between either genotype. For NG, DRG, and CG-SMG IP, tissues were isolated as described above. The RiboTag IP protocol was then followed (http://depts.washington.edu/mcklab/RiboTagIPprotocol2014.pdf) with the following modifications. All samples were homogenized by hand with a dounce homogenizer in 2.5 mL supplemented homogenization buffer (changes per 2.5 mL: 50 μL Protease Inhibitor, 75 μL heparin (100 mg/mL stock), 25 uL SUPERase• In RNase Inhibitor). Samples were then centrifuged for 10 minutes at 10,000 G, after which 800 μL of supernatant was removed and 5 μL of anti-HA antibody (Abcam, ab9110) was added. Samples were kept rotating at 4°C with antibody for 1 hour. 200 μL of Thermo Protein magnetic A/G beads were washed with homogenization buffer, added to the sample, and kept rotating for 30 minutes at 4°C. The beads were washed four times with high-salt buffer and samples were eluted with 100 μL of PicoPure lysis buffer. RNA was extracted using the Arcturus PicoPure RNA isolation kit (Applied Biosystems) according to the manufacturer’s instructions.
Whole mount intestine, NG, DRG, and CG-SMG samples were imaged on an inverted LSM 880 NLO laser scanning confocal and multiphoton microscope (Zeiss) and on an inverted TCS SP8 laser scanning confocal microscope (Leica).
Briefly, following secondary staining CG-SMG, nodose and DRG were submerged in Refractive Index Matching Solution (RIMS) for 30–120 min then mounted in RIMS solution on a glass slide and sealed with a coverslip for confocal imaging
Mice were sacrificed by cervical dislocation and CG-SMG were harvested and fixed overnight in 4% PFA. CG-SMG were then washed four times in DPBS at RT and permeabilized in PTxwH at 4°C for at least 5 days. Primary antibody cFos (1:1000, Cell Signaling Technologies, 2250S) was added to the samples in PTxwH and incubated at 4°C for 3 days. Samples were washed four times in PTxwH at RT and then stained with goat-anti rabbit AF555/568/647 at 4°C for 3 days. Samples were washed four times in PTxwH at RT, covered in Fluormount G, and coverslipped for confocal imaging. We first established criteria for identifying neuronal cFos+ nuclei by staining CG-SMG from restraint-stressed mice, a condition known to activate the sympathetic nervous system


 8613371530291